

Almost two weeks left before the Fourth of July and all I have left is the label. (Have I harped enough about labels? Every quilt needs one.)
At the very last minute, I decided to scallop the edges of this quilt. Don’t ask me why. Because I don’t know. It was lovely without it, but I felt like I wanted a bit more…maybe a touch of femme or softness, or something to make it distinctive.
The pattern comes from a book called French Farmhouse by Marie Claude Picon. The quilts are all designed for rustic simplicity, which is lovely. But I never found a pattern I didn’t adapt at least a little. So same with this one.

The quilting, as you can see on the back, is all stars and stripes, in keeping with the theme. I always quilt on my domestic machine, a Bernina 780 (which was a precursor to the current 790.) I don’t enter my quilts in competitions–for obvious reasons. They are purely for the pleasure of creating. So you can see that I have a lot of fun with quilting, and I’m not hung up on perfection. As the Amish like to say about their quilts, “Only God is perfect.”
I like my quilts to be functional.
About the scallops. Don’t overthink.

I literally dumped some thread out of a Polish pottery bowl in my sewing room functioning as storage. I turned it upside down and started drawing the scallops. I did not measure. I did not plan. When I got to the last two or three at the end of a row, I just made minor adjustments so it fit. I don’t even know the size of the bowl.
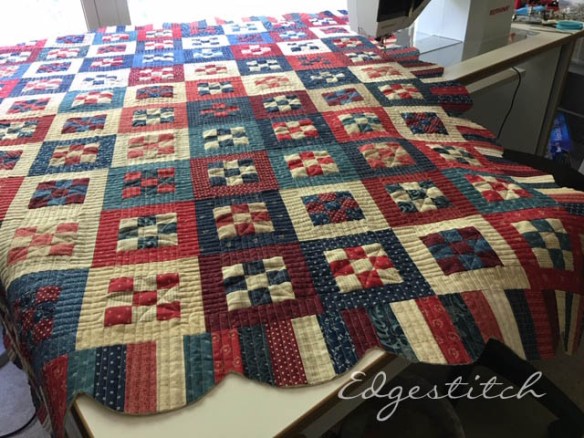
So I assure you that you can enjoy creating scallops as a quilt edging. However, I DO have some tips because when you get to sewing, you just need to be prepared.
Scallop-Edge Quilt Tips
- Cut before you sew. I know this sounds crazy, but a lot of books and instructions will tell you to draw the scallops and sew your binding on before you trim the scallops into shape. The argument is that the fabric is less inclined to stretch or distort. It’s stable and you have a straight piece on which to work. Feel free to go ahead and try it that way. Maybe it works for you. But I really need to see my cut edge. I like to work directly on the shape that the quilt will be in the end. It may not be ideal for everyone, but this is about what works for you.
- Pin each scallop one at a time before you sew. Not gonna lie. This is a slow process. But you will get better results.
- Use bias binding. Yes, you knew that. Of course you did. But, I’m always surprised by the number of quilters who don’t ever use bias binding on their quilts–even those that are meant to be passed down as heirlooms. When a binding is on the straight of grain, all the wear-and-tear is on about two or three threads going longwise over the edge. When the binding is cut on the bias, you have hundreds of threads that support the edge. It will last so much longer. I wrote about this in a previous post.
- Don’t stretch. When you work with anything on the bias, it’s easy–really easy–to pull the fabric. It’s easy (and tempting) to stretch it into position. But this will just cause the quilt to curl and not lay flat. Fabric is very compliant and is happy to work with you. But you have to understand the ways it wants to be handled. The puckering that you see in the pinning, is exactly what you want to see. This gives the curve enough “give” to flip around to the back side.

Above, you can see how the binding is pinned in place. When you get to the deepest part of the scallop, you’ll leave the needle down and turn the quilt. Stitch a tiny bit down onto the next scallop and then pin the rest into place. Here’s a book called “Happy Endings” which gives a good illustration of attaching binding to a scallop. It’s not hard, but it’s not something you can just whip right through like a straight binding. It takes a bit of patience and maneuvering.

And I think patience is something we could all use a bit more of these days. I know that quilters sew love into every stitch. It’s what moves us forward.