Sewing for the Generations

My friends are all becoming grandparents.

Not just the ones who had children at a very young age, but also now those who had them at a normal or not-so-very-young age.

I first started quilting in my twenties when all my friends had babies. I made dozens and dozens of flannel baby quilts, most of them hand-tied and filled with the fluffiest polyester money could buy. The parents and kids loved them.

I moved on to more traditional quilting, took classes, and eventually started teaching. But I never forgot how I got started.

Babies.

These days, I’m doing a lot on diapers and onesies. It took some experimenting, but I have found the best methodology.

Keep it simple.

Onesies absolutely do not support a whole lot of stitches. Even some fonts are iffy, depending on the number and size of the satin stitches.

Use two layers of polymesh stabilizer.

I use OESD cutaway polymesh. I experimented with one layer and just didn’t think it was enough. Depending on your design, you may even want three layers. A traditional cutaway adds way too much bulk and stiffness, so go with a polymesh. I also tried fusible, but that distorted the look of the onesie. I’m not a fan of 505 spray so I don’t use it when hooping.

Use a ball point needle.

If you’re familiar with embroidering on knits, you already know this. But if you usually embroider on quilt cotton, it’s easy to forget to change out the needle. Onesies are very stretchy and the fabric really separates when you use a ball point or “jersey” needle. It makes a difference in the longevity of the embroidery, because a ball point separates the threads of the fabric instead of cutting right through them.

Washing Instructions.

I use rayon thread (Isacord) which is bleachable and holds up well when washed. I throw onesies right into the washer and dryer…even in hot water and high settings.

The fabric, 100% cotton, always shrinks a bit. And the embroidery may curl because of that. The best way to fix this is to lay a towel on your ironing board, and lay the onesie face down against the towel — with the embroidery against the towel. Iron the back of the onesie without steam until everything is laying flat again. No problem.

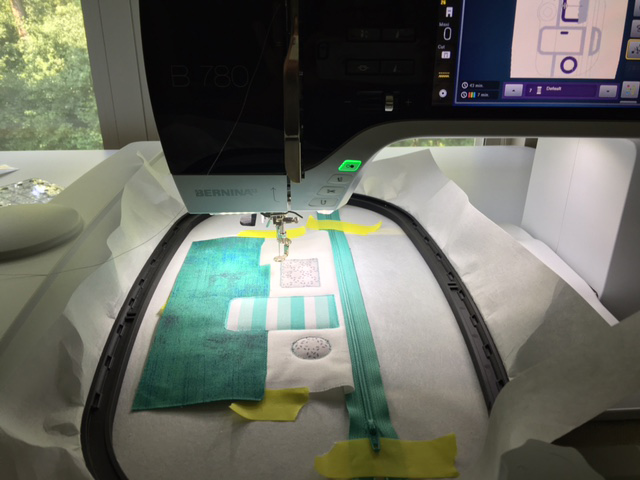
I sew on a Bernina and you can see that with their free arm, it’s really easy to stitch on a onesie without a lot of pinning, clipping and gyrations to keep the back out of the way.

Finally, use a 9 month size or larger.

Maybe it’s possible, but I never attempt to embroider a newborn or 3 month size. I just don’t see how I can stretch it enough around the hoop. I’d have to switch to the very smallest hoop which has a tiny field of embroidery. Most of the onesies I’ve done are size 12 month. They still look relatively small, and get smaller after washing. But they are large enough to work on comfortably.

Sending love and blessings to all my friends and co-workers and friends of friends and co-workers who are keeping the earth populated. There’s really nothing quite like participating in the ritual of welcoming the very newest generation.

In-The-Hoop Easter Machine Embroidery

I know I’m getting ahead of the game, thinking about Easter. But I felt like I needed a bit of Easter cheer early on, so these are what I found.

Do you have an embroidery unit you haven’t taken out of the box? (You know who you are, my friends.) This is about as simple a project as you can imagine.

Go to embroideryonline.com and search for “in the hoop”. Just download them onto a USB stick.

Prepare some fabric…you only really need scraps. And find some scrap batting. You know, the stuff you cut off around the edges of your last quilt.

Tip: After cutting small amounts of batting on your cutting mat, use a lint remover to clean up the batting.

Here’s the trickiest part. You need a nylon zipper. At least 7 inches. These are unbelievably common in the sewing world. Anything over 7 inches will work.

I used 14 in. zippers because that’s what I had on hand. Here’s a source that your local quilt shop may have even used: atkinsondesigns.com

And here’s a bonus. If you purchase her zipper pulls, you can easily change the color of the pull. Here’s instructions on how to do that. Your life will never be the same.

Back to the Easter egg pouches. I’m sure they come with instructions but I never read them. (Surprise, surprise.) Take some scraps of batting, approx, 6 inches x 6 inches, along with some scraps of fabric, about 6 inches x 12 inches. You’ll need 2 of the smaller size for the top and bottom half of your egg, a larger quilt sandwich for the backing/lining.

Wrap the smaller size fabric around the batting, so you have a straight edge to lay against the fold.

As you can see here, I didn’t even cut my scraps with any precision, as they will be completely trimmed away. You are just making sure that the batting is covered front and back. The fabric shown is Modern Quilt Studio’s Dot Crazy. I love this because it has fabric with a line of larger dots through the center…no piecing necessary.

Hoop your large oval or any 5 x 7 or larger hoop with sticky back tearaway stabilizer. I used OESD Stabilstick tearaway.

The design will walk you through all the steps on your machine. The first stitch out will be the placement line for the zip, which stitches directly onto the stabilizer.

Then stitch down lines on the zipper, then you lay down the top part of the egg with the fold right up to the zipper. The design will then stitch across the top fabric on the zipper. The goal is to make sure you have enough fabric wrapped around the batting to cover both sides of the egg.

Next, it will stitch the top half of the egg down.

Then lay your bottom fabric with the fold up against the zipper, as you did with the top. The next stitch will secure the bottom fabric to the zipper, and the stitch after that will secure the bottom half of the egg.

Move your zipper pull to the middle of the design!

This will allow you to turn the pouch inside out once it has been stitched. Now, you can also add a ribbon or handle at the top before the backing/lining is stitched down. (As I did). Add a quilt sandwich with the backing and lining down on top.

The final stitch is a zigzag to secure the seams.

This entire stitch out is a total of 6 minutes–almost as long as it take to read this blog post. These are easy and really quick, using fabric and scraps you likely have lying around.

When you take it out of the hoop, trim close to the stitching. Remove the stabilizer from around the zipper, and then open the zipper as far as you can. This will help when you turn the bag inside out. Remove as much of the stabilizer on the rest of the bag as possible. You should only see a bit of stabilizer around the outside seam, and a tiny bit where the zipper is attached. Everything else can be removed. Turn your little egg inside out and press.

Use your egg pockets as decorations or gifts–a great gift card holder or candy pouch!

Now reward yourself with fine chocolate.

Valentine’s Day is coming after all.

Are You a Happy Glamper?

glamping 2You can’t fool me with colorful new fabrics and joyful projects and slick looking retro-styled trailers and chef-inspired meals on Pinterest, cooked over wood-burning fires with tents and campers lit softly with warm beds and bathrooms and lighting.

glamping 4

I have been camping.  And there is nothing “glam” about it.

I pitched tents that required directions and patience to assemble…long before they snapped together in minutes.  I canoed down a muddy stream in a strange state in the pouring rain with a boat partner who had no idea how to steer. The couple behind us had a large black snake slide into their canoe. That’s the definition of horror.

I’ve slept on air mattresses that flatten completely by morning, on earth that slopes and slowly rolls me downhill all night till I’m shoved up against the door.

I’ve cooked real meals over an open fire and inhaled more than my share of campsites (especially in a state preserve where everyone is close to the next campsite and all are burning God-knows-what all night long.)

I’ve bathed in lakes and cold community shower stalls, discovered 5 ticks on one foot, and been terrified of the fierce growling in the middle of the night no more than 6 inches from my head on the outside of the tent.

Yes, I’ve been camping. Or do you say glamping.

Love it or not, the trend is hot hot hot.

And sewists are all over it!  Take a peak at this link to hand embroidery that everyone is into these days.

hand embroidery

glamping 3Since I’ve been obsessed with in-the-hoop bags, here’s another.

I purchased this design from an Etsy shop called Disorderly Threads.  You can purchase the design here.

It’s a lot of steps for a small design but the instructions are pretty clear. I love how it turned out and made a couple of them.

glamping 1The idea of glamping is 100% fun, and retro and cute.

And if you’re looking for me, I’ll just be enjoying the whole trend vicariously from under the covers in my cozy, warm, dry bed.