New for Me! Hatch Embroidery Software by Wilcom

If you’ve followed this blog for any length of time, you know I like my embroidery software. But I recently made a switch…for many reasons.

I switched to Hatch Embroidery Software. It is made by Wilcom, the same folks who create Bernina Embroidery Software. So if you have used Bernina, the user interface will look familiar.

They offer 3 levels of functionality, and I decided to go with the one that is basically the least expensive. I certainly could upgrade at any point. But for now, I’m very, very pleased. I found that I was not doing a lot of digitizing from scratch. In fact, most of the time I just purchased a design, added copy (or words) and was done.

I wouldn’t discourage anyone from using any embroidery software, as long as you learn to use it and then USE IT. What I found is that I was not using 90% of the software I was paying (quite a lot) of money for.

So I switched to something that is easier in functionality, downloads in a flash, is not encumbered by any hefty programs, and still does what I want it to do.

Reasons I use embroidery software:

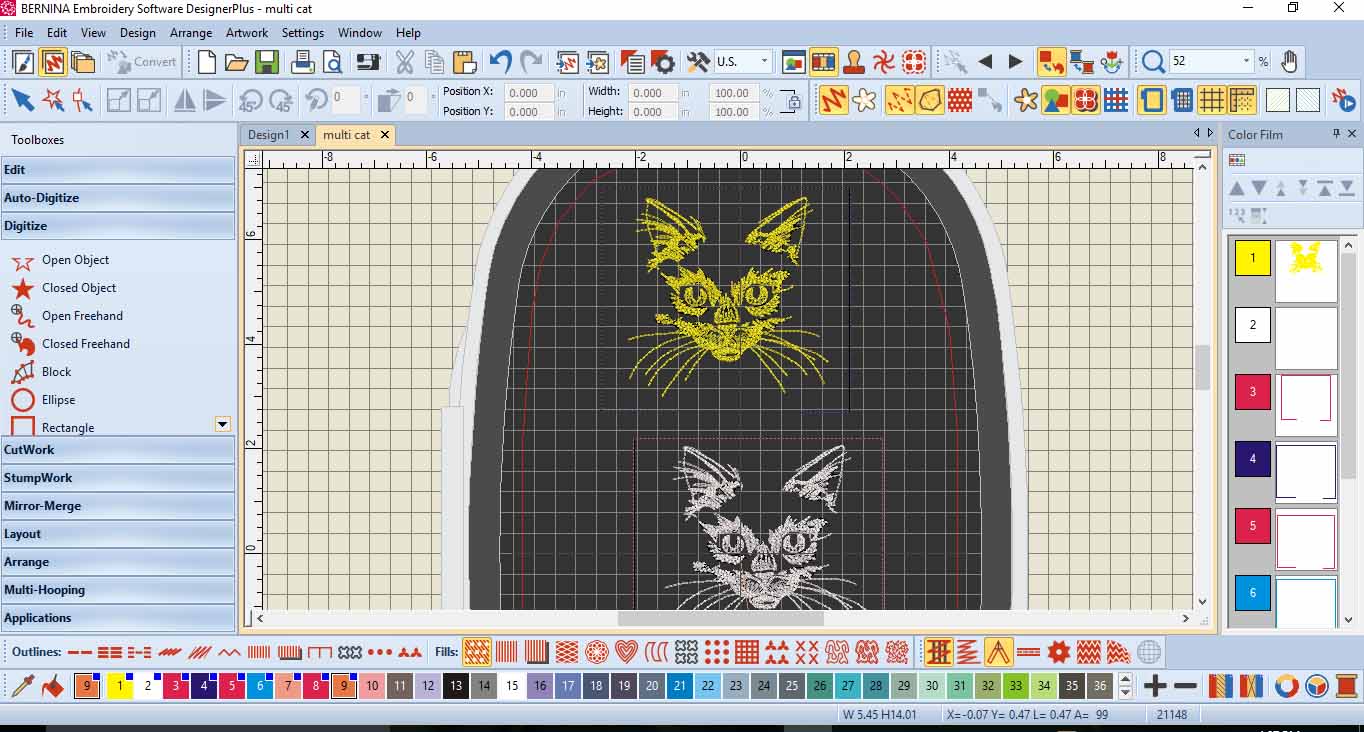
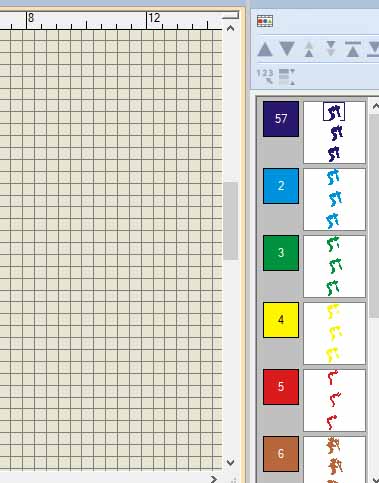
–I like to see the order of thread colors that my design will stitch out.

–I want to personalize it by adding words or names. I do all my quilt labels in embroidery.

–I always want to know stich count.

–I like to be able to re-size my designs, or combine them on a screen that is big enough for me to see.

–I want to easily use the software on both my desktop and laptop. I keep my laptop near the sewing machine so I can refer to it, while I’m stitching out. But I purchase designs on my desktop.

Reasons to switch:

–I want to easily use my software on both my desktop and laptop, without it getting bogged down launching or freezing.

–I’m really tired of dongles and USB sticks for loading.

–Honestly, I don’t want to pay quite so much to upgrade every time for features I rarely use.

This is a personal decision and everyone has different software needs. And our personal embroidery software wants and needs change over time. Believe me, no one pays me to promote their software, so I am free to make decisions based on my own preferences.

But, of course, I wanted to share those things with you. Once I discovered this software, I was really pleased that it was an option for me.

Hatch offers a 3-tiered purchasing offer. The one I use is Personalizer. But they have 2 more upgrades which have more functionality.

You can use all 3 versions for a month for free, so you can decide which best suits you and the things you want to create. And heaven knows, they always encourage you to upgrade/update.

I find that this works for me at the moment. I reserve the right to change my mind.

And next time, it won’t cost me quite as much to do so.

The Lowly Zen of Cardmaking

No one uses paper any more. I know. Just a quick email or text…how are you? what’s up? how’s everything? hey, thanks (I may be using too much punctuation.)

But I am a card writer. I would much rather tell someone how I feel in long form. And if I want to confound my son, like sending a message in code, I use cursive, which no one in younger generations can interpret.

Last year, or maybe the year before, or maybe even 2019, I purchased some card stock for machine embroidery.

The two best places I have found to purchase card embroideries are Embroidery Online, Embroidery Library.

The designs you see here are a mix of the two.

I did not purchase anything new to make these. That’s part of my new goal, to be as much of a non-consumer as possible unless it is electronic. The designs don’t count, at least not in my book, as they are digital–a simple download, and off we go.

Here are a few tips if you want to work with machine embroidery and cardstock:

  1. Use designs specifically digitized for cards. Unless you are daring and a pro, I don’t recommend trying to use any design that is stitch-heavy. It’s just not worth the hassle.
  2. Use a sticky back cutaway stabilizer like Stabilstick Cutaway from OESD
  3. Score the paper side of the stabilizer, and remove it from inside the hoop. You hoop the stabilizer first, paper side up, then score it with a straight pin. Don’t be afraid. Then just tear it out of the inside of the hoop.
  4. On OESD designs, the first stitch is for placement of the card. The first color of the design is a stitched rectangle that goes directly onto the stabilizer and shows you where to place the card. It saves you from some fiddling you might have to do with other designs to get the placement centered.
  5. General machine embroidery tip: If the machine says it will take 15 minutes to stitch out, allow 30 minutes. The time allowed for stitching is just that: stitching time. It doesn’t account for any thread changing time, or cutting of jump stitches or your general speed that you like to work. The more thread changes, the more time you should allow “over” the predicted time.
  6. Always start with a well-oiled machine, a full bobbin and a new needle (sharp or Microtex 80/12.)

This Christmas card from OESD was quite stitch heavy, and I’m not sure I would do it again. It required an applique for the black background. I measured the placement stitch and cut a piece of Kraft-Tex to fit. It turned out well, but I did not appreciate the amount of time involved for one card.

You can see the back of one of the cards. I think you can cover that up with another piece of cardstock. But I thought that some of the charm was that it looked as nice from behind as it did from the front.

As someone who loves stationery, I found these lovely and easy to stitch, for the most part. The designs do come with thread charts and instructions, but it’s a lot more fun to choose your own color way.

Finally, for the last card in the box, I took one of my photos (a peace lily bloom, with a pointsettia background). I transferred it onto the card using Transfer Artist Paper. It was simple and easy, and now I have a set of personalized cards for all occasions.

I hope you still write letters from time to time. I love to receive them and I think others do too. In a world where everything is fleeting, fast and electronic, let’s cherish a little bit of slow communication.

Peace out.

Cross Stitch Life Hack

I love cross stitch. But I am completely inept.

I have watched the YouTube videos. I have studied people moving those needles in and out. I purchased the right fabric. I can sew, machine embroider, hand embroider, knit, crochet, do hand quilting. I’m not afraid of stitching by hand. But for the love of all that is good, I cannot figure out how to cross stitch. I. Cannot. Do. It.

So I did the next best thing.

I digitized.

I found the most adorable designs (from Little House Needleworks on Etsy.)

Using Bernina Embroidery Software 8, I got the idea into my head that I could run a border of these gorgeous cross stitch patterns around the outside of a very simple tree skirt I was making.

But as always, it was not an easy task. Like Tina Turner, I never do anything nice and easy. I do it nice, and rough.

It starts with a scan of the pattern, which needs to be trimmed to the exact pattern size in some sort of graphics software. I’m used to working in Adobe, so that’s what I used. But Bernina’s software comes with Corel, so you can use that too. Then it gets imported into the Cross Stitch application in the software.

Now comes the tedious part. Every single stitch gets reconstructed with a click, and a color choice. If you look closely enough at the above image, you can see that some of it is filled in with color, and some of it still has the cross stitch symbols shown. It took me about an hour to get everything filled in for that design.

The next step is to move it into the embroidery program. The software then converts every click that you made in cross stitch into machine embroidery stitches. And it’s pretty magical. One moment it’s just a weird looking drawing, the next minute it’s stitches that my machine will understand.

And I am absolutely loving the way these turned out.

I still have a long way to go on this tree skirt, and each design from start to finish probably takes about three hours. Could someone do it by hand in that time? Maybe someone who knows what they’re doing. That would not be me, when it comes to cross stitch. But I am just so taken in by their charm and sweetness.

I hope you are tolerating this difficult holiday season.

I leave you with this December thought:

“Someday soon we all will be together
If the fates allow
Until then we’ll have to muddle through somehow
So have yourself a merry little Christmas now.”


Doors, Doorhangers and Paint, Oh My!

How’s everyone doing out there?

I am not ashamed to say I had a rough summer. Between the pandemic, and a kid who’s still in the school system, I managed to fall while taking pictures. Hard. On my knee, but did a number on the ankle too.

Wound up in the ER, and x-rays were fine, but still healing. On top of that, I have the usual “You know, at your age…” health issues. But hard as I tried, I was not able to avoid going to a doctor until coronavirus is eradicated….as I had hoped. Who am I kidding?

So layer on top of that all the societal and natural disaster issues we’re facing and I made a decision:

TO PAINT MY FRONT DOOR CORAL.

Why? That’s a good question. I was all set to go with teal. And then I randomly saw a pic online of a coral front door. And I couldn’t get it out of my head. You need to know that my front door is a very dark, forest green. It has been that way for 18 years.

But it suddenly became my obsession. A primal scream, I think. I NEED A CORAL FRONT DOOR.

Since then I have discovered, to my surprise, that a front door that faces south should indeed be red or orange according to feng shui principles. Who knew. (Not me.) So, apparently, I did the right thing.

I used some paint called DecoArt. Find it here.

It was not my favorite. It went on kind of gloppy and was a semi-gloss. I’m generally a satin girl. And please note, that while I was doing this I was NEVER sure it was going to work. My only thought was that if I ruined the front door, we needed a new one anyway.

The first coat was pretty hideous. It was a lot of work just to get that far, and needed several hours to dry. I had to keep going back and smooth over places that wanted to drip. At this point, I was really torn. Give up now and paint it black? Or forge ahead and see where I end up. Anyone in their right mind would have hired a professional to salvage what they could.

I went for it.

Two more coats later.

My husband strolled by while I was in the process. “You’re making the front door pink?”

“IT’S NOT PINK, IT’S CORAL!”

He and my teenage son exchanged glances and backed away. They don’t really care.

But at least here’s where I get to the sewing part. Now I needed something to put on the door.

I have some black Kraft-tex, and so anyone who’s read this blog in the past, knows I love my Kraft-tex. I wanted a round doorhanger, but one that I could update seasonally. Or just when I got tired of it.

If you don’t know, cutting a perfect, professional-looking circle is hard. Really hard. So I use a rotary circle cutter from Olfa.

But the tool has a maximum circle size of about 8.5 inches. Not nearly as big as I wanted it.

So I approached my husband with the tool, and I told him what I wanted to do. He has a mill and a 3D printer. I wondered if he could help me find a way to get bigger circles.

He sniffed around the tool for a bit, while I went off to make dinner. An hour later he handed me an extender. Then he attached it.

He simply fitted it to the device, added a screw and bolt to hold it together and, like magic, I can now make circles about twice the size. It was amazing! And it worked perfectly. My new circle was somewhere near 18 ” acorss, almost the entire length of the Kraft-tex paper.

Now I just stitched my embroidery out and attached it with a single stitch to the the circle. I made slots so that I could switch out the seasonal part at any time.

I finished it up with a ribbon and hung it with a flourish.

I have no idea how anyone else is coping. I hope you are doing well.

I highly recommend doing something you’ve been afraid to do. (Let’s not get reckless here, I’m talking about painting a door, or a room, or yikes! a dresser.)

I didn’t know I needed this color in my life. Nor do I know how long I will want it. But it showed up at the right time for me.

Color heals.

I hope.

When Your Sewing Machine Needs to go to the Spa

Well, I finally broke my machine.

Actually, I’m not sure I did anything wrong.  I just changed thread colors during an embroidery, started the machine up again and WHOA.  Needle broke and gears of death appeared.

It’s all OK.  I cleaned everything out and could only find 2 pieces of the needle.  A tiny tip is missing.  Normally I can set everything back to normal and just continue, but I think that little needle tip is scraping somewhere, so off to the tech we went.

Tech Update for Bernina 7 Series Owners

I chatted with my new tech for a while and told him about my machine issue.  He asked me if I knew that we were not supposed to oil in the top reservoir any more.

I did not know that.  I had heard some buzzing…questions from customers around the time the shop I previously worked for was closing.  However, we had not received any definitive information from Bernina at that time.

So here’s the deal:

–If you own a 7 Series, DO NOT put oil in the red-ringed reservoir under the stitch plate.

–DO oil the two felt pads in the hook and around the outside of the hook.

Heirloom Creations has a nice video showing and explaining this.

It’s important to know about this change.  If you purchased your machine longer than 6-7 months or so ago, you were likely taught to fill that red reservoir, and keep it filled.

The tech told me that too much oil was spreading, not only into the hook but also getting into the auto-thread cutter, and pieces of felt were working their way into the mix as well. I remember our tech at the store showing me how the machine looked with the thread cutter pulled out and oil getting on everything. At that time we had not heard the official “fix” from Bernina. Now it’s here.

With that resolved, I now have an embroidery design that’s not complete.

See those cute little flower buttons?  They are supposed to be embroidery.  Luckily, my “breakdown” occurred in a convenient place, and I think I can just add those flowers instead of embroidery.  Not exactly perfect, but it’s effective and I think it will work.

I’ll share the rest of the project as I get further along.

I’m determined to THINK SPRING. It has to get here eventually, right?

In the meantime, of course I have another sewing machine that I can use to continue piecing my quilt project. And it won’t hurt for my larger machine to be in the spa for a bit.

What’s Happening in Machine Embroidery?

I’ve been scrounging around on my machine embroidery sites looking for the most interesting projects and new ideas.  I’ve found that with machine embroidery, there’s always a new way to do something that’s been around awhile, or an old way to do something very fresh.

We have snow on the ground here this April, but I just KNOW that spring will get here eventually.  So I focused my search on all things inspirational for spring.

Enjoy!

Embroidery Library

Although they always have new product, I found their Garden Party Lookbook to be charming and full of spring-like ideas. You’ll want to check out all their lookbooks.  But the Garden Party book had an interesting technique (something I hadn’t seen before) for embroidering on straw hats.


Embroidery Design Studio

They are featuring a strong graphic spring collection called Grow Love. These cute little flowers and butterflies would be great on jeans or anything denim.  They also have their washaway stabilizers on sale through April 13.  If you are someone who loves freestanding lace (which I’m thinking about for Halloween) now’s the time to stock up on Aquamesh.


Urban Threads

So the big trend I’ve seen lately and it’s reflected quite a bit at Urban Threads is embroidery on garments everywhere.  Jeans up and down the legs, t-shirts, sweatshirts, hoodies, everything.  This trend extends far beyond just the embroidery world.  The newest Dolce and Cabbana runway collection is just loaded with over-sized, all-over embroidery.  The kitschy-er, the better.  Urban Threads has some great examples in their Fashion Look book.  But it’s everywhere.


Kreations by Kara

OK, I was drawn to these lovely purple flowers in her sale bin.  I need them along the hemline of a summer skirt.  Wouldn’t that be lovely?


Kimberbell

Kimberbell, if you’re not familiar, is a wholesale design distributor. Their store locator is actually pretty accurate so feel free to use that to find a dealer near you.

Their products are always cheerful and sometimes over the top for me, but I fell in love with the designs on Hello Sunshine quilt. The quilt itself is a bit much at the moment, but who can live without the charming bike design, the mason jars, the watermelon?  Not me. I bought the collection and am already laying out something for a wall hanging for this spring/summer.


I recognize this list is not comprehensive, just a little tour to get your creative juices flowing about machine embroidery again.  I hope you find something that inspires you to dust off that embroidery module and rev it up for spring!

Chicken Soup and Embroidery Software

It’s a chicken soup kind of day.

My son came home after his first few days of high school with a nasty cold.  I’m not surprised.  The place is a breeding ground for experimental teenage germs.

On top of that, the weather turned cooler today…for how long, I’ve no idea.  But it’s cloudy and cool right now.

Furthermore, like everyone else in the sewing industry, I read Nancy Zieman’s latest blog with a heavy heart. Whether you watched her show or not, you know Nancy.  You buy her notions or you attend Quilt Expo in Madison. I’ve learned many tips from Nancy along the way, but my favorite line was this: ” I sew at least one quilt a year for charity.”  She never said “You should…”  She told us what she did, and then she did it, among all the other wonderful charitable contributions she made within the industry (and outside of it).

So, yes, it’s a chicken soup kind of day.

While the soup bubbled away, I sat down with my laptop and organized some of the Halloween designs I want to make in the very near future.

I use Bernina Embroidery Software 8, and I’m planning on making tiny pillow-like ornaments to hang on my Halloween tree.

The designs I’m using came from urbanthreads.com, a favorite of mine for cute and/or spooky embroidery.

It’s hard to see the design in this shot but it is a single thread color of a cat.  I used a feature that people rarely take advantage of in the ‘design” menu. Click on “background” and change the background color in the hoop.

Now you can actually see what the design will look like stitched out on dark grey or black fabric. In the prior shot, you can see where I added stitching in a square around the outside.  Before I stitch that, I will add a square of fabric and a ribbon for hanging.  I’m not stitching out today, but I promise to share when I do.

In this design, I’m stitching the profile of this cat, but it has multiple thread changes for each cat.  For some reason, the.exp file I’m using has changed all the colors from shades of purple to random colors.  I did not take the time to fix the thread colors on screen because I will just use the correct ones as I stitch out.

The important thing to note here is that on the side, in the color film, I used the “Sequence by Color” tool.  This way, I’m able to stitch all the same colors at once instead of changing threads each time for each color on each cat. Whew!

It makes a big difference in the amount of time it takes to stitch out.  Also, I will have to cut the jump stitches in between each thread change, as I have the thread moving around quite a bit.


Still, I have loaded all this onto my USB stick and am ready to stitch as soon as I prep some fabric, stabilizer and fabric for the backs of these cute little ornaments.

Can’t wait to get started, but I won’t have time for a couple of days.

My Halloween quilt is complete, and ready for its debut! Stay tuned. It may be early September, but it’s already time for a cool change.

Freestanding Lace for the Holidays

freestanding laceI found these wonderful designs on Urbanthreads.com.  I immediately thought of Valentine’s Day, although these were likely meant for the Christmas Season.  I have not yet whip-stitched these together, but I love the look of them.

If you are not familiar with freestanding lace, a lot depends on the density of the designs and the stabilizer you use.

I used OESD Aquamesh, 2 layers for each piece.  Each envelope has 3 pieces.

freestanding-lace-4You can see the double layer of washaway stabilizer in the above photo.  Each section of the envelope took at least an hour to stitch out, so be sure you start with a full bobbin, a well-oiled machine, a new needle and plenty of thread.  I matched the bobbin thread to the top, using Isacord on everything.

free-standing-lace-2There were two different envelope designs to choose from, one was roses, as shown above.  The other was holly leaves, and I stitched that out in red.  Both of the envelopes I stitched were about greeting card size.

But I do have a smaller size design that would be perfect for business cards or a gift card.

freestanding-lace-3Once the design was complete, I trimmed away all the stabilizer, leaving 1/4 inch or so around the outside.

drying-frestanding-laceEach piece gets rinsed in warm water.  Some people recommend filling the sink and letting the lace soak.  That will work, but I usually keep the warm water running and rinse it thoroughly until all the stabilizer has dissolved.

The design needs to dry overnight, and I use a piece of florist’s styrofoam as a base, and flatten each design and pin in place.  This prevents any curling as they dry.

After that, it’s just a whip stitch to assemble the front and the back, and then the top to the back.

I had the most fun searching for just the right button for each of envelopes.  I plan to make a few more…I want the rose design in red. (Shhhhh…I think that’s part of this year’s Valentine’s Day gift.)

knitted-scarfFinally, I thought I’d share my scarf, which is moving along nicely now.  In fact, it’s probably twice as long as this photo shows…but not quite long enough to be complete.

The scarf will also have to be gently washed and stretched flat to dry. That way it will hold the shape.

If you enjoy designs from Urban Threads, you’ll get a kick out of their new holiday Look Book.

They also have their own line of fabric from Spoonflower now.

I actually have created my own fabric on Spoonflower with some of my black and white photography.  But I’ll have to save that for another post once I come up with how I’m going to use the fabric!

Machine Embroidery Valance

I love one-of-a-kind.

If it  hasn’t been done before, I’m in.  Even if it has been done before, but it can be done slightly differently, I’m in.

What I’m not really interested in doing is creating exactly what someone else has already created.  Let’s be honest, here. Nothing under the sun is really new any more.  We all receive our inspiration from someone, or something, or some technique.  Original ideas come from many places, but they almost always require inspiration from somewhere, and we all learn from one another.

That’s OK.  As long as it’s new to you. I don’t judge people who take a pattern and re-create it exactly as the book dictates. That’s how we learn. We aren’t all designers. I’m not…at least I don’t get paid to be one.

But my favorite projects come to me like a whirlwind, and I have all to do to scribble them down before they disappear.  The end product is not always exactly what I had planned, but I know when I have a starting point.

My challenge:  To create a project based on some digitized rulers created in Artwork Canvas within Bernina Embroidery Software 8.

I started with the 3 black ruler shapes, wondering how to place them in an interesting project.

I knew I wanted to use a sewing theme, and I also wanted to incorporate Amanda Murphy’s Sewing Room embroidery designs. I thought they were cute and fresh. (See the link below).

Sitting at the computer one day, I had an idea.  I don’t ever design on a computer.  It’s just not fast enough to capture the idea before I talk myself out of it.

So I grabbed the back of the closest sheet of paper and scribbled out this initial design.

valance-plan2I thought I’d make a table runner, with all the embroidery designs lined up in a row.   I thought about adding buttons scattered around the design, since the theme has thread spools, scissors , rulers, etc.

I didn’t have any fabric at home that was close to my reach that was in the right shape to hold all the designs.

So I stitched a number of half fatquarters together (fat-eighths).  I think they were leftover from this project.

And I printed out some templates to see if I was getting close to my original thought.

valance-plan1It was going to work.

I began embroidery, and once the embroidery was complete, a friend at work (hey Bobbie!) asked if I was making another valance…this time for my sewing room. (You can check out the last time I made a valance here.)

I had actually been thinking of it as a table runner, but when she said valance, I suddenly saw that too!

I continued with the quilting which for some reason was a part of the original scribble and I couldn’t depart from it.  Here are a few of the detail shots.

sewingvalance3sewingvalance2sewingvalance1


I’m sure you can see why I wanted to use Amanda Murphy’s embroideries…but it actually works pretty well with the digitized rulers.

Here’s what it looks like complete.  It’s quilted all over using a walking foot, and the back is turned down to form a rod pocket.

sewingvalance4It will be at the shop for a while, but I can’t wait to hang it on the window in my sewing room. I moved the random-sized buttons to the middle to give it a look of continuity. I love the Barbie-style dresses.

You can make the rulers if you attend Bernina’s November Software Inspiration class at your local dealer.  And if you don’t have software, I’m sure you can find a measuring tape embroidery or replace it with another design.  The point is not to make the same valance I made, (although you certainly are welcome to do that) but to make it your own!  Have fun with the idea, and create something new and original for your own home.