Mending is Trending

Do you have a pair of pants that are past pretending to be cool with all their holes? Shirts with stains? ( I seem to have a lot of these, I can’t seem to keep my food in my mouth. Kids, this is something they don’t tell you about aging. You constantly have your food on your shirt. Yes, it’s gross. You’ll get there soon enough.)

My husband is particularly good at wearing down the hems of his pants. (Another sign of aging…you seem to get shorter and your pants drag on the ground.)

Although for those of us who have never been considered tall, dragging hems is a lifelong problem.

But hey! We fix our clothes now. I’d love to do a blog post on fast fashion and where all our cheap clothes end up. We all know it’s a problem. We can’t just keep purchasing new clothes and throwing out the old ones or even just donating them. Third world countries are telling us to keep our crap. They have enough stupid t-shirts, thanks.

Here’s a pair of stretchy pants that were way too long and were an easy fix on a serger using the cover stitch.

Of course, mending and hemming are where a serger really comes in handy. For the shredded hems. I just run them through the serger and hem on the sewing machine. Takes a few minutes, and the pants get a bit shorter, but a really quick solution, all things considered.

Speaking of all things NOT considered, here’s another mending project.

I have this sweatshirt which I made, and it is actually quite loved. Worn and worn and worn. But I set it aside when I realized it had grease stains on the front. Probably from cooking at some point. Aprons actually do have a function, but I’m not yet ready to wear one around the house. (That’s really crossing an old lady rubicon for me. Still, why deny the inevitable?)

I decided to cover it with some hand embroidery. Looking back, I probably should have just embroidered a few strategically-placed daisies and been done with it. Instead, I used a photo out my back window, and converted it to a hand embroidery design.

I drew it out onto a piece of wash away stabilizer, so I could see it on the dark fabric. I think I should have just drawn it using a white pencil. The washaway stabilizer made every stitch a bit harder to push and pull through. And there are a LOT of stitches.

This design took me a ridiculously long time to finish. So simple, yet so time-consuming.

And to be honest, I’m not a hundred percent sure I love it, but it is interesting. The washaway was rather stubborn and I had to rinse it in the sink for quite a while.

I finally threw it into the wash and pulled it out before it got to the dryer. I ironed it while it was still damp.

Here’s a tip:

When ironing embroidery, even machine embroidery, use a towel on top of the embroidery. A hot iron will flatten it and take away all the dimension, and it might even harm the thread. So just use a towel over the top which allows the threads in the design to have a place to go.

It turned out kind of fun, almost like a window in the middle of my sweatshirt. In fact, I’m thinking I just might add a frame around it to make it look like a window. It has that hand-made feel, which is something that was important to me. I also get a kick that it’s the early spring view out my family room window. All in all, it was a learning experience.

I love the look of visible mending that all the kids are doing these days. I’ll be trying more and more. I have plenty of jeans with holes in the knees.

Here’s to making things last a bit longer. Like the planet.

Hugs and stitches.

Top Ten Holiday Gift Ideas for a Sewist–Even If It’s You

I love a good list. So when I needed some gift ideas, I thought…why not go to my sewing room and share with you some of the tools I use the most?

They are things I probably would not want to live without, and I’m sure each of you would have your own items to add to this list. But I recently came across someone online who was fairly new to sewing and didn’t have any quilt shops nearby. And I thought, well, if someone is new to the hobby, and getting a machine for Christmas, or just is interested in the tools I use non-stop…well, here’s a peek.

Whether you are a beginner or an old pro, I hope you’ll find something to consider.

1 Karen Kay Buckley Scissors

I love these scissors because the finger holes are not small. I have several pairs of the green ones because I keep one pair downstairs for hand sewing, one in a container upstairs for binding, and another near the sewing machine for miscellaneous small tasks.

2. Numbered Quilt Pins

I never really thought I’d use these but now I would never assemble a quilt without them. I label rows and point the pin in one direction. That tells me when I go to grab all the pieces for row assembly, which direction to sew. It’s fantastic and I would screw it up every time I turned around with a stack of fabric in my hand, without these pins.

3. Telescoping Magnet

A telescoping magnet is the best tool you never knew you needed in the sewing room. And, what a great stocking stuffer. These are available at most hardware stores and online. I find more pins and screws (because I always have a screw loose) than I ever thought imaginable. And if, like me, you are clumsy and occasionally knock over a box of pins…well. Trust me, you need a good magnet to get into those corners on the floor under the machine.

4. BobbinSaver

Here’s a trendy gadget that I resisted as unnecessary until I was gifted one. And now, I don’t know what I’d do without it. They come in multiple sizes, so be sure to get the right one. My bobbins are larger than standard, so I need the larger size. Comes in regular and jumbo for those Bernina bobbins that are large.

5. Clover Roller

This humble looking little roller can really save some time. This is perfect for tiny piecing, when you don’t really want to run to an iron for every itty bitty seam. It really works.

6. Cast Iron Thread Stand

Sorry for the awkward shot. But when I taught lessons, one of the first things I suggested for someone to purchase after they got a new machine was a cast iron thread holder. Especially if you do any fast sewing like embroidery or machine quilting. I can’t speak to Viking or Brother machines. But on Berninas and many others, the spool cap can catch the thread and break it. I find that this is one of the smoothest thread paths ever, and the thread feeds like a dream.

7. Machine Embroidery Bobbin Thread

Such a simple purchase, but for a machine embroiderer, it’s something you cannot live without. Bobbin thread from OESD. You can use it in your bobbin any time you do machine embroidery. It’s inexpensive and comes on a large spool. You don’t have to use your higher priced embroidery thread in the bobbin. 5500 yards. It comes in black or white.

8. Curved Basting Pins

We can argue about this one. I don’t mind. Everyone has their own process. Obviously, someone with a longarm would not need them. But I quilt on my domestic machine at home. And I hate basting with thread. It just doesn’t work well for me. So I’ve grown to love my curved basting pins. I lay my quilt out across several banquet-sized tables and I don’t have to crawl around the floor. It works for me. So…I never have enough of these.

9. Stabilizer Organizer

To the naked eye, this may not look organized. But shockingly, it is a free-form sort of organization. If you are an avid machine-embroiderer, you know that stabilizer accumulates. Often you don’t know what you have, and can never find the right thing when you need it. Believe it or not, this really helps. I tuck the label inside the roll, so I always know what’s there. This particular organizer cam from Nancy’s Notions and is no longer available. BUT. I found another online that I think would be just as great. (In fact, maybe mine needs an upgrade).

10. Babylock Accolade Serger

Finally, last but not least, you knew I would have a machine recommendation. And I would like to give a shoutout to the Bernina 435 machine which is on sale right now. It’s an excellent machine. But this Babylock Accolade serger has been one of the best investments I’ve ever made. It’s versatile. It has all the normal serger features, plus a wonderful cover stitch and chain stitch. Do not be put off by the list price. No dealer will ever charge that much. But it’s a worthwhile machine. I can make a t-shirt in about 2 hours. I hem shirts and pants professionally. I use it for quilt backs, valances, garment sewing, and 100 other things. You’ll never regret a serger. And you can see the thread dust on mine, as I often also use it to finish quilt fabric before I wash it. (I tend to wash quilt fabric before using it because I don’t like to handle the finishing chemicals) All in all a great sewing room tool and gift idea.

I hope there’s a little bit of sewing in your holidays and that you get everything your heart desires under the tree or however you celebrate the season. Remember that sewing is not just a hobby. It’s a way of life for some of us. We think in terms of this project and the next. And the next and the next after that.

May you find a way to share your love of sewing…with the next generation, with a friend, or in gifting someone with a product made by hand. That’s what the season is really about.

Merry Sewing!

The Lowly Zen of Cardmaking

No one uses paper any more. I know. Just a quick email or text…how are you? what’s up? how’s everything? hey, thanks (I may be using too much punctuation.)

But I am a card writer. I would much rather tell someone how I feel in long form. And if I want to confound my son, like sending a message in code, I use cursive, which no one in younger generations can interpret.

Last year, or maybe the year before, or maybe even 2019, I purchased some card stock for machine embroidery.

The two best places I have found to purchase card embroideries are Embroidery Online, Embroidery Library.

The designs you see here are a mix of the two.

I did not purchase anything new to make these. That’s part of my new goal, to be as much of a non-consumer as possible unless it is electronic. The designs don’t count, at least not in my book, as they are digital–a simple download, and off we go.

Here are a few tips if you want to work with machine embroidery and cardstock:

  1. Use designs specifically digitized for cards. Unless you are daring and a pro, I don’t recommend trying to use any design that is stitch-heavy. It’s just not worth the hassle.
  2. Use a sticky back cutaway stabilizer like Stabilstick Cutaway from OESD
  3. Score the paper side of the stabilizer, and remove it from inside the hoop. You hoop the stabilizer first, paper side up, then score it with a straight pin. Don’t be afraid. Then just tear it out of the inside of the hoop.
  4. On OESD designs, the first stitch is for placement of the card. The first color of the design is a stitched rectangle that goes directly onto the stabilizer and shows you where to place the card. It saves you from some fiddling you might have to do with other designs to get the placement centered.
  5. General machine embroidery tip: If the machine says it will take 15 minutes to stitch out, allow 30 minutes. The time allowed for stitching is just that: stitching time. It doesn’t account for any thread changing time, or cutting of jump stitches or your general speed that you like to work. The more thread changes, the more time you should allow “over” the predicted time.
  6. Always start with a well-oiled machine, a full bobbin and a new needle (sharp or Microtex 80/12.)

This Christmas card from OESD was quite stitch heavy, and I’m not sure I would do it again. It required an applique for the black background. I measured the placement stitch and cut a piece of Kraft-Tex to fit. It turned out well, but I did not appreciate the amount of time involved for one card.

You can see the back of one of the cards. I think you can cover that up with another piece of cardstock. But I thought that some of the charm was that it looked as nice from behind as it did from the front.

As someone who loves stationery, I found these lovely and easy to stitch, for the most part. The designs do come with thread charts and instructions, but it’s a lot more fun to choose your own color way.

Finally, for the last card in the box, I took one of my photos (a peace lily bloom, with a pointsettia background). I transferred it onto the card using Transfer Artist Paper. It was simple and easy, and now I have a set of personalized cards for all occasions.

I hope you still write letters from time to time. I love to receive them and I think others do too. In a world where everything is fleeting, fast and electronic, let’s cherish a little bit of slow communication.

Peace out.

Dig Out All Those Old Fatquarters!

It’s that time of year where we start to clean out our fabric collections. This time, I dug deep and was ruthless about not “saving” these fatquarters for something else. The time for saving is over. Now is the time for using. And NOT purchasing.

If they weren’t slated for a project, they were open season to be made into grocery bags. My commitment this year is to avoid as much in single use plastic as I possibly can. Those pesky grocery bags were something I got away from a few years ago, and then along came COVID, and we worried about what we’d be bringing into our homes.

Now, we know it’s much more likely that we will breathe in the virus, and not as likely to get it from touching something that touched something else that might have had COVID sneezed onto it.

At any rate, it was time for me to stop with the plastic bags. Again. Fabric ones are easily tossed in the wash, reused, and if nothing else, I like them. At one time or another I purchased the fabric because I liked it. So there’s that. And, if along the way, I can avoid a tiny bit more in the landfill, then that’s my goal.

I shuffled through my collection of odds and ends of fatquarters and gathered twenty-five of them. Twenty for bags and another five for the handles.

It took me two days to make them all because I only worked about an hour a day. I lined up all the fabric and partnered each fatquarter with another that *could* be compatible. And I sewed them up on three sides.

On a serger, this just zipped right through.

The one thing you want to be careful about is having finished seam allowances. These will be washed over and over.

Next I made a bunch of handles that could be mixed and matched on the bags.

This type of sewing is really a lot like therapy. In these dark days of winter, sometimes I don’t have the energy to take on a tough project. Or to start something big. Or to work on that monotonous thing I committed to do, but have lost interest in doing. This stuff’s not hard. It’s not serious. It’s fast, it’s colorful, it has a purpose, and therefore satisfying.

And when you’re done, you have something practical and a little fun.

So get those old fatquarters out of hiding. You know you’re never going to make something with that bundle you just HAD to have. Or maybe if you look around, you’ll find the fatquarters you didn’t even know you had. Or possibly, you have leftovers from some other project.

Use them!

And make it fun and easy. Next week you can start that complex thing. You know.–the one that requires you to do THIS, before you can do THAT, and so on and so on, until you do nothing, because now you have to spend all your time looking for your good scissors.

I’ve been there.

It’s been a rough couple of years.

Do something simple and practical that will never be in a competition or on display or will never be judged. You’d be surprised at how freeing it can be. And those pretty fatquarters you’ve held onto for years? Or even the not-so-pretty ones you’ve also held onto for years?

Now they have a job.

Sewing Your Own Clothes

I know some of you have been sewing doll clothes since you were a toddler. And others have made their own wedding dresses and prom dresses and more.

I tried sewing a blouse once when I was in my teens. After weeks of agonizing, I emerged with a blouse that looked worse on me than the cheapest thing I could have purchased from a dime store. And I had invested WAY too much time and money.

That was the end of my garment sewing. Why on earth would I spend so much time making something that looks like it came from Target when I could just go to Target and get it? (I don’t remember Target existing at that time, but you get the point. Substitute Zayre or Woolworth’s or Venture if you’re in the Chicagoland area.)

Years went by. Decades went by. And garment sewing changed. And so did the idea of making a trip to Target. Folks like Grainline Studio came onto the scene.

And along the way, I learned that sewing something to wear can be simple. Once I purchased a serger with a coverstitch, I started creating my full pandemic wardrobe–sweats and tees.

I have been purchasing fabric from Hawthorne Supply Co., using only organic interlock cotton. I have found this to be ultra-comfortable, soft, drapey, and easy to sew. It’s ideal for t-shirts and kids’ clothes.

Here’s a little video.

The round neck shirts above are from the Hemlock tee pattern from Grainline. The v-neck tees in the video are my own design. I literally took a tee that was comfortable, laid it on a table and made my own pattern. I changed the neckline to one that I preferred, added a bit of length, changed the sleeves, and boom: my perfect 3/4 sleeve v-neck. Sized for me.

I am enamored with the triple coverstitch.

It forms such a beautiful hemmed finish. And the wrong side is even better because it offers that serger “stretch”‘.

Best investment I ever made.

I have more fabric on its way in fall and winter colors, as this fabric was purchased in February and March of last year.

A Tip for Interlock Cotton Knit

When I purchased my serger, the dealer said the needles were fine on knits and wovens.

She was wrong.

It was a universal needle. Sewing machines all come with universal needles. And I used to tell my students that a universal needle is supposed to be good for everything but it’s really good for nothing.

I stand by that on serger needles as well.

I don’t know why I thought that a serger needle might be different.

In the above photo, you can see what happens when you use a needle that’s too sharp for the fabric. Now, this didn’t happen at first. It took a couple of washings. But that is plainly the needle cutting through the knit fabric and breaking it.

Which is why you should ALWAYS use a ball point needle on knits.

Serging or sewing. A ball point needle is actually dull. It separates the threads of a knit with each penetration and doesn’t break it. Your garment will last a LOT longer. Luckily, I only made that mistake on the first pattern. All the others are done with ball point needles and are fine.

Just to summarize. When you purchase a new sewing machine, take those universal needles and toss them in a drawer for someday when you’re desperate. Replace it with a sharp if you’re working on a woven, like quilt cotton, or with a ball point if you’re sewing on knits.

And if you’re on a serger, you can use those factory-loaded needles on wovens. But no matter how special they tell you the needles are that come with the machine, don’t use them on a nice knit.

Someday I’ll do a blog post on different types of needles (there are plenty.) But now, I need to get back to cutting out fabric. I need a winter wardrobe.

Tips on Scalloped Edges for Your Quilt

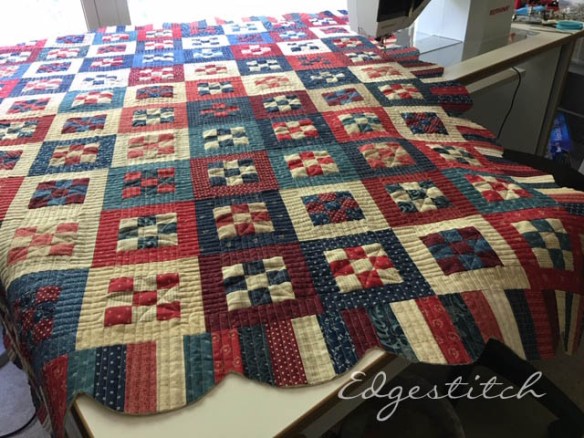
Almost two weeks left before the Fourth of July and all I have left is the label. (Have I harped enough about labels? Every quilt needs one.)

At the very last minute, I decided to scallop the edges of this quilt. Don’t ask me why. Because I don’t know. It was lovely without it, but I felt like I wanted a bit more…maybe a touch of femme or softness, or something to make it distinctive.

The pattern comes from a book called French Farmhouse by Marie Claude Picon. The quilts are all designed for rustic simplicity, which is lovely. But I never found a pattern I didn’t adapt at least a little. So same with this one.

The quilting, as you can see on the back, is all stars and stripes, in keeping with the theme. I always quilt on my domestic machine, a Bernina 780 (which was a precursor to the current 790.) I don’t enter my quilts in competitions–for obvious reasons. They are purely for the pleasure of creating. So you can see that I have a lot of fun with quilting, and I’m not hung up on perfection. As the Amish like to say about their quilts, “Only God is perfect.”

I like my quilts to be functional.

About the scallops. Don’t overthink.

I literally dumped some thread out of a Polish pottery bowl in my sewing room functioning as storage. I turned it upside down and started drawing the scallops. I did not measure. I did not plan. When I got to the last two or three at the end of a row, I just made minor adjustments so it fit. I don’t even know the size of the bowl.

So I assure you that you can enjoy creating scallops as a quilt edging. However, I DO have some tips because when you get to sewing, you just need to be prepared.

Scallop-Edge Quilt Tips

  1. Cut before you sew. I know this sounds crazy, but a lot of books and instructions will tell you to draw the scallops and sew your binding on before you trim the scallops into shape. The argument is that the fabric is less inclined to stretch or distort. It’s stable and you have a straight piece on which to work. Feel free to go ahead and try it that way. Maybe it works for you. But I really need to see my cut edge. I like to work directly on the shape that the quilt will be in the end. It may not be ideal for everyone, but this is about what works for you.
  2. Pin each scallop one at a time before you sew. Not gonna lie. This is a slow process. But you will get better results.
  3. Use bias binding. Yes, you knew that. Of course you did. But, I’m always surprised by the number of quilters who don’t ever use bias binding on their quilts–even those that are meant to be passed down as heirlooms. When a binding is on the straight of grain, all the wear-and-tear is on about two or three threads going longwise over the edge. When the binding is cut on the bias, you have hundreds of threads that support the edge. It will last so much longer. I wrote about this in a previous post.
  4. Don’t stretch. When you work with anything on the bias, it’s easy–really easy–to pull the fabric. It’s easy (and tempting) to stretch it into position. But this will just cause the quilt to curl and not lay flat. Fabric is very compliant and is happy to work with you. But you have to understand the ways it wants to be handled. The puckering that you see in the pinning, is exactly what you want to see. This gives the curve enough “give” to flip around to the back side.

Above, you can see how the binding is pinned in place. When you get to the deepest part of the scallop, you’ll leave the needle down and turn the quilt. Stitch a tiny bit down onto the next scallop and then pin the rest into place. Here’s a book called “Happy Endings” which gives a good illustration of attaching binding to a scallop. It’s not hard, but it’s not something you can just whip right through like a straight binding. It takes a bit of patience and maneuvering.

And I think patience is something we could all use a bit more of these days. I know that quilters sew love into every stitch. It’s what moves us forward.

Crazy is Good

I was sitting at the kitchen counter one day, staring at the valance over my window.  I’m ready for something new.  I get this from my mother who changed curtains in the kitchen to match every holiday and season.  In the fall, we had leaves, after Thanksgiving, holly and berries, in the spring, the lovely florals went up…you get the picture.

I don’t have cafe curtains, though I have thought about them.  But sitting there, staring away, I had an idea.  What about a quilted valance?  Better yet, what if I made matching seat covers for the chairs?

Suddenly I was excited about a project.  All I wanted was colorful and different.  So that’s what I made.

window3The valance is made of crazy quilt blocks, 8 1/2 inches unfinished. I grabbed all sorts of scraps I had lying around…some were from fatquarter bundles, some random, some leftovers from other projects and just began sewing.

The beauty of this project is that it doesn’t take any real focus or concentration.  The 1/4 inch seam doesn’t have to be perfect.The colors can be anything you want…no matchy-matchy stuff. Just square it up to 8 1/2 inches, then sew them together.

crazyblocks1 If you have never sewn this way (improvisational is what some call it) you will love it. Well, some people like me love it, and others find that they need more guidelines.  But, the freer you are with the blocks, the more fun it gets (if you can let go of the need for perfection.)

And the result is happy crazy.

window1For this valance, I assembled 3 rows of blocks, measured the window and the rod, and created a quilt sandwich and quilted the whole thing.  Then I came back and added the scallops and bias binding.  From the top, I just folded it down enough to form a rod pocket and sewed it in place with a couple of straight seams.  The binding goes all the way around, it’s just turned down at the top so you don”t see it.

And because the quilt is heavier than plain fabric, even with a lining, it hangs nice and flat.

I love it.  It’s exactly what I wanted.

Then I turned to the chairs.

chair3Each chair requires an additional 9 blocks.  I only finished one chair so far, but it goes fast. The blocks on the chairs are not quilted…just nine blocks sewn together.  I studied the chair to see how the cover was attached, and I could see that they started in the back. ( I am NOT an upholsterer, but would love to be…I don’t think it’s as easy as it looks when you get to armchairs and things like that!)

Anyway, I started in the back and pulled the fabric to the front, using a staple gun.  I did allow myself enough fabric to double the seam where it’s stapled…I didn’t want the fabric to fray and unravel.

chair2Just pull taut from the back  to the front and staple it down.  It doesn’t look very taut in this picture, because my hands were on the camera, but when you are working, you really need to pull tight, with one hand and staple with the other.

chair1You can do this.

I am loving how this turned out.  I know it won’t last forever, but now that I’ve changed the covers once, I can do it any time.

sinkwindow1Finally, I made another little valance to go over the sink, which is a smaller window.  Same process, fewer blocks.

This was fun stuff.  If you can make a quilt, you can make these valances and chair covers.  It’s just taking the same principles and adjusting to different shapes.

Baby Steps Toward a Project

I’m getting ready to start working on the polka dot project.  I have an idea about creating a tree with the different polka dots as the leaves.  I am starting as a base fabric some absolutely lovely twill which I ran across on rosie.com, which had an advertising link to Honey Be Good. Honey Be Good sells premium organic cotton.  I’ve only purchased this red twill there so far, but wow, the twill is yummy.  I need some clothes made out of this stuff.

I’ll be adding wool as the trunk of the tree, and I wanted to outline it in white.  I’m never sure how it will all turn out, but that’s the thought right now.

So I experimented on the machine using white perle cotton, size 8, as the blanket stitch thread.

perleAs you can see, the perle has a lot of dimension, jumps off the fabric and generally adds a lot of pop. But size 8 is just too large to go through the tension disks properly.


backside  I used a 90/14 needle and reduced the tension somewhat.  But you can see that the back side was looking like it might get knotted and nested at any moment.  Considering the size of this project, I just don’t want to be worrying so much about the  thread.


aurifil 28


I switched to Aurifil, size 28, and used the triple blanket stitch.  I made the blanket stitch a little wider for visibility, since the thread is so much finer.  Aside from having a more “machine-stitched” look, it does the job with the same “eyeball impact”.


finalSo here’s where I’m eventually headed.  I will be using much larger pieces of wool on the twill, with the white blanket stitch around it.  Eventually the whole project will be machine quilted, but not until I get all the details that I want.

I urge you to really experiment with your machine and some of the thicker threads.  You can get a hand-stitched look, and even when it does not look quite as hand-stitched, you can certainly add texture, dimension and detail to your project.

Be bold.  Nobody is writing the rules.

The Making of a Raincoat – Part 4 – Slowly but Surely

Like most of you, time is the culprit on all projects.  And with this one in particular, I take one step forward and one step back.  Learning curves:

–Patterns can be perfect. Patterns can be imperfect.  It’s not always easy to get into the head of the designer.

–The Teflon foot is great on vinyl-covered fabric.  Regular feet work even better as long as I’m working with right sides together.  A big hangup at that point is the vinyl-covered seam allowance running against the bottom of the machine.  It sticks.  Wishing someone would invent a teflon stitch plate.

–The zipper foot with dual feed is almost as good as it gets for attaching piping.

–Don’t rush.  It’s miserable to backtrack.

It’s looking more like it might actually become a coat.  All that’s left is to attach the hood, sew the lining and coat together, then finish up the hems and topstitching.  Still a lot of work but I am seeing the light at the end of the tunnel.

IMG_1335[1]


The Making of a Raincoat – Part 3 – A Tale of Two Sleeves

Just as anticipated, the answer to the sleeve dilemma appeared when I least expected it…in the form of a petite white-haired woman who walked into the store.

We chatted for awhile, and I invited her to join some other customers in having a little cookie treat in the back classroom.  I sat down with a cookie myself, and almost thinking aloud, I mentioned  the “speed bump” I had run into using vinyl-covered fabric.  It’s actually a dream to work with.  It sews and folds and presses just fine (with a pressing cloth).  But vinyl-covered fabric doesn’t have a lot of “give”.

When setting the sleeves on the muslin and on the lining, I had no trouble because I could ease the fabric.  Not so with this.  So I ended up with two sleeves that appeared to be too big for the armhole.

The petite woman looked at me.  “Why don’t you undo the sleeve seam and the side seam, attach the sleeve, and then sew up the sleeve seam and down the side?”

I looked at her, disassembling and reassembling the coat in my mind.  It was an obvious solution – and I never would have thought of it.  “That just might work…”  I said slowly.

“Mmm-Hmmm,”  she said, taking another bite of cookie.  “I used to do a lot of garment sewing, and you know, you can forget about pattern instructions.”  She waved her hand dismissively, with a twinkle in her eye.

Sure enough.

The next day I went back to work on the project, and tried what she suggested.  Voila!  Two (almost) perfectly set sleeves.

IMG_1329[1]Onward to the next set of challenges.

And a special shout out to all the women who help other women every day.  You make the rockin’ world go ’round!