If You Have a Little Girl in Your Life

Oh, it’s irresistable.  If you have a little girl in your life, and you sew, you will want to make something for her with ruffles…or a little bit of lace, or some gathering, or bows or frills.

You won’t be able to resist, I’m not kidding.

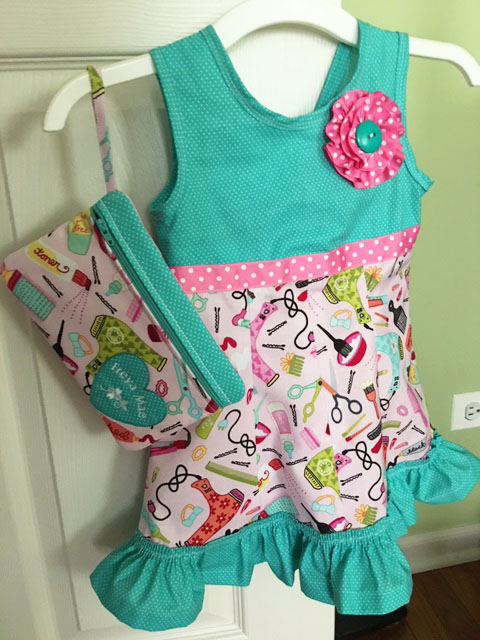
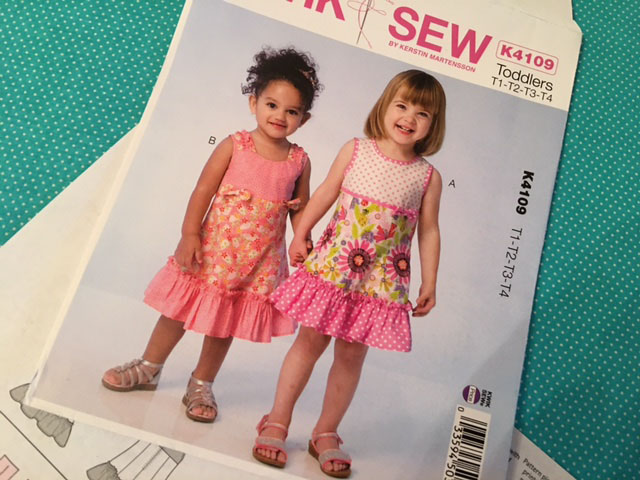
I have a wee one in my life. But she lives far, and I don’t really know her size.  She’s two years old this week, but I decided to make her a 3T dress.

Isn’t that pattern cute?

Anyway, garment sewing is not really my thing, but I am more and more interested in it as I would prefer something that fits and is one-of-a-kind, than something store-bought and cheap.

I found these great fabrics, and in my head I had it all created before I even found the pattern.  You know how that is…then you have to go looking for a pattern that comes close to what you already had in mind.

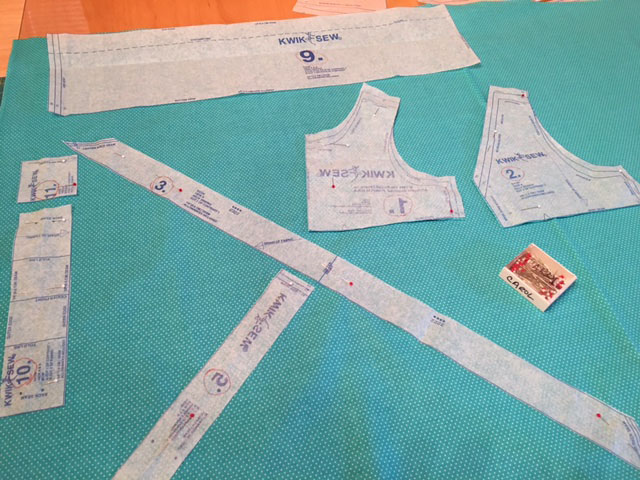
Then the fun begins.  And frankly, the older I get the more difficult it is to follow a pattern. Sew this on the straight of grain, this on the bias, flip this piece backward, and this one sits on the fold.

Ugh.

(Not to mention that sometimes patterns have mistakes, so it helps to know a little about what you’re trying to do.)  Moreover, I usually just want to do something my way and not the way it shows in the pattern.  For instance, on this dress, I replaced the waistband with a ribbon, and I used a ruffler foot to gather the bottom ruffle.The pattern called for the more traditional method of manual gathering.

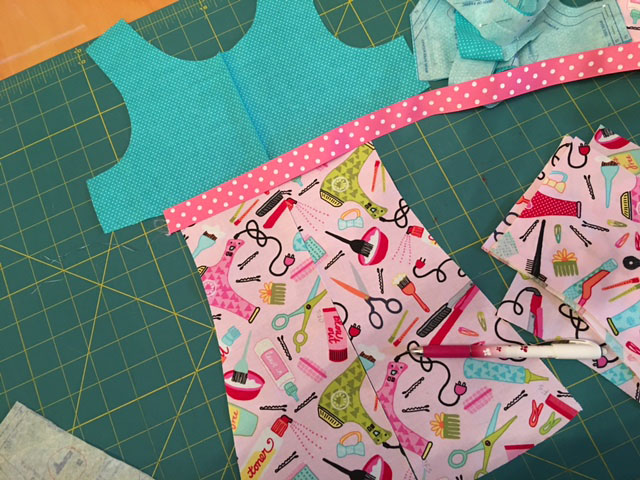
I also changed my color scheme a bit from the original layout.

My tip for sewing any garment pattern:  Read the pattern from start to finish.  (Every pattern will tell you this.)  But read it again.  And read it again if necessary.  Unfold the pattern pieces and stare at them as well. Get comfortable with the whole process in your head before you even lay out your fabric. Trust me on this one.

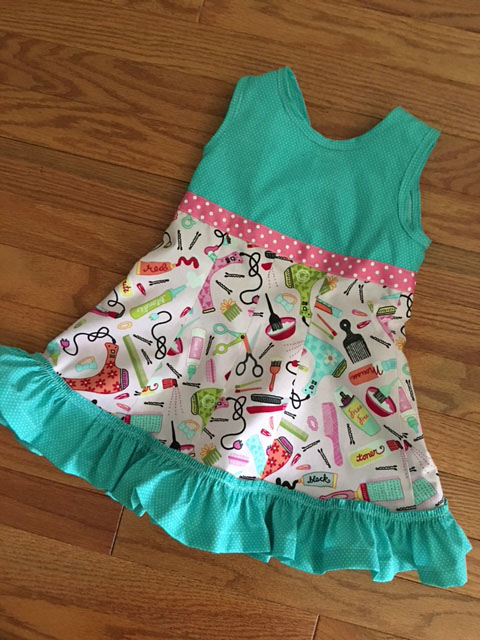
This turned out almost exactly the way I pictured it.

I learned a little about the zipper on the back…I would raise it a bit higher.  But all in all I am happy with the result.


I found out this week that they are coming in to town, so I will be able to give it to this little one in person.  I know at two years old, she won’t care.

But what can I say?  I couldn’t resist.

I only hope it will fit her for at least a few weeks so she can wear it. The matching bag is an in-the-hoop project in machine embroidery, and I added her name there.

Maybe we can get a few pictures of her wearing it before she eats her birthday cake!

The Neopixel Process

[embedyt] http://www.youtube.com/watch?v=T1_VZdfc3PA[/embedyt]

So, with the vest finally complete, thought I would let you see it in action.  I know it’s a little creepy as everything is in shadow so the lights would show.  Actually, they show pretty well in daylight too.  Those little neopixels are quite bright!

You can see that I used the Adafruit book as a reference during every step.

adafruit book

After I had the lining of the vest created, I used an erasable sewing pencil to trace out the pattern of the pixels, making sure to keep power and ground from crossing.

power and ground designI numbered the pixels to keep track.  The next step was to handle all the wiring.

Problems encountered:

  1.  The conductive thread, while it did work, would have lost a lot of power by the time it went through 19 pixels.  So we switched to 22 gauge insulated wire for both power and ground.
  2. We use the thread to attach the accelerometer to the Flora and it did hold up, but did not like the silver solder at all.
  3. Working with wire and Neopixels is tiny, tiny work, much tinier than wool embroidery, or even working with embroidery thread.  Be prepared with a nice set of wire strippers.

power and groundHere is a pic showing power and ground and attached to each pixel with the 22 gauge wire.  White was power, black was ground. Each neopixel was at least temporarily held in place.

solderNext came the one thing I didn’t do.  My husband did all the soldering. Silver solder every place the wires touched the pads on the neopixels, the flora and the accelerometer.

vest sewnThen I brought the whole thing to the sewing machine, and zigzagged down power and ground.  I found that I needed to add a cutaway stabilizer behind all the wire and stitching to support the fabric.  When I finished all the stitching, I went back and trimmed the stabilizer as much as possible.  All of that added a lot of stiffness to the vest, but surprisingly, it still hung pretty well when I added the top layer of fabric.

We repeated the whole process with data in and data out: wire to the neopixels, pin down, solder, stitch.

vest lining1Finally, I created the top layer and attached it to the lining.  It was designed to have serged edges, one of the reasons I chose the pattern.  However, I think if I were to make it again (without any wiring,) I’d do a more traditional lining and finishing technique.

finished vestI’ll say this much about the project.  It’s a big hit at parties.

We worked together on the programming. Actually the Adafruit book is very helpful with that, as everything is done in software and transferred via USB to the Flora.  My vest is programmed to do a number of sequences, based on the movement of the accelerometer.  As you see in the video above, I just have to shake it, and it changes mode.

Actually, I learned a great deal about simple wiring, I am proud that I could get through something like this, even with expert advice!

My next LED project will likely be a bag that lights up.

For now, I need to get back to some simple quilting.  But I have lots of spare parts and I’m excited about the idea of another electronic project!

Save yourself — from Pinterest

If only I could.  But every now and then I get sucked into it.

If you sew, you know just how many absolutely gorgeous fabulous creative bright shiny fresh interesting lovely stunning fabric-savvy darling sweet edgy smart…whew…IDEAS are on that site.

I am helpless to resist.

So this little t-shirt project was inspired by one of the ideas I saw there at some point, and I wish I could credit the original poster.  But that’s the thing about pinterest.  You click on something, then on another thing, and before you know it you are down the rabbit hole somewhere on a blog, mixing all the ideas together.

So, for the record, I bought several of these cheap tees to use at a class for embroidery positioning.  The students used them in the class and now I have them left over and I was wondering what else I could do with them. Here’s the upcycle idea:

Before.

Before.

After.

After.


Just a plain tee to start, but it gets cut up into a shrug-type garment.


In the summer, I think it will look cute over a tank or tee.  Not bad for the $5 or so that I paid for it.

In the meantime, I’ll be shielding my eyes from the inevitable lure of pinterest.

For the moment.

Chicago in the Dead of Winter

Let’s start this blog post off with a little movie clip, a classic:

I was trying to find “Now is the winter of our discontent…” Of course, it had to be Richard Dreyfuss. But I coudn’t find that clip on youtube. So this will have to do.  Now I want to watch the whole movie again.

Anyway, this is both Chicago in the dead of winter and the winter of our discontent.

But it’s great for getting some sewing done.  I have been trying to do a little more garment sewing, but it’s not something I’ve done much in the past.  It’s just exciting to spend a couple of hours whipping up something to wear when I’m tired of everything in my closet.  Also, I have been collecting fabric for garments over the past year or so.  They are calling out to me to be utilized.

Here’s a very simple sweatshirt jacket that took a couple of hours.  The pattern says 45 minutes, but sorry, it takes me that long to read the pattern and cut the fabric.  Then, of course, I modified it a little as I went along, adding some extra topstitching so the seams looked a little more finished.  But all in all, I’m pleased with the result.

Sweatshirt jacket February 2014

Sweatshirt jacket February 2014

The pattern is from a book called “The Feisty Stitcher” by Susan Wasinger.    The book has a number of unusual patterns that all look like they would be fun to try.  However, this one looked like just my style so I had to try it.

The Feisty Stitcher by Susan Wasinger

The Feisty Stitcher by Susan Wasinger

sweatshirt jacket

As I said, it looked easy enough to do, and quite casual.  I did not add the hood, just a simple placket.  I thought about adding some embroidery, but that’s for another day.

I have some more sweatshirt fabric in a darker color and I just might whip up another jacket some time soon.  It’s easy enough that anyone could try it!  No garment experience necessary!  As for now, I’m off to work on finishing a quilt.

The winter of our discontent may just turn out to be one of the most productive we’ve ever had!