Re-incarnating My First Quilt

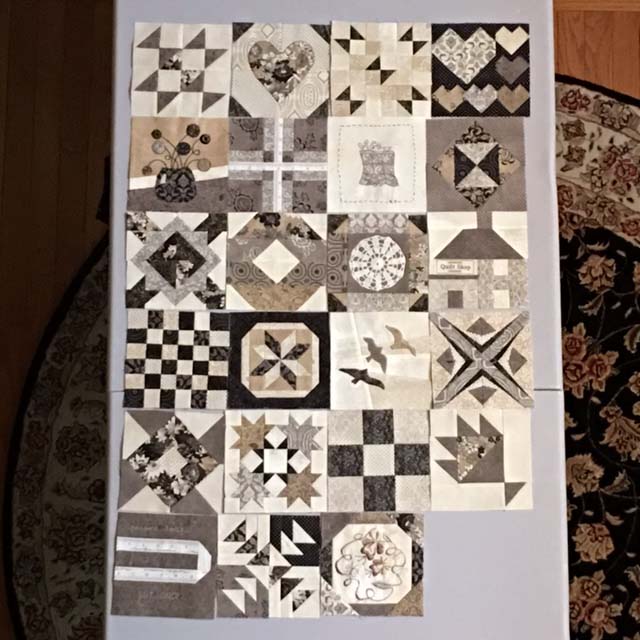
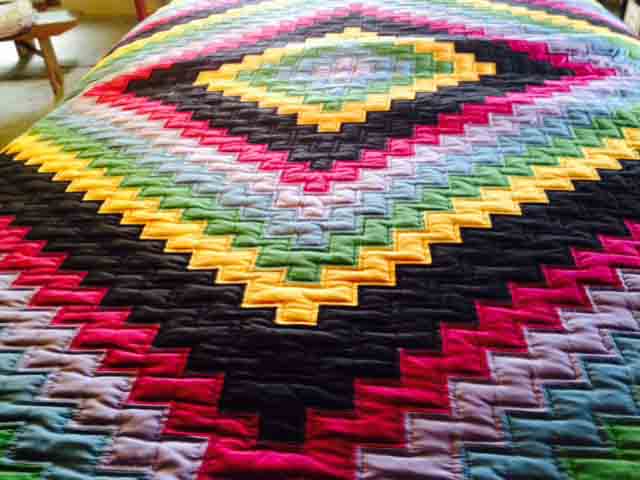
Though it’s not a great picture, I created this quilt over 20 years ago in the aftermath of 9/11. I distinctly remember yarn-tying each and every little intersection with hunter green yarn. The news was on all day, and doing something with my hands was the only way to stay calm.

The quilt was enormous. It is a giant square, so 40 % of it is hidden on the other side of the railing. The squares are homey, comfy flannel. It was designed to say “cozy” every step of the way. Of course, even my first quilt, knowing absolutely nothing, I didn’t use a pattern–just laid it out in a way that seemed pleasing to me.

I didn’t have any idea how to quilt, though…thus the yarn-ties. And I put it together, like a pillow case. Turning the whole quilt sandwich inside out, I sewed 3 sides, turned it right side out, and managed to secure a seam along the remaining side. Then I started tying.

And it does work. You really could make a quilt that way.

However, the yarn started to fall out. Every night on our bed, I would find another one or two strings. And the quilt was so massive, that it was impossible to find where the yarn came from. After a few weeks, I decided that it needed some more work.

So I put it away.

In a closet.

For 20 years.

My nephew recently married, and he and his wife have a cabin-themed home…they love all the pine trees, the deer and northwoods-type atmosphere.

I went back to the closet and pulled out this quilt. I sent a pic of the pattern to my sister: Will they like this? Oh yes, was the answer. That’s just their style.

I examined the quilt and that night I got out the seam ripper.

I took off the entire backing and pulled out the batting. I straightened and corrected and made sure the quilt top was completely solid again.

I found some neutral backing which had also been in my closet…hmmm…maybe 7-10 years now.

And I laid the whole quilt sandwich out and quilted it for the first time, on my home machine. This time done right.

It really was a huge quilt to attempt at home, and remember the top is flannel. Not lightweight.

But I got it all quilted with an overall pattern and an edging that gives it some distinction. I still have to make a label and bind it, but I think it will make a perfect Christmas gift for them.

An heirloom, in their style, with a breath of fresh life. Nothing thrown away–just recycled, re-used and re-incarnated.

I wish I were better at re-purposing. I think it’s a skill I want to improve and increase.

May your holiday season take you on a spiritual journey… to loved ones, to the Earth, and possibly to the back of your closet.

Industry Consolidation – Cotton+Steel and More

Cotton+Steel

Just in case you haven’t heard, the 5 original designers of Cotton+Steel have departed and are no longer working with RJR, who was their distributor.

Apparently, RJR owns the name of Cotton+Steel outright, so the designers are leaving that behind.

Craft Industry Alliance has a detailed article about the move, which the designers announced on Instagram several weeks ago. It sounds as though RJR was having difficulty with technology, and deliveries weren’t being made to quilt shops in a timely manner, record-keeping and accounting was faulty, with a lack of training and many other issues that make or break businesses.

It’s a shame, as Cotton+Steel was a very recognizable brand.  The quality of the fabric was definitely superior, and that was one of the main reasons the brand had such a following.  The last collection submitted by the original team was submitted at this spring’s quilt market, which means it will likely hit stores in the fall.  After that, RJR has in-house designers who will continue the brand. It’s hard to imagine, as anyone who has ever used Cotton+Steel fabric knows, the designs are unique.  Frankly, the designers are the brand.

We’ll keep an eye on what they are up to next.

Machine Quilting Unlimited and Modern Quilts Unlimited

If you are familiar with these two titles, you’ll be sorry to hear that they are both being discontinued.

Everyone knows that the magazine industry is truly suffering, as ad sales are plummeting and online content replaces a business model that has outlived its time.

Still, I am someone who prefers to read actual books as opposed to digital, and I like my magazines the same way.

I would rather turn pages while sipping a cup of hot chocolate than stare blankly at another screen.  Nevertheless, these are two more magazines that will no longer be available.

I will, however, recommend instead, the folks at Modern Quilt Studio.

They self-publish magazines called Modern Quilts Illustrated which are full of great ideas tips and tricks.  They adhere boldly to the modern aesthetic.  They have been around for decades and I imagine they will be around for decades more. Their magazines have no ads.  This husband and wife team are inspirational, skilled as artists, well-known and respected in the industry, and all-around nice people.

As the industry changes, it can only mean one thing…opportunity.  The gals from Cotton+Steel will find their way to new and exciting endeavors and the rest of us will have higher quality designs and talent to choose from…if less assortment for the moment.


Hello Sunshine! Machine Embroidery for the Season

I wanted something cheery for my basement door, and finally took down all the “Rules of the House” in pictorial form.  If my 15-year-old doesn’t know the rules of the house by now, like brushing your teeth, not jumping on the sofa, not throwing superballs, we have truly failed as parents.

Anyway, I had a nice blank door that was screaming for something to hang on it.

A while back I found these embroidery designs from Kimberbell, part of the “Hello Sunshine” quilt collection.

I wasn’t sure what I wanted to do, and didn’t really want to purchase any fabric

I had a teensy memo notebook on my desk and scribbled out a few ideas.  I printed out the embroidery designs and laid them out on some linen fabric I already owned  It was an awkward amount…not really enough for a quilt but enough for a decent wall hanging.

On the last bicycle, my machine locked up and I had to bring it into the dealer for a cleaning and tune up.

My machine is now running smooth as silk and I was able to complete the design.

I wanted something simple and cheerful.

I love these bikes as they remind me of the possibilities of the summer season.

It also gives me an excuse to create something in machine embroidery for that spot every season.

Ready for fall leaves and holiday yet?

Going Against the Grain

If you’ve ever done any garment sewing you know that:

1. It’s not easy.

2. If you don’t know what you’re doing, you better follow that pattern EXACTLY.

Well, I’m not much of a garment sewer, although from time to time fabric tells me what it wants to become and my job is just to do what it tells me.  That’s how it was with this delicious fabric from Cotton and Steel.  It’s really not an easy line to piece into a quilt as it doesn’t lend itself to small cuts.  But it was just calling out to me, begging to be made into this vest.

And so I bought it and set it aside until I was ready.

You can see that the line on the pattern indicates that the pattern should lay on the fabric the way it’s shown in the pic above —  grain line parallel to the selvage.

But that wasn’t the vision.  I wanted vertical stripes in front.  So I began my research.  What will happen if I ignore the grain line?  Will the shape be distorted?  Will the vest not lay properly?

I turned to the Internet where the general consensus seemed to be:  Always follow the grain line. Unless you don’t want to.

Actually, most people were specific. If you wanted a pattern to run a certain way, then It’s OK to cheat the grain line a bit.  Especially on a fabric that is not stretchy.  Since I’m working in a pretty tight woven, I thought…I’m going for it.

So I cut out all the pieces, along with a liner.  The pattern I was using was from Indygo Junction (Modern Silhouette Vest).

As usual, I did not follow the pattern completely.  I wanted it to be lined and reversible, so I modified along the way. I actually assembled the entire vest, then the entire lining, and pinned them right sides together. Then I stitched around the outside of the whole thing (very much like making a bag lining.) I also went back and serged all the unfinished edges. I left a space in the back hem to turn inside out.

***Do not sew the armholes together when it is inside out.*** Ask me how I know.

When I teach, I often tell students “Don’t worry. I make the mistakes, so you don’t have to.” It gets a chuckle, but it’s truth. I make a lot of mistakes because I try a lot of new things. I’m as comfortable unsewing as I am sewing. The seam ripper is your friend.

As long as the armholes are still raw edge,  the whole thing can be turned inside out and pressed.

You can finish the armhole by overlocking the right side and lining separately, and then turning them both under and topstitching. It forms a neat finish, with all seams hidden. The last step is to topstitch all the way around the vest and in the process turn under the back hem which was left open when you turned it inside out.

All seams are finished and I can wear it either way.

The back is pieced as well with the same line of Cotton and Steel fabric.

Final step is to add a button in front.

I think I really worried needlessly about the grain line.  It lays just fine, and the little pandas were cut on grain.

C’mon, that fabric is cute!

The bottom line is this: Don’t worry about the grain line QUITE so much when you are working with a medium or tight woven. Anything stretchy, and all bets are off.

Go ahead, try something new.

And don’t be afraid if it goes against the grain.

If You Have a Little Girl in Your Life

Oh, it’s irresistable.  If you have a little girl in your life, and you sew, you will want to make something for her with ruffles…or a little bit of lace, or some gathering, or bows or frills.

You won’t be able to resist, I’m not kidding.

I have a wee one in my life. But she lives far, and I don’t really know her size.  She’s two years old this week, but I decided to make her a 3T dress.

Isn’t that pattern cute?

Anyway, garment sewing is not really my thing, but I am more and more interested in it as I would prefer something that fits and is one-of-a-kind, than something store-bought and cheap.

I found these great fabrics, and in my head I had it all created before I even found the pattern.  You know how that is…then you have to go looking for a pattern that comes close to what you already had in mind.

Then the fun begins.  And frankly, the older I get the more difficult it is to follow a pattern. Sew this on the straight of grain, this on the bias, flip this piece backward, and this one sits on the fold.

Ugh.

(Not to mention that sometimes patterns have mistakes, so it helps to know a little about what you’re trying to do.)  Moreover, I usually just want to do something my way and not the way it shows in the pattern.  For instance, on this dress, I replaced the waistband with a ribbon, and I used a ruffler foot to gather the bottom ruffle.The pattern called for the more traditional method of manual gathering.

I also changed my color scheme a bit from the original layout.

My tip for sewing any garment pattern:  Read the pattern from start to finish.  (Every pattern will tell you this.)  But read it again.  And read it again if necessary.  Unfold the pattern pieces and stare at them as well. Get comfortable with the whole process in your head before you even lay out your fabric. Trust me on this one.

This turned out almost exactly the way I pictured it.

I learned a little about the zipper on the back…I would raise it a bit higher.  But all in all I am happy with the result.


I found out this week that they are coming in to town, so I will be able to give it to this little one in person.  I know at two years old, she won’t care.

But what can I say?  I couldn’t resist.

I only hope it will fit her for at least a few weeks so she can wear it. The matching bag is an in-the-hoop project in machine embroidery, and I added her name there.

Maybe we can get a few pictures of her wearing it before she eats her birthday cake!

A Little Lace Goes a Long Way

I have this stash of lace from my mom, that I keep in the basement, well-protected.  I never know what to do with it, but it’s always in the back of my mind as a resource.

The other day I purchased a (very) cheap sweat-shirty looking top on sale at a discount store where I normally buy groceries. So you know the price was right.

I wore it a few times before I started to get an idea to “cuten” it up a bit.

I ran downstairs to my stash of lace and found something perfect. I added it around the bottom of the shirt.

This took MAYBE half an hour.

It’s cute, right?

That’s when I got out the ruffler and decided to try ruffling the lace a bit to create a flower pin to wear on this shirt (or any other for that matter). I adjusted the ruffler to take a small “bite” so that the ruffle was soft.

You can see that it forms a natural curve and so I then proceeded to sew it onto a piece of wool I had around.

Really, this is very easy and fun stuff if you have the right tools.

I added a button and hot-glued a pin-back onto the back.  Pin-backs are widely available in places like JoAnn’s, Michael’s, etc.

To summarize, everything that’s needed for a project like this:

  • Lace
  • Ruffler foot (or needle and thread if you gather by hand)
  • Basic sewing supplies
  • A round piece of felt
  • A button or another cute center (silk flower?)
  • Pin back
  • Glue gun

This looks adorable on a handbag, a headband, a jean jacket, anywhere! You can also ruffle some fabric and create another look.

Have some fun…I highly recommend a ruffler foot for your machine.  They haven’t changed in years, and I wrote about it here.

So take a break from quilt blocks and try something new!

Splendid Sampler — Half Way Home

Splendid SamplerAre there any Splendid Sampler participants still out there?

I know there are.  We were in the neighborhood of 20,000 strong when we started last February.  I know many of you are up to date and still participating…and many, many more of you, like me, are hanging on…barely.

We knew when we started that this would be a long and unpredictable journey. A yearlong commitment to any project is risky, and in this one, we really had no idea what blocks would be thrown our way.

My special thanks to all the designers who have donated their time and effort to these wonderful blocks.  While I have deep respect for all of you, I may not sew out a few of your blocks.  Please don’t be offended.  Sometimes the stress of learning a new technique, combined with time constraints, just has me putting off a few blocks.  Also, in fairness, If I had the same taste as all 75 or 80 designers, I wouldn’t have much of my own. So, every now and then, a block just isn’t my thing.  That’s OK.  I still appreciate the work, and I probably would take the time to do them under different circumstances.

But, hey, it’s my quilt, and at the end of the day, I reserve the right to be a little choosy.  That said, I have ventured into many an area I never thought I’d enjoy–like hand embroidery.  Believe me, I still fall back on machine embroidery when I fall behind…or when I don’t really want to do any applique.  Then I just digitize the whole block.

Splendid Sampler

But a few of them I’ve done by hand, and while time-consuming, they have that unmistakable “slow stitched” look.

Splendid SamplerNo matter how you look at it, I am still proud that at the end of this year or the beginning of the next, I will have an amazing, interesting, unique and lovely quilt all pieced and ready to be assembled.  It will be both a tribute to fellow quilters and a learning process on my part. In this picture, I left the blocks in their cellophane sleeves so they don’t begin to fray from too much handling.

Splendid SamplerNow back to the business of filling in some of the blocks I missed along the way.

Splendid SamplerIf you are inclined to join, feel free to hop on board.  You can find the block patterns and all you need to know right here. 

The Splendid Sampler Facebook page is also a great place for inspiration and community–see everyone else’s projects!

New blocks come out every Sunday and Thursday, and bonus blocks are plentiful.  The patterns will be available for free for a year and then they will all be assembled in a book. (You know we’ll all want the book!)

Keep going Splendid Sampler lovers…we’ve rounded the corner!


Splendid Sampler Update

splendidsamplermapI love a good visual.

So I thought I would open with a map of all the participants in this project.  Pretty impressive, right?  Here’s a link.

According to Pat Sloan and Jane Davidson, the coordinators and people who apparently never sleep, we are now somewhere between 20,000 – 30,000.  Could that be right?  Many are not following on Facebook, but are making the blocks at their own pace.  (Just an aside, I ran into Pat Sloan at the local Panera while in Paducah.  She is absolutely as tireless and upbeat in real life as she seems online…and she looks just like her pics!)

A few observations…Japan and South Korea are in the house, but no one from China…a reflection of their internet access? So odd, because a disproportionate number of modern day sewing machines distributed here and around the world are built in China.

And no one from Greenland. Or Kazhakstan. (I know there are quilters there.) No one from Mongolia or from the middle of Africa. Much of the middle east is silent.

A surprising number from South America.  I did not know we had so many quilters in that area.  Australia and New Zealand, no surprises there.

Still not on board?  If you are mildly curious, here’s a link to all the block patterns so far They come up every Sunday and Thursday. If nothing else, it’s a great way to become familiar with new designers and block patterns.

We are somewhere around 22 blocks at this point.

splendid sampler 23Those are 6 1/2 inch blocks.  As you can see, they are getting harder and harder for me to fit into one frame.

Lessons I’m learning about myself:

  • I like to piece.  Easy, repetitive, simple piecing is unbelievably relaxing for me.
  • Paper piecing needs to be done in the morning or afternoon, but not after a big meal or if I’m tired or stressed in any way.  I need all my focus on getting everything in the right place.
  • I didn’t realize how much patience I have lost for anything done by hand.  Hand embroidery seems like it takes a lifetime.  All I can think of is that I could have digitized this and had it done days ago. And yet, I love the way it looks and I love the threads.

hand embroideryThis little design took me weeks.  Of course, I’m not working on it every minute, just a bit of time here and there.  Yet I am loving the texture of this thread.

wonderfilI found this thread at the Wonderfil booth in Paducah.  I’m sure many of you have heard of it before. It’s called Razzle. (Yes, they have a metallic looking thread that is called Dazzle).

Razzle has the weight of about size 8 perle cotton, but it’s a rayon.  So for those of you who are cotton purists, you’ll just have to look away.  Me, I fell in love with the sheen and the weight of it.  It was a pleasure to use for hand embroidery.

closeup This project is only about one fifth of the way done.  Eighty or so more blocks to go.

Will my stamina hold up?  Will I have the patience to learn more new techniques?  Will I lose interest in the color scheme half way through?  Will I actually create a setting for these blocks after the project is complete and finish the quilt instead of leaving the blocks neatly in their cellophane pockets in the binder?

I don’t know. I really don’t. A lot of life can happen in the next 8 months.  We’ll both have to wait to find out.

Stay tuned.splendid_button_4

Bag Obsession

bag3

I’ve been making these little cosmetic/chotchke/jewelry bags now for a couple of days.  So easy and fun to make.

They’ve become an obsession.

All the ones I’ve made (8 of them in total, so far) are made from Art Gallery Fabric, Sketchbook.  The look of the fabric is artsy and lends itself well to these small bags. They are approximately 6 x 8 in. finished.

These are all done in embroidery, by the way.  I digitized the lines for the bags, and all the work is basically in the cutting of fabric.

First stitch is a placement for the zipper, then you lay down the zipper, then folded fabric with batting in the middle across the top of the zipper, stitch a line, same thing with the bottom layer of fabric, stitch a line, then lay the lining/backing down (a quilt sandwich) and stitch around the outside.

bag4Voila! That’s it. You’re done. Trim and turn it inside out.

You use a sticky back stabilizer, so you end up picking that off the back at the end, but other than that, these bags go REALLY FAST.  Use batting in between every layer to give the bags a nice hand.

I’m thinking these would make great holiday gifts. I have gone through my stash and have come across some old home dec fabric that I think would be fun.  Denim would also be great.  Who doesn’t have an old pair of jeans that need to be repurposed into new life?  Add some embroidery or a little bling…anything is possible.

These in-the-hoop projects are great stash busters.  Gotta run, I need more zippers.

bag2


Shipshewana Dreamin’ – Part 3

Don’t worry, this is my last post about Shipshewana.  I’m not a travel brochure.  But it was a peaceful getaway not far at all from home and so I just wanted to share.

I had the opportunity to meet an Amish woman who sells hand-quilted Amish quilts from her basement  —  some of them she works on herself, some of them she contracts out from others, and some she sells on consignment.

(An aside: the stark contrast between an Amish basement and my own is embarrassing. Hers was empty, with a few things on shelves, not a dust bunny or piece of anything unnecessary in sight.  Mine is filled with boxes from outdated electronics, old toys, old furniture, old books, old pictures.  What a cluttered, junk-filled life we live. )

Here are a few of the quilts she showed me.  This is just a sampling as she had many more. Make sure you scroll to the bottom, because at the end is an absolute masterpiece.

While she gave me permission to take the pictures and put them on a blog, she did not want her name given.  “What if someone sees a quilt and cannot live without it?”  I asked, in my total blundering non-Amish way.

She smiled and gave me a card.

So if you cannot live without one, leave a comment and I will privately give you her info. The prices are very reasonable for the amount of work.

While I did purchase a piece from her smaller-sized collection, everyday I think about driving back out to get the whole cloth quilt.  And who knows?  Maybe she already sold it.

But we can all still appreciate it.

This is one she did herself.  She pieces by machine and quilts by hand.

This is one she did herself. She pieces by machine and quilts by hand.

SHe chose the colors for this, but asked others to do the piecing and quilting.  She said she's not good at curves.

She chose the colors for this, but asked other Amish women to do the piecing and quilting. She said she doesn’t like curves.

amish4

Hand appliqued and hand quilted.  A beauty.

Hand appliqued and hand quilted. A true beauty.

This one is a masterpiece.  She told me an Amish woman in Pennsylvania gave it to her to sell on consignment.  It is a whole-cloth quilt, and the hand quilting is so perfect it almost made me cry.

This one is a masterpiece. She told me an Amish woman in Pennsylvania gave it to her to sell on consignment. It is a whole-cloth quilt, and the hand quilting is so perfect it almost made me cry.

wholecloth4wholecloth3

THe whole quilt was for queen size but with overhang, so very large.  the entire edging was in scallops with these lovely feathers.

 The edging was in large scallops with these lovely feathers.