Though it’s not a great picture, I created this quilt over 20 years ago in the aftermath of 9/11. I distinctly remember yarn-tying each and every little intersection with hunter green yarn. The news was on all day, and doing something with my hands was the only way to stay calm.
The quilt was enormous. It is a giant square, so 40 % of it is hidden on the other side of the railing. The squares are homey, comfy flannel. It was designed to say “cozy” every step of the way. Of course, even my first quilt, knowing absolutely nothing, I didn’t use a pattern–just laid it out in a way that seemed pleasing to me.
I didn’t have any idea how to quilt, though…thus the yarn-ties. And I put it together, like a pillow case. Turning the whole quilt sandwich inside out, I sewed 3 sides, turned it right side out, and managed to secure a seam along the remaining side. Then I started tying.
And it does work. You really could make a quilt that way.
However, the yarn started to fall out. Every night on our bed, I would find another one or two strings. And the quilt was so massive, that it was impossible to find where the yarn came from. After a few weeks, I decided that it needed some more work.
So I put it away.
In a closet.
For 20 years.
My nephew recently married, and he and his wife have a cabin-themed home…they love all the pine trees, the deer and northwoods-type atmosphere.
I went back to the closet and pulled out this quilt. I sent a pic of the pattern to my sister: Will they like this? Oh yes, was the answer. That’s just their style.
I examined the quilt and that night I got out the seam ripper.
I took off the entire backing and pulled out the batting. I straightened and corrected and made sure the quilt top was completely solid again.
I found some neutral backing which had also been in my closet…hmmm…maybe 7-10 years now.
And I laid the whole quilt sandwich out and quilted it for the first time, on my home machine. This time done right.
It really was a huge quilt to attempt at home, and remember the top is flannel. Not lightweight.
But I got it all quilted with an overall pattern and an edging that gives it some distinction. I still have to make a label and bind it, but I think it will make a perfect Christmas gift for them.
An heirloom, in their style, with a breath of fresh life. Nothing thrown away–just recycled, re-used and re-incarnated.
I wish I were better at re-purposing. I think it’s a skill I want to improve and increase.
May your holiday season take you on a spiritual journey… to loved ones, to the Earth, and possibly to the back of your closet.
This barren pathetic patch of earth is where I’m setting up my community garden plot this year. The ground is hard, prone to weeds and, frankly, as inhospitable a piece of land as I’ve worked on in a long time. It reminds me of pics from Curiosity, the Mars Rover.
It’s clear to me that it’s been deprived of nutrients and expected to perform over and over with nothing returned to the soil.
But it’s mine this year.
In our house, it’s a season of beginnings and endings. My son is heading off to college in August, saying goodbye to an old school, old friends, and his old parents. Yesterday, he was 10 years old, reluctantly traveling with me to 30 quilt shops one summer. We did the entire Northern Illinois Quilt Shop Hop. He was supplied plenty of food, was instructed to be Chief Navigator and man of the GPS, and off we went. We found our way to unknown towns (with candy shops) and got lost in cornfields and stopped in strange places for food and potty breaks. He later told me it was the best summer he ever had.
Fast forward a few years to the present, and he (again reluctantly) is tasked with helping his mother by carting 10 bags of organic compost and spreading it out on that empty, unyielding piece of land. (I’m going to make sure he’s happy to be headed off to school.)
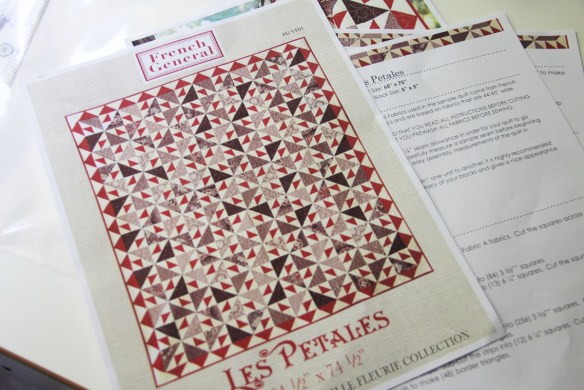
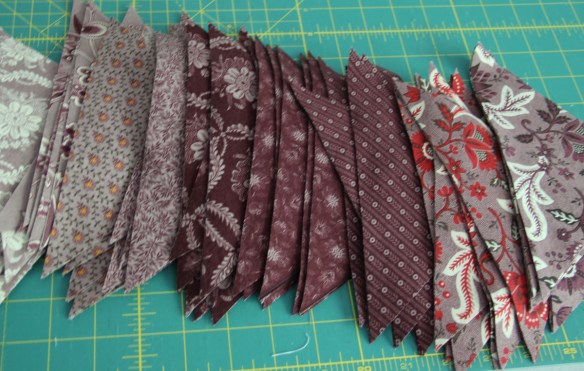
In return, I’m making him a quilt of his choosing. I won’t go into the horror on his face when I showed him all his t-shirts from middle school and high school and suggested I’d make a quilt out of those. It was as though nightmare zombies from the dead had reappeared and come back to haunt him and travel with him to college. In the end, he selected a tasteful French General pattern. And it just so happens that I’d been collecting that fabric for years so…hooray…no new purchases.
With the cutting done, I’m ready to start sewing. I figure, if I don’t finish by August, it’s OK, I can always ship it to him. He won’t need an extra quilt for a month or two.
In the meantime, at the garden plot, I’ve had a few seed failures. I tried purchasing flower seeds from an independent grower, and most of those seeds just haven’t germinated. The commercial seeds have begun to emerge, and some of the vegetables are doing OK.
On we go into summer. I hope you have some exciting things planned. I’ll be delving into this quilt in between trips to carry water buckets at the garden plot. Wish me luck.
We have all seen the books about making “scrappy” quilts. You may even own a few of them. I know I do. And most of them recommend separating all your fabrics into neat, color-coordinated bins.
Sounds great.
Have you ever tried to do it? I find myself asking questions. What about this colorful print which really does not seem to fit into just one category of color? What about this collection I purchased all at once which coordinates perfectly with the other fabrics from its own collection? Do I really want to wrench those apart? (Hello Downton Abbey fabric line from 6 years ago.) And then there are the pre-cuts. Am I supposed to take apart these charm packs and layer cakes and re-sort each and every fabric into different categories even though they are all from the same collection and look great together?
As you can imagine, my answer was no. In fact, I was feeling a little defiant. Guess what? There are no rules.
Normally when we talk about making a scrappy quilt, we just mean that we are going to make an ordinary quilt from some pattern we’ve purchased, by shopping our stash. I’ve done that many times. Here’s a nice pattern. What do I own that will look good? Most of the time, I can fill out the pattern requirements part of the way. But in the end, I’m missing the exact perfect shade of grunge that I need to finish. Or I just need 5 more fatquarters in this color family. Or I need a better binding or 4 yards of backing. No matter how hard I try using that method, I always end up purchasing more fabric. Which, frankly, is not my goal.
That old saying? She who dies with the most fabric wins? No she doesn’t. She just becomes a pain in the rear end to her family AFTER SHE’S DEAD.
That’s not the legacy I want to leave. Too many quilts? Yes, my family will grapple with that, but at least those are useful.
Anyway, I might be in a dark place because a friend of my sister’s, and a family acquaintance, just suffered a severe health emergency. (not COVID.) But she is middle-aged, and was healthy and vibrant until this struck. And now she’s got a long recovery ahead of her. I’ve had her on my mind so much recently, that I decided to make her a quilt. One that was scrappy but strong…a message I want to convey to her. Lots of pieces put back together in odd ways can make something interesting and strong and vibrant.
So instead, I started with whatever fabric I had been hanging onto for years, moved from bin to bin, never having a purpose. I put them all together in a pile and challenged myself to make a quilt.
And this is the result.
It’s made from a mini charm pack bundle I was given as a sampler at Quilt Market years ago, along with a couple of charm packs, and scraps of red and coral fatquarters. The backing is 4 yards of vibrantly red fabric. I feel like this quilt is saying:
I’m strong.
I’m tough.
I’m fierce.
I break the rules.
Don’t f$%^ with me.
And that’s the message I hope is conveyed to our friend who will receive it. Ride it out. Don’t let anyone tell you that you are weak. Show them you are a survivor. Be bold.
So my challenge to you today is this: If you’re feeling like you’re in a rut, break out. Do the thing you are told you should not do. Put two colors together that don’t belong. Simplify. Complicate. Whatever it takes to shake it up for you. And then pass it on to someone else who really needs the courage.
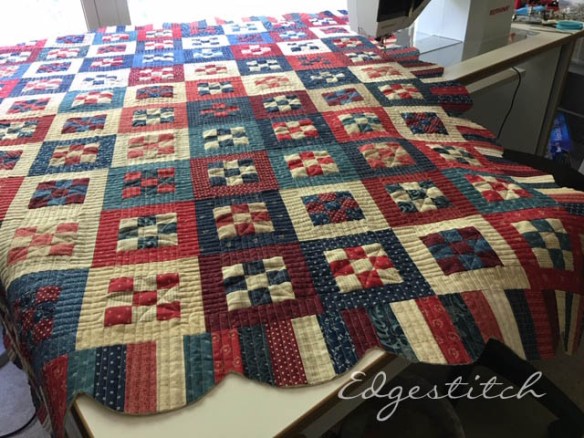
Almost two weeks left before the Fourth of July and all I have left is the label. (Have I harped enough about labels? Every quilt needs one.)
At the very last minute, I decided to scallop the edges of this quilt. Don’t ask me why. Because I don’t know. It was lovely without it, but I felt like I wanted a bit more…maybe a touch of femme or softness, or something to make it distinctive.
The pattern comes from a book called French Farmhouse by Marie Claude Picon. The quilts are all designed for rustic simplicity, which is lovely. But I never found a pattern I didn’t adapt at least a little. So same with this one.
The quilting, as you can see on the back, is all stars and stripes, in keeping with the theme. I always quilt on my domestic machine, a Bernina 780 (which was a precursor to the current 790.) I don’t enter my quilts in competitions–for obvious reasons. They are purely for the pleasure of creating. So you can see that I have a lot of fun with quilting, and I’m not hung up on perfection. As the Amish like to say about their quilts, “Only God is perfect.”
I like my quilts to be functional.
About the scallops. Don’t overthink.
I literally dumped some thread out of a Polish pottery bowl in my sewing room functioning as storage. I turned it upside down and started drawing the scallops. I did not measure. I did not plan. When I got to the last two or three at the end of a row, I just made minor adjustments so it fit. I don’t even know the size of the bowl.
So I assure you that you can enjoy creating scallops as a quilt edging. However, I DO have some tips because when you get to sewing, you just need to be prepared.
Scallop-Edge Quilt Tips
Cut before you sew. I know this sounds crazy, but a lot of books and instructions will tell you to draw the scallops and sew your binding on before you trim the scallops into shape. The argument is that the fabric is less inclined to stretch or distort. It’s stable and you have a straight piece on which to work. Feel free to go ahead and try it that way. Maybe it works for you. But I really need to see my cut edge. I like to work directly on the shape that the quilt will be in the end. It may not be ideal for everyone, but this is about what works for you.
Pin each scallop one at a time before you sew. Not gonna lie. This is a slow process. But you will get better results.
Use bias binding. Yes, you knew that. Of course you did. But, I’m always surprised by the number of quilters who don’t ever use bias binding on their quilts–even those that are meant to be passed down as heirlooms. When a binding is on the straight of grain, all the wear-and-tear is on about two or three threads going longwise over the edge. When the binding is cut on the bias, you have hundreds of threads that support the edge. It will last so much longer. I wrote about this in a previous post.
Don’t stretch. When you work with anything on the bias, it’s easy–really easy–to pull the fabric. It’s easy (and tempting) to stretch it into position. But this will just cause the quilt to curl and not lay flat. Fabric is very compliant and is happy to work with you. But you have to understand the ways it wants to be handled. The puckering that you see in the pinning, is exactly what you want to see. This gives the curve enough “give” to flip around to the back side.
Above, you can see how the binding is pinned in place. When you get to the deepest part of the scallop, you’ll leave the needle down and turn the quilt. Stitch a tiny bit down onto the next scallop and then pin the rest into place. Here’s a book called “Happy Endings” which gives a good illustration of attaching binding to a scallop. It’s not hard, but it’s not something you can just whip right through like a straight binding. It takes a bit of patience and maneuvering.
And I think patience is something we could all use a bit more of these days. I know that quilters sew love into every stitch. It’s what moves us forward.
Tell me why you sew, and I’ll tell you who you are. Isn’t that the truth? These wonderful ladies, friends of mine, wanted to learn machine embroidery. We won’t talk about how long they have had their embroidery units neatly packed away in boxes with all the best intentions in the world.
We’ve been talking about getting together for years to learn the ins and outs, tips and tricks of the trade. Finally — we did it.
They came over to my house for a day and and I gave them the basic Embroidery 101 lessons. Someday, I will write it all down in lesson form for this blog. I know there are plenty of others out there who have an embroidery unit packed away somewhere, hoping that they will use it eventually. Or maybe you gave up on embroidery entirely.
I am here to re-inspire you. Machine embroidery is truly fun. And the more you know, the more you can experiment, and the more you are inspired to try new things. The hardest part? Getting started.
You can see from these pics that one of the biggest impetuses (is that a word?) for machine embroidery is, wait for it, grandchildren. And children as well . But I think the grandkids get the machine embroidery lovin’. Why? Because they are fun. The things we do for them is done with pure love with no expectations for anything in return.
That’s also why I teach. I want to share what I know, so that others can enjoy this craft. I also want us to use our hands, machines, brains and ideas to make things and to inspire each other, and maybe that will spread into the world and make a difference.
I don’t know if it will. All I know is that they will be coming back for another lesson next week. I hope it inspires you to dig in, as well.
The old saying goes “You can’t take it with you.”
No you can’t. But with any luck, we can quilt it, sew, it, embroider it and leave some of it behind and hope it does some good.
A friend had been struggling with adding the Wisconsin fight song to a quilt she did for her son. It was made of flannel and very cozy. It had a 2 inch inner border which really was ideal for the words of the fight song. She had already pieced it, and had it quilted professionally.
Over breakfast one day, several of us were talking about the best approach. My friend had purchased some minky-like yarn and was hoping to create the words by couching it. I suggested using the Bernina free-motion couching foot. It seemed like a good approach, but she was not sure she had the foot or knew how to use it. I thought I would test it out for her.
As you can see on my test-out, disaster ensued. The #43 couching foot let the yarn slide around too much to catch it, and basically the thread did not grab the yarn. So then I thought I would try the Bernina stitch regulator on zigzag using the free-motion foot. Slightly better results but still horrific. My experience with the couching foot has been to use very specific sizes and yarn has never worked well. I’ve had much better results with cording, which neither of us had.
I then suggested embroidery might be the best way to go.
After finding a font that was similar to what she wanted (cursive) I then created embroidery hoopings for all the words to go around the quilt. It had to be spaced decently so that it would be readable.
From the above pic, you can see that I positioned every phrase and laid it out on the quilt so that I would have a guide for spacing. The quilt was about a twin size. This took 17 hoopings, all done in the software from a TrueType font. I matched the bobbin thread to the back of the quilt, so, while you could see the embroidery on the back, it did not noticeably stand out. When finished, the embroidery words actually acted more like quilting.
We needed a satin stitch because a plain stitch of the words –or even a triple stitch–was just not visible.
In the end, I think the words ended up looking sharp, and added a lot of personalization and interest to the quilt.
Could we have managed the same result with couching? Maybe with cording, but almost certainly not with yarn.
I have seen that Bernina now offers couching inserts to attach to the #72 ruler work foot and I’m interested in seeing how easy that is to use. For our purposes, I think embroidery ended up being the best result.
That’s it. That’s the message. I know it’s no longer October and we’ve moved on from the specific Breast Cancer Awareness Month to the festive Hallmark Channel and holiday activities. But I want to emphasize the message again.
Get your mammograms, ladies.
My sister went in September. They found something and it’s been removed. Just not as easily as we had hoped. Things like this tend to get complicated. But she is past the surgery and doing well. Of course, once she found out, I immediately made an appointment for mine. I got called back…something didn’t look right. After four agonizing days of wondering if I had the same problem, I was able to go back in and they took another picture and all was well. For now. They handed me a chocolate breast cancer ribbon and sent me on my way.
I know you’re all busy. We worry about our cholesterol, our weight, our eyes, our teeth, our hair, our families and their health, and we even worry about the planet.
But we all need to start to prioritize ourselves. It’s not our nature to do that. But I’m learning, especially as I get older, to make the time for myself. I can’t help my family or friends or anyone else if I’m not OK.
You,too. None of us is here forever. But let’s make an effort to be well while we’re here.
Not sure if it’s my age, or my season of life, or the times we live in, but these days, I’ve been thinking a lot more about SLOWING DOWN.
I used to see how many quilts or projects I could finish in a year. How many blog posts? How many pictures taken? How many trips? How much fabric? What’s next? And next after that? And after that?
I’m not that old.
OK, I’m a little old. Old enough to realize that maybe we’re not meant to live our lives in such a constant hurry.
Richard Rohr, a Franciscan priest, has me thinking these days about what he calls the first half of life vs. the second half. The first half of life is pretty frantic…working, working, working to establish oneself, to acquire, to achieve and to “become.”
The second half of life (if we do it right, according to Fr. Richard) is when we’re better at giving it all back. Re-packaging, adding wisdom, paying it forward. Now, I’m certainly in the second half of life (even farther than that, unless I plan to live well into my hundred and teens), so I am feeling the need to do just that — down-size, slow down, appreciate more, waste less and generally live a bit closer to nature, to my origins. To leave a smaller footprint. To listen to what the world needs and not just the raging, never-filled loudness of my own concerns.
I think those of us approaching “elderhood” owe it to the next generation to be examples and thoughtful guides.
So with that in mind, I’m going to spend more time appreciating what is, and thinking about what needs doing vs. what I want to do.
Of course I will keep sewing and quilting. I have a room full of fabric that would be criminal to waste.
But what else needs doing?
That takes time, listening and contemplation.
I’m not an expert at this second half of life thing. Quilting friends will understand. I’m a UFO.
Once again I heard the expression “glamping.” This time it was referring to a new site in Michigan, called The Fields of Michigan…a blueberry farm that offers luxury tents on their property.
I am not going to judge anyone young enough or adventurous enough to want to spend a few nights outdoors. It can be fun. That has not really been my experience, but, hey, to each his own. For $329 per night, I’ll take the Four Seasons in basically any city or town anywhere.
But in honor of that time of year when people seem to want to celebrate camping, I am re-upping a blog post I wrote several years ago:
When is the last time you thought about where your quilting
stash comes from? Have you ever thought about the process, the transport, the
distribution? How many of us have ever even recognized on a conscious level
that quilt cotton is a plant?
If these questions seem abstruse or even mildly annoying,
you’re not alone. So few people care
about this issue. At least that’s the information I was given when I contacted
some of the largest distributors of quilting fabric around.
Moda told me there’s no market (that’s us) for organic fabric. Oh yes, they had one line of it a while ago and it didn’t sell terribly well, so…they don’t even carry any organic fabric right now. Fatquartershop.com who sells fabric online said they have nothing to do with the content of their products. In their copy on their website, they describe whatever a manufacturer tells them to say, and distribute on demand. Period.
Fabric designers tell me they do not get involved with the
fabric manufacturing process. They
license their designs and have no say in whether their designs are used sustainably/responsibly
or not. This may not be true for all of them, but it’s common practice.
So who makes the determination about whether fabric should be organic or not?
Surprise! It’s you. And me. We are the ones who define this market, and we will have to be the ones to require change.
The question is:
Do you think we need change?
Let’s talk about it a bit.
Because I’m going to make the case that we have no choice but to put
pressure on manufacturers to change their cotton growing processes. And we
might have to start with our local quilt shops.
Here’s why:
–70% of the world’s topsoil is degraded.
–It takes 1,000 years to replace 3 cm of degraded topsoil.
–With current farming practices, all the world’s topsoil will be gone in 60 years.
This is not my opinion.
This information is provided by lengthy studies done by the
Textile Exchange and reported in life cycle analyses done over spans of years.
Without topsoil, the world doesn’t eat, let alone quilt with natural fabrics.
I don’t know about you, but I don’t want to be responsible for
my kids and grandkids being unable to have food and clothing because of my
simplistic, uneducated (and, frankly, selfish) choices.
I’ve seen some people make the case that organic fabric requires more resources.
That is simply not true. Not when using any scientific methodology of measurement. Not when attempting to understand the life cycle of the product. And certainly not when we entertain the implications of the alternative. On the contrary, we now have clear indications that water use on organic farms is far less than traditional practices.
I don’t pretend to understand all of the information on these two charts, but the explanation for them was very clear: Organic farming of cotton greatly reduces water and other energy consumption, and continuing on our current trajectory is simply not sustainable.
Here is where we encounter the power of market forces.
You and I can demand that things change. Manufacturers, distributors and farmers, all have little reason to improve their processes. Inertia and monetary fears will keep them all from advancing to more sustainable processes.
But the science tells us that we will pay a price one way or another. As consumers, we either start demanding organic cotton now, or we will not likely have access to any at all in the future. The choice is that simple and that stark.
But I’m just one person.
What can I do?
-Ask your local quilt shop to carry organic cotton. Be assertive. Those designers that you love? Their designs can be made on organic cotton. But folks like Moda (who is a HUGE distributor of fabric) think you don’t care. I’m telling you it’s time to care and care deeply.
—Contact folks like Moda directly: marketing@modafabrics.com and let them know about your concerns.
–Do your own research. Here are a few links to explore:
Folks like Wrangler, H & M and Nike are starting to recognize that their own businesses will not be around if they don’t educate consumers on organic products, and make the industry more sustainable.
The organic cotton industry has increased by 11% in the US from 2016 to 2018. But that’s not enough. Where does our quilt cotton come from? India? China? the US?
I don’t have all the answers. But I will continue to follow up. In the meantime, I will continue to work down my stash of fabric, and I plan on only purchasing organic fabric in the future. This is a statement I can only make because I’ve done a bit of homework on this and believe it is the best path for me.
I’ll be exploring more of the current manufacturers soon. The good news is that there ARE organic quilt fabrics out there. We just aren’t aware of them.
I leave you today with a current picture of my own garden out back. Our Midwestern loam is the finest on the planet. Everything grows here. But we need to be responsible stewards of the land, of our money and of our resources.