Quilting a Large Quilt on a Home Sewing Machine

When folks ask me about quilting on their home machine, my go-to answer has always been: You’ll probably be OK with anything up to a twin size quilt. After that, it just gets unmanageable.

And, overall, I stand by that recommendation.

However, I’d like to add an amendment. As long as you are not attempting to do some really advanced level quilting, go ahead and try a large quilt on your home machine. (This one was 90 x 90.) But here are a few tips:

  1. Surround yourself with supportive tables and ideally a sewing machine cabinet designed for quilting.

As you can see above. I have a fairly large quilt table to support the weight of the quilt as it gets moved around. It doesn’t hurt to have a a cabinet that allows your machine to sink down level with the table.

2. I always use gloves. And this has a lot to do with personal preference. Some people get too hot in their hands, and I can understand that. But I love Machingers, as they are lightweight, fit my hands, and are machine washable.

3. Do 1/4 of the quilt at a time.  This way, you’ll never have more than half the quilt shoved up against the machine at one time. And I do mean shoved.

4. Avoid rolling your quilt. It’s simply impossible to do any type of freeform quilting with a giant roll on your right. Any good quilter will tell you to just bunch it up and straighten as you go.

5. Quilt from the center to the outside, always moving fabric away from your machine. Even as I type this, I recognize that there are times when you are moving up or down on the quilt and even occasionally in the wrong direction. That’s fine. As long as OVERALL, your are moving from middle to your right edge. That’s the beauty of working on a quarter of the quilt at one time. Once a quarter is done, spin your quilt 90 degrees (a quarter of a revolution), allowing you to work on the next quarter. Does that make sense?

6. Keep your quilting simple. Save the gorgeous, ornate, custom, refined work for the longarm. Or make yourself an expert on this with LOTS of practice. I don’t consider myself an expert yet on quilting a large quilt. It’s an awful lot of heft to shift around elegantly. I’d rather use machine embroidery for a more complicated design. But remember this: you are only working on about a dinner plate size area at any given time. After that is done, you need to shift your hands and the quilt.

As always with this hobby, if you’re not enjoying yourself, or are afraid to ruin something, then it is just advisable to pay someone to do your quilting. If, though, like me, you prefer to have a quilt that’s all “your own”, then don’t be afraid to try some things.

On the queen size quilt above, I knew that once it was washed, all I really wanted was that old-fashioned scrunchy, quilty look. I did some small/medium-sized stippling, with straight line quilting on the outer border of half square triangles. I threw it in the washing machine and all sins were forgiven. All that’s left to do is the label, which I’m hoping to squeeze in before the end of 2018, so I can declare this one FINISHED.

And as we all know, finished is better than perfect….though I am loving the way this came out, and my teenage son has already claimed it.

Have a Happy New Year and a wonderful and productive 2019! My next project is much more carefree and colorful. Here’s a sneak peak.

Happy Stitching–a sewing machine, a glass of champagne and a bit of chocolate would be a perfect way to start the new year.

Mini Quilt Accents

From time to time, I find myself just needing to focus on a small project with comforting and cozy colors. In this particular case, I had some parameters…it cannot be more than 16 in. wide.

Where do you find a quilt that size?

If you are familiar with Jo Morton, you can find them in her books.  She now has 3 books out with her “Little Favorites.”  These little quilts are wonderful as decorating tools.

The pieces go together pretty quick as I assembled this one in less than a week, working sporadically…one day for an hour, one day for two hours, etc.

The satisfaction comes from finishing something that looks nicely put together in no time.

I’ve been on the hunt for hangers and ways to display these little quilts. I found a gentleman at Quilt Fest in Madison who sells every imaginable type of quilt hanger.

I found a couple of things I liked but I’m sure I’ll go back to him as a resource. Just be sure to pay attention to measurements otherwise you’ll be fudging the sleeve and squishing your quilt.

Enjoy the process, because nothing warms up a house in the fall like a quilted accent. That and some apple pie.


More Freestanding Lace

Boo!

Machine embroidery has so many uses, but the one I’ve been dabbling in the most lately is freestanding lace. I’ve blogged about it a few times in the past. You can read those posts here and here.

Lately, I tried something new and I wasn’t sure how it would turn out. I took a simple lace embroidery, meant to be a small doily.

Then I stitched a number of them together after creating a design in software to see what it might look like.

Freestanding lace, Bernina Software 8All you have to do is use a simple zigzag with an open-toed foot on your machine.

Just pin the multiple pieces together and sew the zigzag in various points to hold it together.

Keep the zigzag stitch narrow and tight, and it will be hardly visible on the finished piece. I went forward and back-stitched, just to make sure it would not unravel.

The finished product turned out better than I had expected.

While I am using it now for Halloween, it obviously will be gorgeous for the holidays, as well.

I also have to admit that I am in love with these tiny LED lights, lit by battery packs. Of course, they cannot stay on all evening as my orange lights do around the fireplace, but the teensy ones on the Halloween tree and surrounding this ceramic pumpkin are just perfect.

Like those ornaments? I’ve made them over the past couple of years in machine embroidery.  You can search “Halloween” on my site or view one of the posts right here.

I hope I have inspired you to make more use of your machine embroidery.  It’s fun and festive and the ideas are endless.

7 Reasons to Own a Serger

I know. You’re a quilter.  Or maybe you enjoy machine embroidery. You don’t need a serger to have a happy life.

But I’m here to tell you that you can use it in many useful ways, even if you think you won’t.  If you never want to have one, that’s OK.  But let me try to persuade you just a little.

Why You (Might) Need a Serger:

  1.  To make quilt backs.  I use my serger all the time for this simple reason.  It is the fastest machine to do a very straight and very sturdy stitch on long pieces of fabric.  Afterward, I just iron the serged edge to one side. This is especially helpful when the back of the quilt is rather scrappy and I am assembling multiple pieces.  Just keep your edges straight, and off you go. Easy peasy.
  2. To make duvet covers. You may or may not want to do this, but I use a nice comforter on my bed that needs a duvet.  I always make my own, never purchase one.  I piece them together just like quilt backs.  Usually I have one print on one side and another print on the other, so when I flip the comforter I get a contrasting, yet coordinating look.
  3. Curtains and valances.  This is the very best way to make things for the home.  I have different valances for different seasons in my kitchen.  They get lots of washing and re-hanging over the course of the years. They have to be able to withstand all of that and a serger keeps the raw edges from unraveling. Of course, the edges that you will see are turned under but seams and ruffles really last with a serger.
  4. Pillow cases.  I use the easiest pattern for pillow cases ever (not the burrito style–google it if you don’t know about that.) The Ready Set Serge is great for simple serger ideas and I have used a number of her patterns over and over and over again.
  5. Garments.  This one is a no-brainer, but if you’ve never sewn garments, it may not be obvious to you.  It’s the best way to give your sewing a finished look without elaborate things like french seams or other couture techniques. This is the tool for quilters who occasionally sew a garment.
  6. Knits and any stretchy fabric.  Sergers were designed for this.  They can pound through sweatshirt fabric like nothing else. Leggings? Bathing suits? Stretchy fabric for a skirt?  All perfect on a serger.
  7. Simple bags. With the onset of the “bring-your-own-bag” movement, I have often found myself using leftover fabric (sometimes not-so-leftover fabric) as grocery bags, farmer’s market bags and carry-alls. I prefer cloth bags to anything else because I can throw them in the washing machine…and often do. The finished serged edges keep them from fraying and they withstand wash after wash.

I hope this persuades you to think again about a serger.  I know that for folks who do more garment sewing than I, the serger is priceless.  But even as someone who is mostly a quilter and machine embroiderer, I find that the serger is the perfect complement to my sewing.

And here’s the thing.  Once you have one, and learn to use it, you won’t know how you ever did without.

Happy 75th Anniversary Joann’s!

This August, Joann’s Fabrics is celebrating its 75th Anniversary by giving a gift to all of us who love fabric, crafts, paint, DIY, etc.

They are getting a makeover, and all I can say is: It’s about time.

I do like to go to my local Joann’s, but I can’t tell you how many times I’ve wanted to throw things on the floor at the checkout line (or the fabric line) and walk away. Either they don’t have enough help, or the help doesn’t care, or the place is just a mess or all of the above.

And yet, if I need plastic snaps, or a white button, or home decor fabric, or any number of sewing notions and I need it NOW, it’s the place we go.

They are starting with a name change…from Joann’s Fabrics to just Joann’s. Because they want folks to remember they are so much more than just fabric. (Honestly, I think that’s just their marketing department catching up to real life, because who of us already didn’t know that’s where to go for storage or plastic flowers or beads or…whatever.)

But the most exciting aspect is that they will be updating their 800 stores this fall and into next year.  They already have a prototype store that’s been updated in Columbus OH.

Who’s up for a road trip to Columbus?

New features in Joann’s stores:

A cutting bar:  You’ll be able to check in, and get a text when your fabric is cut.  In the meantime, you can wander around the store. Anyone who’s ever stood in line while folks dawdle and chitchat or worse, know this can be a frustrating and time-consuming wait.

Creator’s Studio: I love this idea. You can rent a sewing machine, grab a cup of coffee, a cookie, or attend an event or class. The studio is positioned in the middle of the store, not shoved away in a corner.  It’s meant to revolve around community…possibly a place for bees to meet? I don’t know how this will work but am anxious to see it in action.

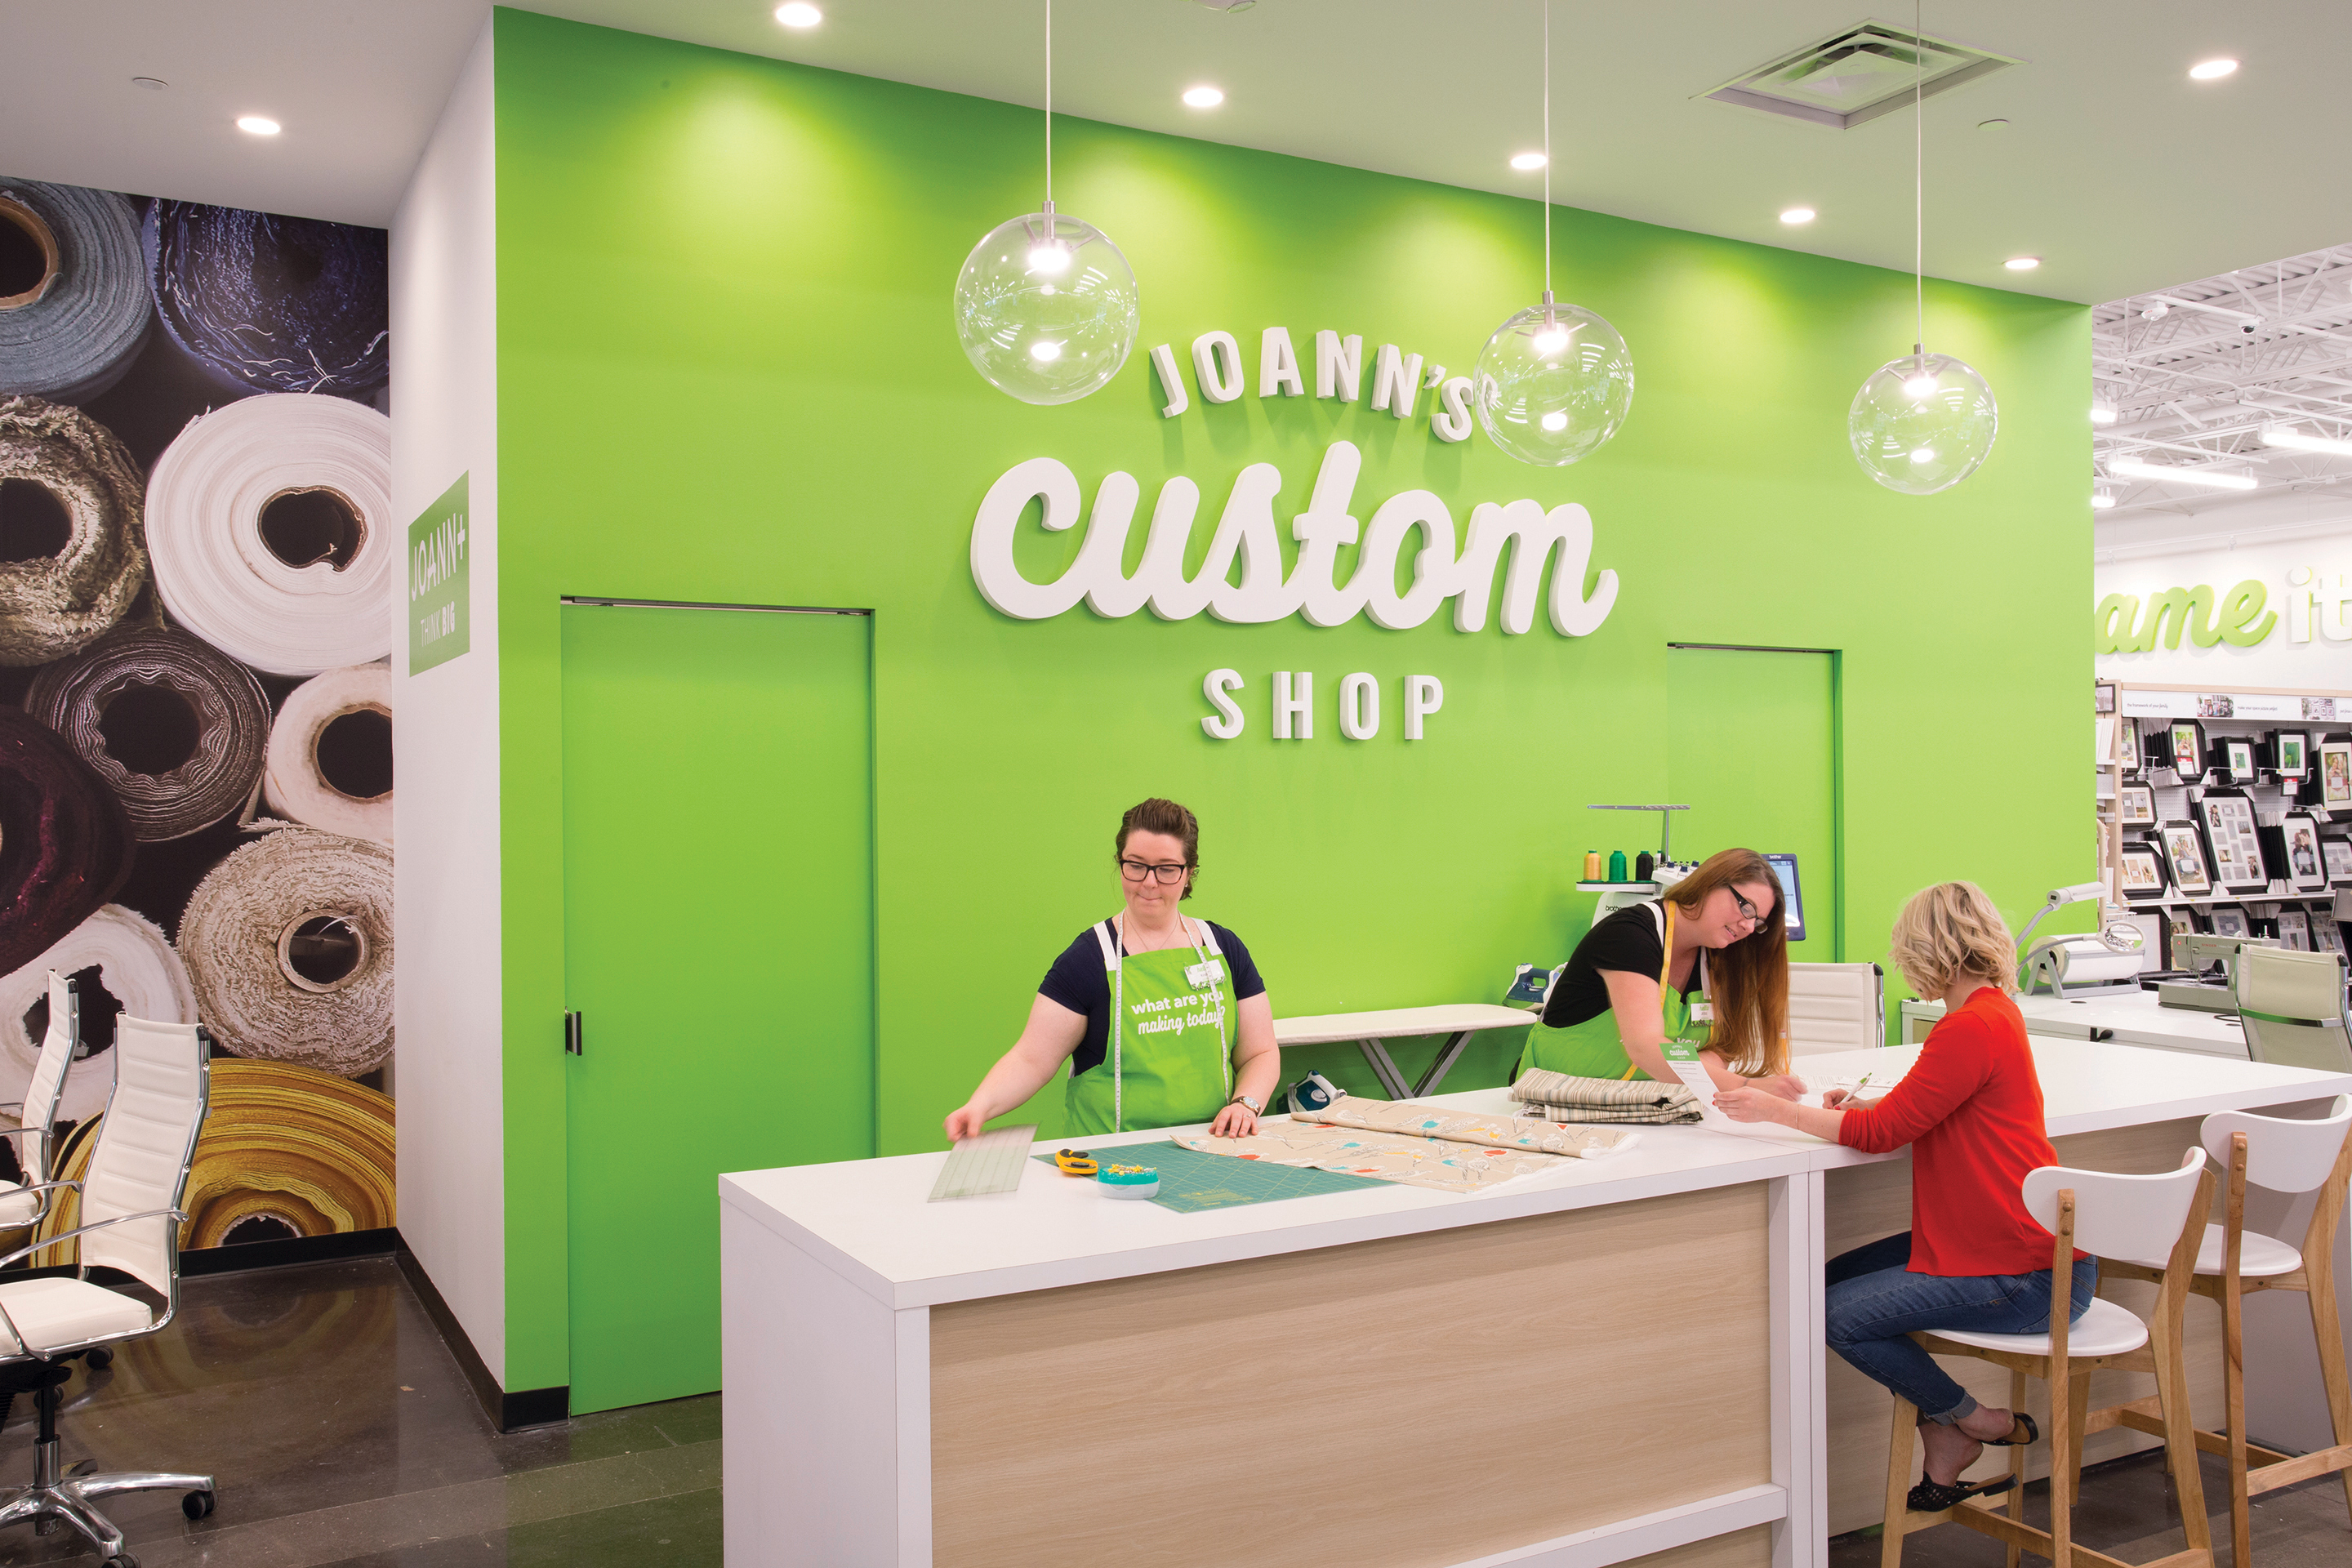
A Custom Shop:  Tailoring, custom design? Sounds like they are working toward a specialization that very few other places have. (With good reason.) I’m guessing this would be a place for alterations and some custom services, possibly home dec.

Expanded merchandising:  They are planning on carrying more sewing machines from different manufacturers, for every budget.  Obviously, this gets complicated because sewing machines need service, but we’ll see where this goes.

All of this is great news for anyone who loves crafts of any kind. And we already know that all crafts overlap. Sewists are often also knitters or scrapbookers or bakers (or gardeners…hey, Joann’s don’t forget about that!) We need a place to go that’s inspiring and caters to customers’ needs.

Of course, we still love our independent quilt shops, and they will ALWAYS be our first choice for quilt fabric. But in a world where so many shops are disappearing because of online competition, it’s good to know that someone is investing in us.

And in our $3.7 billion in discretionary spending.

Do Your Flying Geese Need Their Wings Clipped?

I’m not terribly big on specialty rulers, but I do have a few.  Mainly, I find that I purchase a ruler, use it once (maybe) and then have to find a place to store it for all eternity.

I am guilty of that with my WingClipper from Studio 180.

I had it for over a year and never even took it out of its original packaging.

Then, a couple of months ago, I did some layout/design work for a good friend who is a Studio 180 Certified Instructor.  In return, I asked her to show me how to use the tool efficiently.

If you are in the Midwest, you can contact her and book her for classes.  Her name is Lydia Ziegler and her contact info is themeasuredstitch@gmail.com.

I am planning to begin work later this summer on a project I downloaded from 3 Sisters.

I know I downloaded this for free, but for the life of me, cannot find the link any more. But it is a pattern that is available out there, even if you have to purchase the download.

UPDATE: A friend found the link for the free pdf.  Here you go! (Thanks Tomi!)

It looks like a pretty good challenge, and I will be using Laundry Basket Quilts’ Blue Barn Collection (shown below.) It’s getting to be a couple of seasons old so the fabric is no longer readily available everywhere.  Luckily, I think I have plenty.  But I guess I’ll find out.

As you can see, I’ll be doing plenty of “flying geese”. The medallions are gorgeous and truly intimidating to me, but the flying geese?  I can tackle those…especially now that I have made friends with my WingClipper.

This is pretty straightforward piecing and trimming.  The instructions that come with the ruler are very clear and helpful, and if you want a class, see Lydia!

The reason your piecing stays so accurate is that you create everything slightly oversized and then trim down. You are provided info for multiple sizes.  It’s really a great way to approach any pattern that has flying geese.

Give it a try, and let me know what you think.  I will be embarking on my adventure within the next few weeks.

Til then, may your goose be hanging high.

Persistence Pays Off

Believe it or not, I found my fabric. Awhile ago, I wrote a post about a line of fabric I fell in love with, and all I had was a layer cake to use (40 pieces of 10 in. x 10 in.)

I searched at different shops, but because I no longer knew the name, it was basically impossible to find.

And then I stopped at a quilt shop I haven’t been to in a number of years. I seemed to recall that this MAY have been the place where I purchased the layer cake almost a decade ago.

The shop is hidden in the cornfields of Illinois, on a farm. When you pull in, it feels as though you are pulling into someone’s private property, and frankly, you are.  The quilt shop is located in an out-building, in back of the farmhouse. Two dogs run to greet you as you enter. Sam, the chocolate lab, is extremely friendly and looks perfectly at home lying on the braided rug at the entrance. The other dog (whose name I can’t remember, is more hesitant…a  spaniel mix of some kind, I would guess. But eventually, he warmed to me as well.)

I brought out the cutting samples that I carry with me, and turned to the owner.

“Before I waste a lot of time, do you think you have any of this fabric anywhere?”

The quiet woman took the samples in her hands and slowly wandered to the back of the shop. She ran her fingers over some scraps, and thoughtfully pointed, “There’s a bolt.”

She continued to scrounge through her clearance fabric and one by one found beautiful remnants of the fabric. A yard here, a yard and a half there, another yard here.

I was thrilled.

We found enough for the back of my 80 x 80 in. quilt, and more for any accessories I might like to add. All at clearance pricing.

9 yards total, and I felt like I had won the lottery.

The name of the fabric line is Evening Mist, by Sentimental Studios, for Moda.

And the name of the shop is Basketcases in Clare IL.

Above, over 120 – 4 1/4 in. 9 patch squares. The quilt still has a long way to go.

But I feel complete.

When Your Sewing Machine Needs to go to the Spa

Well, I finally broke my machine.

Actually, I’m not sure I did anything wrong.  I just changed thread colors during an embroidery, started the machine up again and WHOA.  Needle broke and gears of death appeared.

It’s all OK.  I cleaned everything out and could only find 2 pieces of the needle.  A tiny tip is missing.  Normally I can set everything back to normal and just continue, but I think that little needle tip is scraping somewhere, so off to the tech we went.

Tech Update for Bernina 7 Series Owners

I chatted with my new tech for a while and told him about my machine issue.  He asked me if I knew that we were not supposed to oil in the top reservoir any more.

I did not know that.  I had heard some buzzing…questions from customers around the time the shop I previously worked for was closing.  However, we had not received any definitive information from Bernina at that time.

So here’s the deal:

–If you own a 7 Series, DO NOT put oil in the red-ringed reservoir under the stitch plate.

–DO oil the two felt pads in the hook and around the outside of the hook.

Heirloom Creations has a nice video showing and explaining this.

It’s important to know about this change.  If you purchased your machine longer than 6-7 months or so ago, you were likely taught to fill that red reservoir, and keep it filled.

The tech told me that too much oil was spreading, not only into the hook but also getting into the auto-thread cutter, and pieces of felt were working their way into the mix as well. I remember our tech at the store showing me how the machine looked with the thread cutter pulled out and oil getting on everything. At that time we had not heard the official “fix” from Bernina. Now it’s here.

With that resolved, I now have an embroidery design that’s not complete.

See those cute little flower buttons?  They are supposed to be embroidery.  Luckily, my “breakdown” occurred in a convenient place, and I think I can just add those flowers instead of embroidery.  Not exactly perfect, but it’s effective and I think it will work.

I’ll share the rest of the project as I get further along.

I’m determined to THINK SPRING. It has to get here eventually, right?

In the meantime, of course I have another sewing machine that I can use to continue piecing my quilt project. And it won’t hurt for my larger machine to be in the spa for a bit.

Old World Re-Discovery

I re-discovered a layer cake (10 x 10 in.) of this fabric from Moda that had been hiding in my fabric stash for a decade. Not exaggerating.  I no longer know the name of the collection. I tried to find more of it online, and it’s basically unavailable.

Now, like many of you, I have stashes of fabric that just don’t interest me any more. Sometimes I look at something I own, and wonder what in the world I was thinking. It’s dated or seasonal, or, heaven forbid, it was trendy and had a shelf-life of about 15 minutes.

But that’s the stuff I give away.  And, frankly, over the last few years, I’ve done quite a bit of giving away.

But this Old World fabric (that’s the name I’ve given it), is still fabulous.  Every time I look at it I think of Europe, of Jane Austen, of carriage rides and chats by a fireside, and afternoon tea..and maybe a croissant.

I still love it.

And so I recently found a pattern that’s perfect.

That’s a picture of the pattern on the cover of Miss Rosie’s Farmhouse Favorites. While it’s not a complicated quilt, it’s not terribly simple either.  Especially since the pattern calls for fatquarters and all the cutting instructions are tailored for that. As usual, I am switching out colors and modifying the instructions to accommodate the fabric I have and not what is called for in the pattern.

I have been cutting for days.

And I’m still not done as many of the squares will end up cut into quarter and half square triangles.

Still, because I fall in love with these fabrics anew each time I look at them, I am willing to start a project without thinking about how many hours it will take me to complete.

It’s like having a baby. Whatever you do, don’t think about how much it will cost or the hours of your life you will spend devoted to that project.  Don’t think about diapers or doctors’ visits, or bumps on the head, or homework, or cub scouts (or girl scouts) or spills on the sofa or orthodontic appointments or puberty or girlfriends or boyfriends or college exams.  Don’t think about the worry, the tears, the laughter, the arguments, the sleepless nights, the unexpected hugs.

It’s all just process.

And when we think too hard about it, we end up doing nothing at all.

So for today, I will enjoy.  And after all that cutting, I can finally start to sew.

The Zen of Mindless Sewing

Cake Mix Recipe, Layer Cake Mix, ModaIf you’ve never used one of these Cake Mix Recipe packets, you’re missing out on one of the most relaxing ways to sew.

All you need to begin is:

  • 10 in. layer cake of 42 squares, various colors
  • 10 in. layer cake of background fabric, all the same color. (Option:  2 – 10 in. layer cakes of background grunge fabric.  They normally come 20 squares in a packet, so you’ll need at least 2 packages.  I then purchased another fatquarter so that I had a total of 42 squares.)
  • Your choice of any 10 in. Cake Mix Recipe from Miss Rosie’s Quilt Co.

You can see above, that I chose to use a Tula Pink layer cake…lots of bold colors, paired with a Moda grunge that was very neutral.

All you need to do is layer one brightly colored 10 in. square against one neutral, right sides together.  Then just take one sheet from the recipe pad and follow the dotted lines when sewing.

Don’t forget to decrease your stitch length.  I lowered mine to 1.60. This makes the paper easy to perforate when you pull it off.  If you’ve ever used Thangles in a past life, this will all seem familiar.

But here’s where it gets relaxing.

Friends, you do not have to worry about perfection, except to follow the lines. Your paper can be slightly off center. If you’ve ever used layer cakes you know that no two manufacturers cut them exactly the same way, so they never exactly match up.  But it doesn’t matter. You have a good 1/2 – 3/4 of an inch all the way around as excess. It all gets trimmed off.  Just get it close to layered correctly and don’t worry. Follow the arrows, sew on the dotted lines, cut on the solid lines.  That’s it!

With these Cake Mix Recipes, you’re working entirely with half square triangles.

When cutting, if you have a rotating cutting mat, that really helps, so I would recommend using one. But here’s another little tip:  Use one of these clover rollers instead of pressing with an iron.

I fell in love with this little baby a while ago when I was making 1/2 in. half square triangles.  Yeah. 1/2 inch. Try pressing that.  Anyway, the tool works best when you are pressing only one seam open…perfect for this task, and any half square triangles.

As usual, I’m not sure where this is headed.  My chosen blocks will look like this, and I’ll just have to wait until I get more done to see how it comes together.  But that’s the fun of it, right?

I don’t have to think much.  I just sew sew sew.

Eventually, it all comes together.  Just like everything else in life.

Mindfulness gets a lot of press these days.

But sometimes, over-thinking is over-rated.