Free Spirit Fabrics is Shutting Down

UPDATE: PLEASE READ THE UPDATE. FREE SPIRIT HAS BEEN ACQUIRED.

Free Spirit/Westminster Fabrics announced yesterday to their designers that they will no longer be distributing fabric.

This includes some big name designers:  Tula Pink, Kaffe Fassett, Amy Butler, Anna Maria Horner and Denyse Schmidt.

What does this mean for us, as consumers?

Well if you are fans of these designers, their future products are currently up in the air. Free Spirit says they will take orders from quilt shops through May 31, so likely this is everything shown to shop owners at Quilt Market this past fall. This just goes to show how far in advance the pipeline is for fabrics. Products that stores are ordering right now are already in the works overseas…commitments have been made, which means $$$ have been exchanged, and at the end of the day, the products need to be sold to you…preferably at a profit.

Tula Pink is going live today at 2 pm Central time on Facebook and Instagram (Feb. 13) to talk about the future of her fabrics.  We’ll all learn a bit about it then.

Update on Tula Pink fabric:

Her solids are already in the stores. Whatever is there is what’s there. All Stars will ship to stores.  De La Luna may or may not ship, but may transfer to whoever she partners with next.  She is planning to continue designing fabric and is weighing options with new distributors. (She has a great attitude, if you have a chance to see her response, be sure to look it up.)

As for the other designers, I’m sure they will each make decisions based on their own opportunities and interests.

Stay tuned!

You can read about the details of the shutdown here.


Buttoned-Up Valentine

Every year, I make something silly as a Valentine for my husband. I’m not sure what inspired this project, possibly something on Instagram which I then added to embroidery software and used the supplies I had at home.

This year the theme was buttons.

The world is exploding with buttons these days. I tend to gravitate toward the antique ones. I’ve been known to hang out in an antique shop and just sort through all their old buttons, searching, searching. When you find the one that’s perfect, it’s a real treasure.

Bernina makes a button sew-on foot that I’ve used many times. The holes on buttons are set a standard distance apart. Therefore a stitch set at the right width will just sew it on, and most Bernina machines have this stitch in the buttonhole section of stitches.  However, I’ve taught the use of it to others and, honestly, some people get it immediately and some people just have a harder time, and need more practice.

Here’s a link to the Bernina instructions.

Some tips:

–If you are just learning, choose a medium-sized standard button which is relatively flat. This is the easiest type of button to sew.

–If you have a 7 Series machine with “hover” you may want to turn it off in settings. The button can move around otherwise, and that’s not helpful. Use the freehand system (the knee-lift that lifts the presser foot) so your hands are free to adjust the position of the button.

–You can continue to use the hover if you are good at holding the button in place until the first few stitches are taken.

–ALWAYS run the first few stitches slowly by using the handwheel to check needle placement. I usually use the handwheel until the needle pops over to the second hole to make sure it fits nicely in both holes.

–Run the buttonhole stitch twice per button. The first time never seems to be quite enough for me.

–The screw on the foot allows you to adjust the height of the rubber pad for thicker buttons.

–Smaller buttons, though they may still be standard-sized, often benefit from reducing the stitch width slightly.  After you do this enough, you’ll get a feel for the sizing.

Once you get used to using this foot, I promise, you will never want to sew a button on by hand again.  If you break a needle or a button (it happens) don’t worry.  It’s scary, but don’t be afraid of your machine. I do wear glasses when doing this because you can break a needle doing just about anything on a sewing machine. And I also need to see!

Have fun with this.  If at first it seems a little tricky, don’t give up! These feet are engineered to make your life easier.  Take advantage of them!

New Chair vs. New Upholstery

We needed new counter chairs.  I went to furniture stores, I got pricing online and read through dozens of reviews on popular (and some not-so-popular websites).  Honestly, I tried.

New counter chairs are not outrageously expensive.  Decent ones range from $80-200 each.

After much discussion and deliberation, I realized that none of them were as sturdy or as absolutely perfect for our bottoms as the chairs we already owned. Even worse, I would fall in love with a new style, read the reviews and find out in some obscure review that the chair was an inch shorter than described.  To some, that may be of little significance. To someone of my stature, it’s a deal-breaker. Without that extra inch, I am Lily Tomlin in the rocking chair. (Kids, you can google it.)

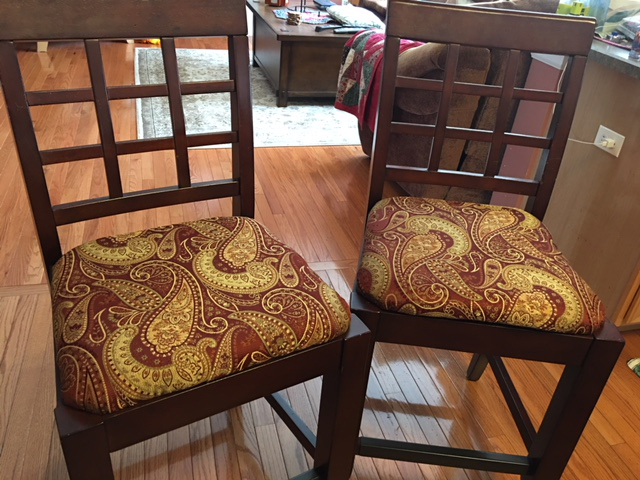
As you can see from the image, our old green fabric is worn, stained (I think my son may have spilled something on it 12 years ago), and finally, it is just plain disintegrating.

I know absolutely nothing about attempting even mild re-upholstering, which never stops me from actually doing it.  Folks, it looks easy enough, it really does.  Examine how the chair is put together, take it apart and then put everything back in reverse order.  You can do this!

Until, of course, you begin to take out the old upholstery staples.  And then you are in for a surprise.  Hope you are someone with upper body strength because that’s what it takes. But I’m getting ahead of myself.

–The first step, is, of course, the most fun.  Get yourself over to a JoAnn’s or a Hobby Lobby and find some choices of fabric.  I know I have said that I am not inclined to purchase garment or quilt fabric at these places (still believe this).  The same is not true for their Home Dec fabric.  They have a really nice selection, unless you are insistent on designer stuff.  Even so, I believe I have seen Waverly and other reputable fabrics there.

— I chose two fabrics, and this one was quickly dismissed as my teenage son said             it looked like vomit.  (My deep apologies to the designer. Perhaps you’ve never had a teenager in the house.)

–After that comment from someone who normally has no strong feelings about anything decorative, I went with the red paisley . I also purchased a couple of 2-inch cushions made of foam.  They seemed likely enough to do the job.

–The next step is to take apart the chair from the bottom and begin removing the old backing, cushion, and fabric by removing the staples. I did not have the special tool for removing upholstery staples and ended up using a hammer, screwdriver and pliers for the task.  I don’t recommend this.  Spend $12 and get the tool.  For my next project, I will have one.

Everything on these particular chairs was attached to a piece of 3/4 inch plywood, which was perfectly fine for re-use.

The old cushion was so smashed and unuseable I could not possibly refer to it as a template.

So I took the plywood up to the sewing studio, set it out on my cutting table, and put the cushion underneath.  I cut the cushion with about 1/2-inch to 3/4-inch extra on each side. This was important, as the cushion cut to the exact size of the plywood would actually be too small once the fabric is pulled down around it.

I gave myself plenty of “pulling” room when I cut the fabric.  That could always be cut down once the stapling was done.

–The biggest step required two people and an electric staple gun.  One person to pull the fabric, the other to staple. I’m sure it’s possible to do this alone, but it was a lot easier and a lot faster to have four hands…as long as both are careful with the stapler.

The end product honestly feels like two brand new chairs.  I’ve long been drawn to re-upholstery.  But there’s a definite learning curve and I needed to start small. You can also get hurt.  Staples don’t always come out whole, and there might be a fragment left in the wood, waiting to shred your arm or hand.  Or worse, the hammer or screwdriver can slip causing all manner of cuts and bruises.  Take your time.

In the end, I am thrilled that we did this instead of settling for new chairs we really didn’t like all that much.  This way, we have the perfect color and fit.

Small triumphs are worth it. And no one in the house thinks they look like vomit.


Document Your Quilt

This week, I finally finished my Splendid Sampler quilt. (And I promise, this is the last post I will be writing about it. If you are still working, I would love to see yours…post to Instagram #SplendidSampler.)

Anyway, I got to thinking about the way we document quilts.  Everyone does it differently, and plenty of folks don’t label their quilts at all.  What a shame!  I think all quilts deserve a label, even if it’s just your signature at the bottom.  They take so much time and effort. While we are working on them, we spend time thinking of the people who will receive them. Life is going on around us while we are sewing.

I remember one of the first quits I ever made was done in the aftermath of 9/11.  So much of the news, the change in our lifestyles, the culture, all got sewn into that quilt.  It’s nothing special, just a Christmas quilt sewn in flannel and hand-tied.  But I never made a label for it.  I just tucked it away. Even now, when I pull it out, it brings me back to that time when we were all huddled around our TV sets getting information. And it brings me comfort.

So now, when I create labels for my quilts, I try to capture the moment or at least the sentiment that carried me through the project.

You can do this many ways.

I have embroidery software and am comfortable using it.  However, I know a lot of people who create their labels in Word or something universal and print it out onto fabric.  Printed Treasures printable fabric works well for this purpose and so does the printable fabric from Electric Quilt.  Just follow the directions.

You can also just hand-write the label with permanent ink.  Some people like to sew it into the binding in the corner. Others, like me, just like to hand-stitch it to the back of the quilt.

Whatever your chosen process, just make it your own.  When you give quilts to people, you’ll find that after enjoying the initial beauty of the quilt, they are always charmed a second time by the label, the sentiment, the love.

It’s like the card, the thought, the capture of that moment in time. And even if it’s only for yourself…ESPECIALLY if it’s only for you and your family. Take the time to document.

Your effort is worth the credit.

(I deleted particular names off the labels for privacy here.)


The State of the (Sewing) Union

Friends, Quilters, Sewists, Designers, Artists and Fiber Lovers of all flavors:

Today we gather to review the state of our industry, and to hold a mirror up to ourselves – – for the fun of it.

The 2017 Quilting in America survey just came out.

The main headliners: 

  • 7-10 million total estimated quilters in the U.S.
  • $3.7 billion in total estimated quilting industry spending for 2017. (Holding steady from 2014, which was at $3.76 billion.)
  • $442 is the amount the average quilting household spent in 2017. (Up by 48% from 2014.)

The survey found two main groups of quilters: Dedicated Quilters and Under 45 Quilters.

Dedicated Quilters:

  • Female
  • Average 63 years old
  • Well educated (70% went to college).
  • Affluent ($95,900 household income).
  • Spends average $3,363 per year on quilting.
  • 85% prefer traditional style, 37% modern quilting, 20% art quilting.
  • Account for 72.2% of total industry expenditures.
  • Purchased an average of 99 yards of fabric the last year (Well, this made me laugh.  How many quilts can you make out of 99 yards of fabric? Quite a few. Hence, the reason we all have a wonderful stash!!)

Under 45 Quilter:

  • Affluent ($98,000 household income)
  • Prefer modern quilting
  • Websites (75%) and online video (63%) play a stronger role for education and inspiration than total sample
  • Blogs are important to this group
  • Even though they are employed, they still devote 10+ hours a week to their craft

Some things to consider: 

  • 97% of Dedicated Quilters are purchasing fabric in person at a retail location. But 66% also purchase online.
  • 83% of all quilters will purchase 100% cotton thread (hello Aurifil) in the next 12 months.
  • 54% purchase batting in queen size
  • In the last year 26% purchased a new sewing machine. Average price $2212.
  • 50% of Dedicated Quilters use social media, like Facebook. (Up from 14% in 2014.)

But what’s happening in the garment industry?

If you are a garment sewist, you have seen some major changes lately as well.  Many quilt fabric distributors are now also featuring rayon and denim in their current lines, and often include garment patterns as part of their collections.

CSS Industries, Inc. now owns: Simplicity, McCalls, Butterick and Vogue.  That’s a LOT of consolidation.  Why?  Because new indie designers and pattern makers are basically taking over the industry, and leaving the old brand names in the dust.  Those “Under 45-ers” listed above want to sew their own clothes.  They want it in their own patterns and in their own sizes.

But the old guard garment industry didn’t realize that patterns as currently packaged are incoherent to someone learning on their own.  In the old days, of course, your mom or grandma taught you to sew clothes.  That doesn’t happen any more and younger sewists need help. Along came sites like colettepatterns.com.  (Patterns that teach, in current trendy designs.)

Furthermore, distribution channels are basically gone for garment fabrics.  JoAnn’s, Walmart, Hobby Lobby?  Please. If you’re making a Halloween costume, sure.  But something you want to wear and spend some time and effort making by hand? Not a chance.

So where does this leave the state of the sewing industry?

In a creative and strong place.  With the Nextgen sewists/quilters already on the rise, and technology and social media filling the gaps in learning curves (not to mention our physical curves like cashmerette.com), the industry is poised for change and growth.  We seem to be insatiable in our desire to create and to learn and to connect.  Social media makes all this possible in fresh ways.

Yet we are still addicted to the feel and touch of fabric, making me believe that we currently have a brick and mortar “hole” to fill. Who will transform the retail and customer experience for us? Who will bring the online and offline advantages together?  Consider it a challenge.

And let the sewing games begin.  Happy 2018!


Splendid Sampler on the Move!

Finally, I am moving forward with my Splendid Sampler quilt.  I wrote about it here and here.

I would like to say that I completed all 100 of the blocks, but alas, life happens and I am a firm believer in stopping while I’m ahead.  At first I did every block that came my way, regardless of the techniques.

I quickly realized that I never want to sew hexies.  I mean *never*. Especially not 1 inch ones.  And I realize that I may make enemies this way, but not everyone likes the same thing and that is just fine.  If you love tiny hexies, bless your heart. If you like bunnies and squirrels on your quilt, bless your heart as well. And if you really love tiny paper-piecing, you’re probably going to heaven too.

It is laid out in our foyer, and I am finalizing the way to finish it.  As you can see, I was pretty strict about the color palette.  Thankfully, I still love the colors.  Something about the neutrality of it makes it slightly less traditional.  As you can see, I’ll probably stick with the dark inner border and a “piano key” outer border. I have so many scraps left over, I will easily be able to use them up as the border. I gain a little size there too.

I vowed a long time ago not to make quilts that are larger than twin size because:

  1. I have no room to store them.
  2. I don’t want to pay someone else to quilt them and I absolutely cannot handle queen size on my domestic machine, at least not with any quality.

But I did learn some new techniques.  And I reignited a love of hand embroidery, which is quite popular right now.


It really does take a lot of time.  As you can see, the left side is done by hand, the right side I just digitized and stitched out in machine embroidery.  Sometimes the new block would be announced and I would think (I’m being honest here), “Not another hand embroidered block. I don’t have time this week.”  At that point I was reminded of  Indiana Jones in the scene with the Samarai wielding the giant sword. Indy, exhausted,  whips out his gun and shoots him. After days of finishing one hand-stitched block, if another came up, I just went to the computer, digitized it in software, and within an hour, machine embroidered the next block.  It’s cheating, I know.

But it looks great.

Over 20,000 quilters started this project back in February 2016.

I would love to know how many finished a quilt!

And So This is Christmas…

And what have you done? Another year over, and a new one just begun.   –John and Yoko

Bah Humbug.

Sigh.  This time of year I don’t want to hear any more holiday songs. (Unless of course it’s “Celebrate Me Home” by Kenny Loggins, which I can listen to over and over and never get tired.  Here you go…a crazy live version.)

Not to be confused with Same Old Lang Syne by Dan Fogelberg, which I listen to for one week every year (between Christmas and New Year’s) and tolerate for its simple wistful loveliness.

But John Lennon haunts me.
Every year at this time, he asks what I have done and reminds me that I’m another year older. And the haunting part is that he’s not. He is timeless now, with his music still playing everywhere.

What HAVE I done? What have you done?  The only thing I have to show for this past year is my work.  So here’s a little gallery of this last year’s finished projects.  And some that might be not-so-finished.

“A very Merry Christmas. And a Happy New Year. Let’s hope it’s a good one, without any fear.”


Going Against the Grain

If you’ve ever done any garment sewing you know that:

1. It’s not easy.

2. If you don’t know what you’re doing, you better follow that pattern EXACTLY.

Well, I’m not much of a garment sewer, although from time to time fabric tells me what it wants to become and my job is just to do what it tells me.  That’s how it was with this delicious fabric from Cotton and Steel.  It’s really not an easy line to piece into a quilt as it doesn’t lend itself to small cuts.  But it was just calling out to me, begging to be made into this vest.

And so I bought it and set it aside until I was ready.

You can see that the line on the pattern indicates that the pattern should lay on the fabric the way it’s shown in the pic above —  grain line parallel to the selvage.

But that wasn’t the vision.  I wanted vertical stripes in front.  So I began my research.  What will happen if I ignore the grain line?  Will the shape be distorted?  Will the vest not lay properly?

I turned to the Internet where the general consensus seemed to be:  Always follow the grain line. Unless you don’t want to.

Actually, most people were specific. If you wanted a pattern to run a certain way, then It’s OK to cheat the grain line a bit.  Especially on a fabric that is not stretchy.  Since I’m working in a pretty tight woven, I thought…I’m going for it.

So I cut out all the pieces, along with a liner.  The pattern I was using was from Indygo Junction (Modern Silhouette Vest).

As usual, I did not follow the pattern completely.  I wanted it to be lined and reversible, so I modified along the way. I actually assembled the entire vest, then the entire lining, and pinned them right sides together. Then I stitched around the outside of the whole thing (very much like making a bag lining.) I also went back and serged all the unfinished edges. I left a space in the back hem to turn inside out.

***Do not sew the armholes together when it is inside out.*** Ask me how I know.

When I teach, I often tell students “Don’t worry. I make the mistakes, so you don’t have to.” It gets a chuckle, but it’s truth. I make a lot of mistakes because I try a lot of new things. I’m as comfortable unsewing as I am sewing. The seam ripper is your friend.

As long as the armholes are still raw edge,  the whole thing can be turned inside out and pressed.

You can finish the armhole by overlocking the right side and lining separately, and then turning them both under and topstitching. It forms a neat finish, with all seams hidden. The last step is to topstitch all the way around the vest and in the process turn under the back hem which was left open when you turned it inside out.

All seams are finished and I can wear it either way.

The back is pieced as well with the same line of Cotton and Steel fabric.

Final step is to add a button in front.

I think I really worried needlessly about the grain line.  It lays just fine, and the little pandas were cut on grain.

C’mon, that fabric is cute!

The bottom line is this: Don’t worry about the grain line QUITE so much when you are working with a medium or tight woven. Anything stretchy, and all bets are off.

Go ahead, try something new.

And don’t be afraid if it goes against the grain.

What Inspires You to Create?

You’ll find no shortage of social media out there:  Facebook, Instagram, Pinterest, Twitter.  Every single one of them is loaded to the brim with lively “inspiration.”

People tell me, “It’s where I go to get good ideas.”

Yet, social media is a double-edged sword. So many things come our way to discourage us on our way to creativity and inspiration.

Short list of inspiration-killers:

–Someone will always be better than you at whatever it is you want to pursue. They have more time, more money, more resources, more experience, or more years of life ahead of them.  And let’s face it, they often have better ideas.

–You’ll waste time on social media.  Yes, you will see pretty things.  But you are more likely to get discouraged than to be inspired. It’s the nature of the beast. (By the way, that’s also the reason that new studies are showing that the more time kids spend glued to their phone, the more likely they are to become suicidal.  This is especially true for teenage girls.  Don’t think adults are so very different.)

–Life gets in the way. We’re busy and pre-occupied with raising our children, working, caring for other family members, getting side-tracked by every day chores, like home repairs, grocery shopping, health issues (our own or that of loved ones.)

So what can we do?

Some ideas:

  1.  Take a walk in nature.  Get to the woods, the trees, a botannical garden, your own backyard, a local forest preserve, any place not overly occupied by humans.  Notice the birds, and the other tiny things. The change from flower to seed, the turning of the seasons, the smell of the air, the sky on any given day. Listen. Is wind rustling? Which birds do you hear? Are you near water?  Crashing waves or trickling creek? Is it starting to freeze? What patterns do you see?

2. Visit some place new. Extensive travel to other countries is fantastic, but we’re not all willing and able to do that. I recently drove a half hour from home to a tiny shop that sells Polish Pottery.  I’d never been there. The owner was a bubbly young lady, and had just moved into a new building.  The shelves were filled with bright, cheerful pottery, hand made by women an ocean away. Lovely.

3. Learn something new. This could mean anything for you. Attend an exhibit. Take a class at the local community college or park district. Or easier yet, read a book.  I recently saw a statistic that said that 30% of college graduates never read another book once they finish school.  80% of families have not purchased or read a book in the past year.  How is this even possible? I’m not entirely sure I believe the statistics but the trend is discouraging. We already know that reading books makes people more empathetic. Where are we headed?

A book suggestion to get you started:  Leonardo Da Vinci by Walter Isaacson.

It’s a peak into his journals and famous works, as you also travel through life with someone totally committed to his art. Think you already know everything about him? I bet you don’t. Some of his geometric studies would make fantastic quilt patterns. Granted, he lived in a time when diversity, architecture, aesthetics, craftsmanship, and great art were all honored and appreciated at the highest levels of society.

Let us recommit ourselves to advancing the arts, in ourselves and in our society. Get out into real life. Experiment. Enjoy a visual and auditory feast.

And step away from social media for just a bit. It will be there when you come back.

I promise.

Of Endings and New Beginnings

The quilt shop where I worked closed this week.

I don’t think very many people understand what a small quilt shop does for a community.

Yes, we sold machines and fabric, notions, patterns, doo-dads and what-nots.

But that’s not what a quilt shop is all about.  We also provided support.  And inspiration.  And education.

And friendship.

We loved our customers and became close.  And they came to visit us when they had enough of the outside world, when they needed a place to unload, to unburden, to be among like-minded people.

We celebrated with them and mourned with them. And they with us. We all grew together and processed life through cloth and fabric, needle and thread.

The purchases?  They were just an extension of all that wholeness. We didn’t close because we weren’t doing well.  On the contrary, the shop was doing great.  But sometimes life intercedes and the owner was unable and unwilling to deal with the crushing demands on her time from her home life and work life combined.

I could go on about the number of quilt shops in this area that have recently shut down, or the economy, or the aging of the quilt-making market.  But I know better.  I’ve been around long enough to see that to everything there is a season.

I was fortunate enough to work there from the time that my son started first grade to the time he entered high school.  What a season!  From crayons to perfume…or deodorant, in this case.

I know that these things are cyclical. The market will re-emerge in a different way. Our customers will find their way to new and exciting shops and relationships, and the world will keep turning.

I will never stop sewing. In fact, I have some new and interesting plans for this blog. Endings provide the catalyst for new beginnings. Stay tuned.

Straigh line quilting on domestic machine

Here’s the quilt I was working on from my last post.  Completed, just need to add the label. Crazy squiggly lines through the color, straight and narrow through the grey.

The ombre blue on the back turned out to be exactly what I wanted.
Ombre modern quilt back
Colorful binding signals the end of this project.  But we never really finish our work as quilters, or as artists. We’re always ready for the next project.

I’m ready. Are you?