Ugly or Interesting? Read about it before you decide.

foodquilt4
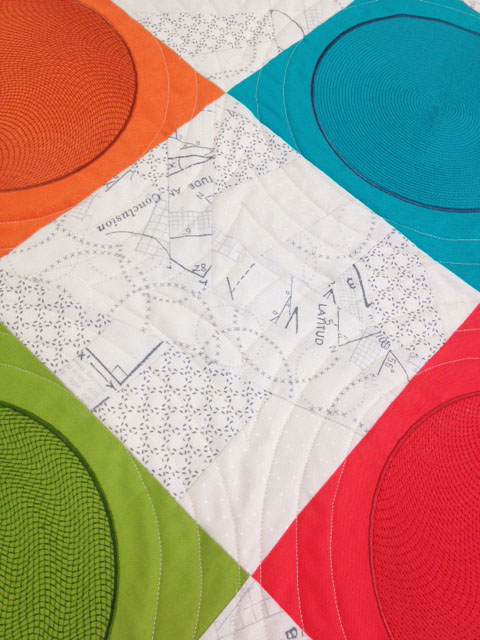
I’ve been working on this quilt for my teenage son.

I’m racing against the clock to get it done for Christmas. All I have left is hand sewing the binding and then I’ll need to make a quilt label (Don’t forget the quilt label!!)

It certainly was not my choice of fabric.  The pattern however, is the disappearing hourglass that I discovered in one of the recent Block magazines from Missouri Star Quilt Co.

The fabric has been the choice of my son, over the course of, oh, 13 years.  If you quilt and have a child, you know what I mean.

For years, basically his whole childhood, I would drag him to quilt shops.  He would slouch into a chair in a corner and wait for me to finish.  Usually.  However, on a number of occasions, he would approach me with a bolt of fabric.  Not a lovely bolt of fabric.

It was usually a bolt of french fries, or pizza, or chocolate chip cookies. Was this child always hungry? And because I wanted to encourage him (and also felt a little guilty for dragging him around), I would purchase a half yard here, a half yard there.

Well over the years, we had assembled quite a collection of food fabric.

And this year, because he’s old enough now, not to be shuffled from quilt shop to quilt shop, I made him a quilt of all the fabric he had selected over the years.

Don’t judge me.  This is not what he eats every day…but apparently what he thinks about while in quilt shops.

foodquilt1
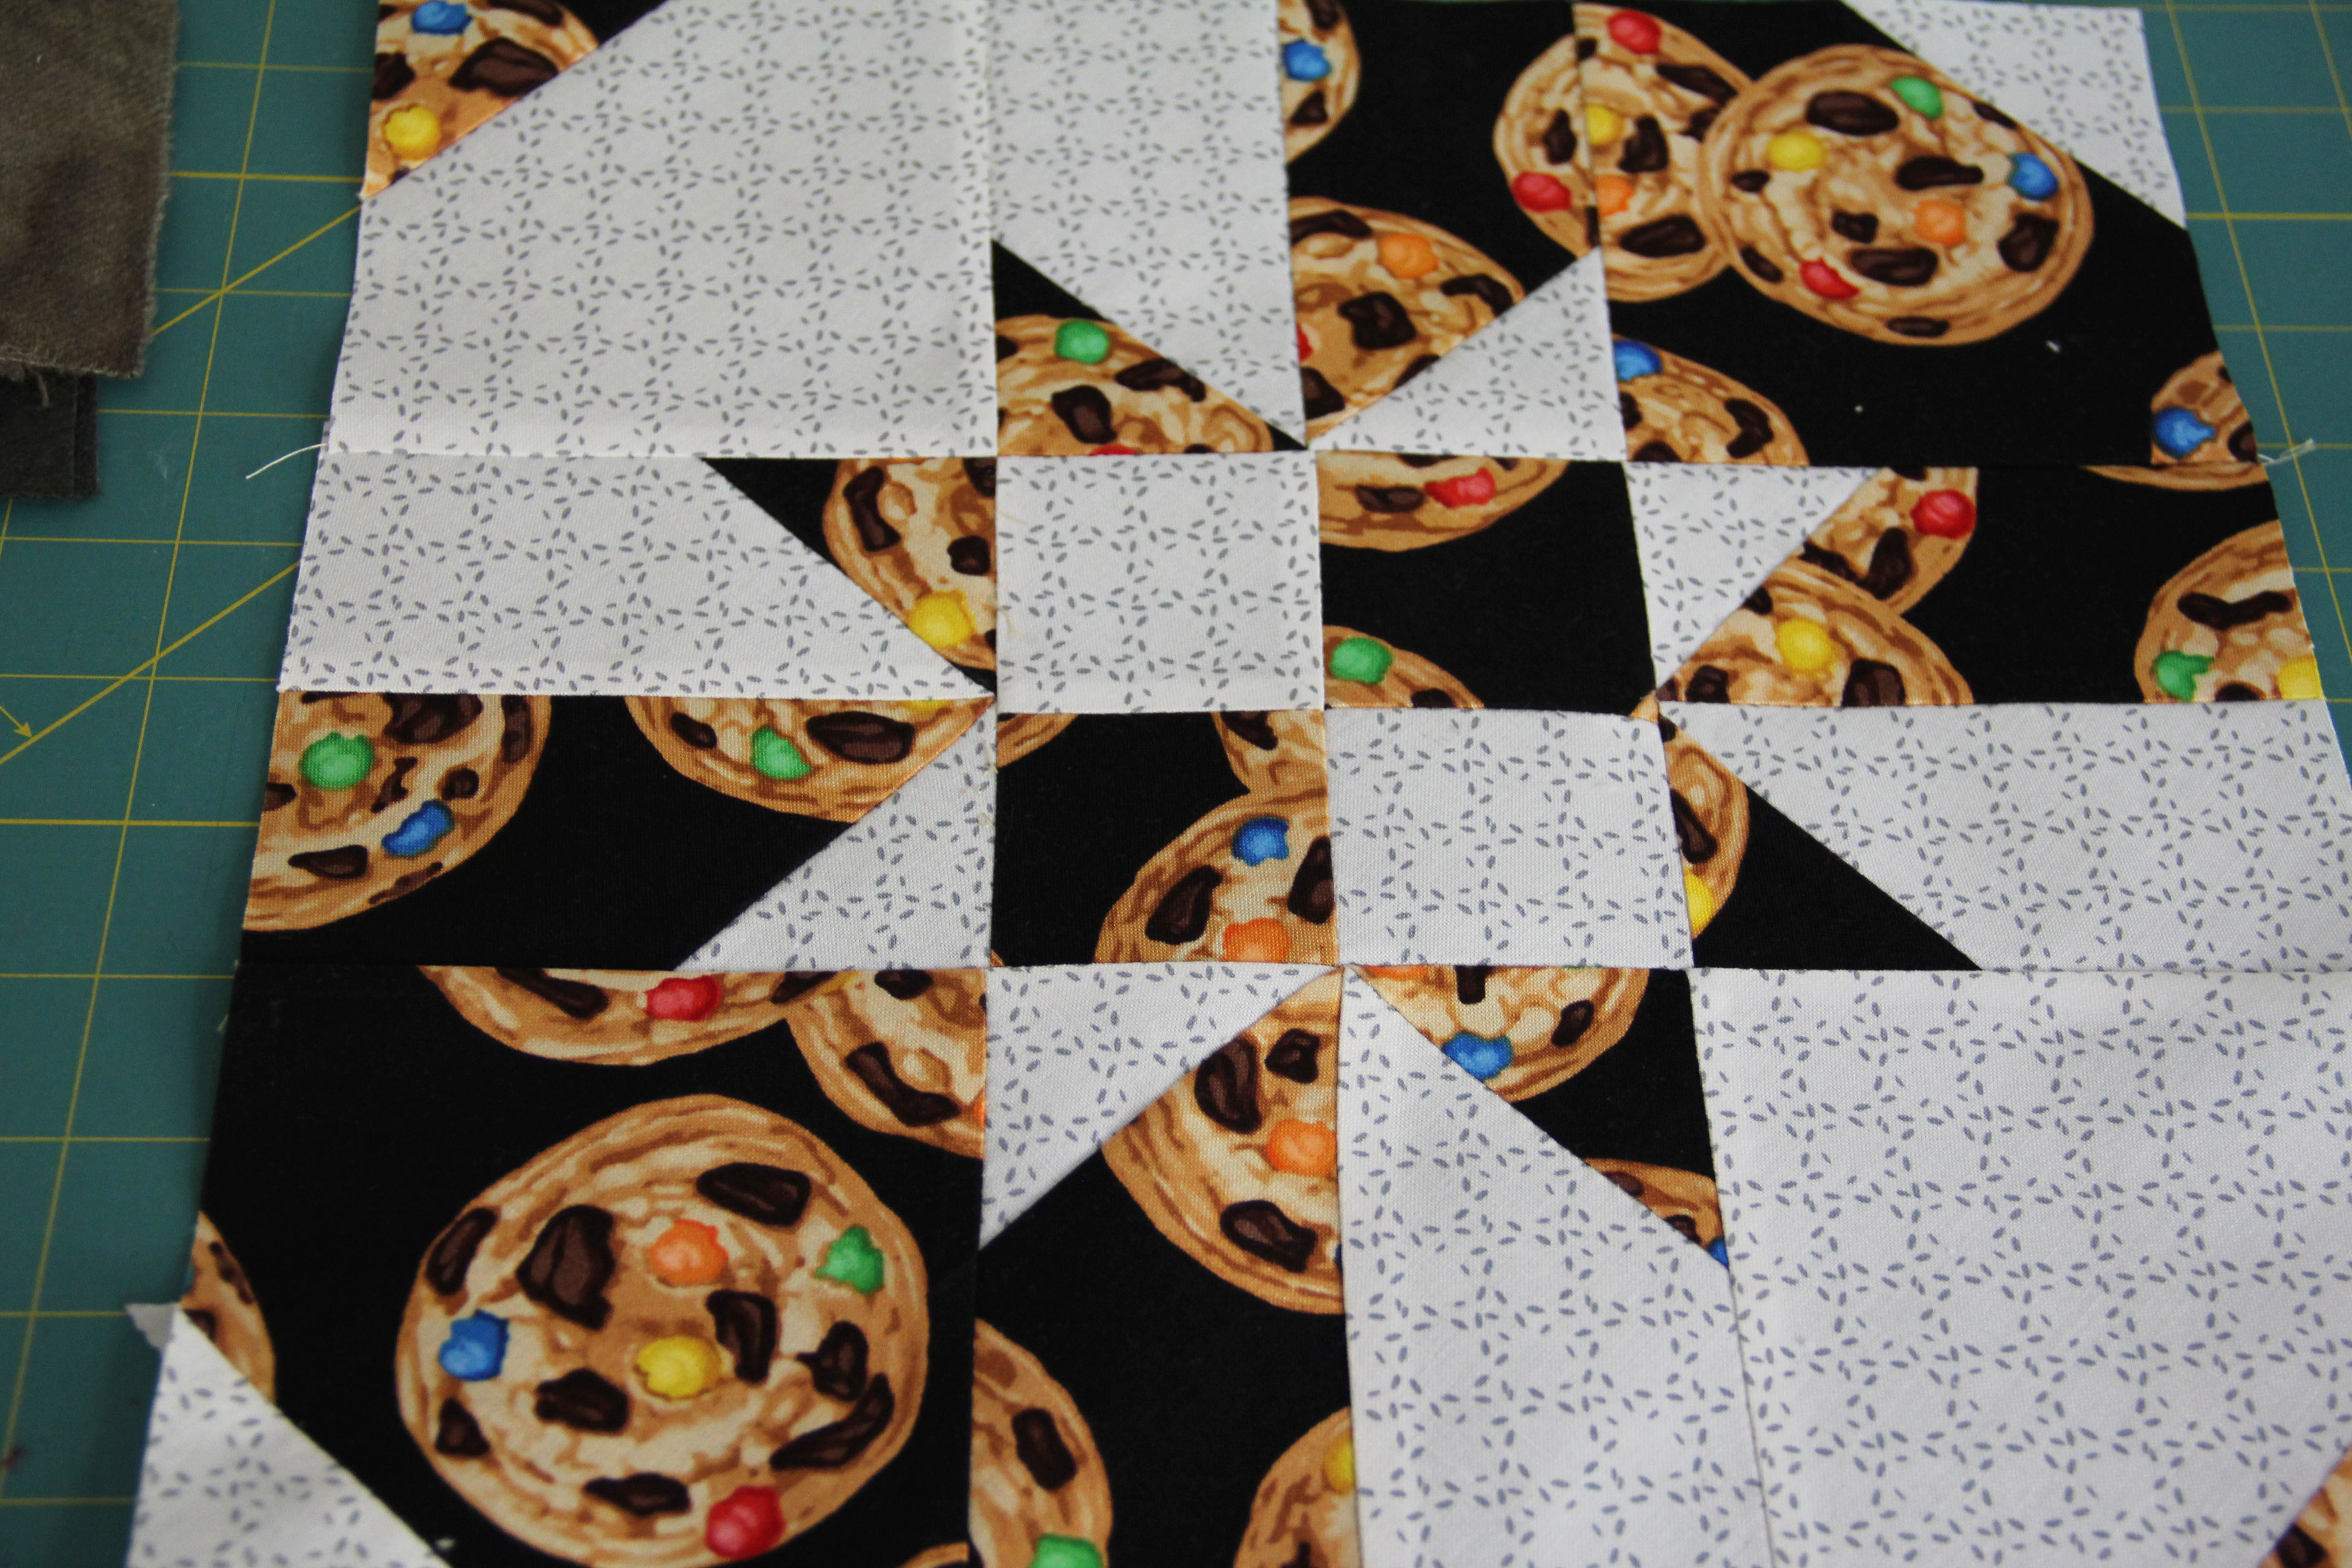
I guess what I’m enjoying about the quilt is that up close, you can see the details of the food, but you have to step back a bit to notice the quilt pattern.

foodquilt3foodquilts2foodquilt6It was larger than I expected, hanging over the top of a full size bed, so quilting was a bit of a challenge.

borderThe border is chocolate chips.  My son picked out the binding fabric which I thought was quite hideous against the chocolate chips.

So I added a small flat piping to separate the two fabrics…and miraculously, it looks pretty great.  I would never have selected any of these fabrics, but the random surprises of letting someone else choose turned out to be the best part.

backFinally, I pieced the backing from other fabrics he had selected along the way:  maps, pheasants and computer gear.

Want to know what floats around in your kid’s head?  Bring him (or her) to quilt shops and let them wander and select a few things.

You may or may not be surprised. But I guarantee it will be interesting.

The Neopixel Process

[embedyt] http://www.youtube.com/watch?v=T1_VZdfc3PA[/embedyt]

So, with the vest finally complete, thought I would let you see it in action.  I know it’s a little creepy as everything is in shadow so the lights would show.  Actually, they show pretty well in daylight too.  Those little neopixels are quite bright!

You can see that I used the Adafruit book as a reference during every step.

adafruit book

After I had the lining of the vest created, I used an erasable sewing pencil to trace out the pattern of the pixels, making sure to keep power and ground from crossing.

power and ground designI numbered the pixels to keep track.  The next step was to handle all the wiring.

Problems encountered:

  1.  The conductive thread, while it did work, would have lost a lot of power by the time it went through 19 pixels.  So we switched to 22 gauge insulated wire for both power and ground.
  2. We use the thread to attach the accelerometer to the Flora and it did hold up, but did not like the silver solder at all.
  3. Working with wire and Neopixels is tiny, tiny work, much tinier than wool embroidery, or even working with embroidery thread.  Be prepared with a nice set of wire strippers.

power and groundHere is a pic showing power and ground and attached to each pixel with the 22 gauge wire.  White was power, black was ground. Each neopixel was at least temporarily held in place.

solderNext came the one thing I didn’t do.  My husband did all the soldering. Silver solder every place the wires touched the pads on the neopixels, the flora and the accelerometer.

vest sewnThen I brought the whole thing to the sewing machine, and zigzagged down power and ground.  I found that I needed to add a cutaway stabilizer behind all the wire and stitching to support the fabric.  When I finished all the stitching, I went back and trimmed the stabilizer as much as possible.  All of that added a lot of stiffness to the vest, but surprisingly, it still hung pretty well when I added the top layer of fabric.

We repeated the whole process with data in and data out: wire to the neopixels, pin down, solder, stitch.

vest lining1Finally, I created the top layer and attached it to the lining.  It was designed to have serged edges, one of the reasons I chose the pattern.  However, I think if I were to make it again (without any wiring,) I’d do a more traditional lining and finishing technique.

finished vestI’ll say this much about the project.  It’s a big hit at parties.

We worked together on the programming. Actually the Adafruit book is very helpful with that, as everything is done in software and transferred via USB to the Flora.  My vest is programmed to do a number of sequences, based on the movement of the accelerometer.  As you see in the video above, I just have to shake it, and it changes mode.

Actually, I learned a great deal about simple wiring, I am proud that I could get through something like this, even with expert advice!

My next LED project will likely be a bag that lights up.

For now, I need to get back to some simple quilting.  But I have lots of spare parts and I’m excited about the idea of another electronic project!

LED DIY Wearables. Um, yeah.

Stop the presses. Hold your horses. Shut the door. Turn out the lights.

Because I’m starting a project I know so little about it’s scary.  And turning out the lights might actually be a good thing.

Luckily, I’m embarking on this project in partnership with a husband who happens to be an electrical engineer–a hardware guy. Someone who’s heard the term neopixel before.

And I, well, I know how to sew.

Together we’ve decided to create one of those DIY wearables the “kids” are building these days.

Go ahead.  Google DIY Wearables with LED.  It looks like fun, right?

I’m not starting totally clueless.  I purchased this book (Getting Started with Adafruit Flora by Becky Stern and Tyler Cooper) which, frankly, I only understand half the words on the cover.  However, diving into it is much easier with a handbook, and I do have someone to consult when I’m completely baffled.

wearables1


The first decision we had to make (as a couple) was what project to work on, and then how it would be lit.  After doing the research, I settled on a simple serged vest, to which I will add a lining.  The lighting would be sewn to the lining, and the lights will shine through the top layer.  That’s the plan.  For now.

vest1The pattern I’ve chosen is Modern Silhouette Vest from Amy Barickman.

The fabric is called Maker, from Art Gallery Fabrics.  Seemed appropriate.

Problems encountered so far:

–I wanted to run a string of lights from front to back on the vest in two places…not cheap to purchase those light strips by the way.  They come in meter long sizes. However, the strips are encased in hard plastic which is just not going to lend itself to the shape of a vest. Or a human being, for that matter.

–So I modified the design to have an all-over sprinkling of lights which I can program to patterns and colors.

–The battery is rather heavy for what I’m looking to do, so I might have to design a pocket in the lining to hold the battery, or we may actually need two batteries. This is something I’ll have to modify along the way.

Things to figure out next:

–How to attach all those lights. I think they must be hand sewn with conductive thread, and all connected to one another.  This is where my partner comes in.  He’s here to make sure I don’t electrocute myself or start the dang vest on fire.

–How to program and what sort of controller to use. I have to get into a few more chapters in the book for that.

Stay tuned.

This could get interesting.


Going to Market (Part 2)

As you know, I had the chance to go to Quilt Market in Houston this year, and so I’m sharing some of the things I saw.

Fig Tree and Co at her booth.

Fig Tree and Co at her booth.

Rennaissance ribbon ideas.

Rennaissance ribbon ideas.

Another cute idea from Rennaissance ribbons.  That's Kaffe Fassett  ribbon.  Rennaissance has a new idea book featuring his ribbon.

Another cute idea from Rennaissance ribbons. That’s Kaffe Fassett ribbon. Rennaissance has a new idea book featuring his ribbon.

Angela Walters with her new line. A real departure for her. This quilt was made with 3 half-yard panels--2 seams. The binding is made with leftovers from the panel.

Angela Walters with her new line. A real departure for her. This quilt was made with 3 half-yard panels–2 seams. The binding is made with leftovers from the panel.

Another color way from Angela Walter's line.  Really loving this pattern.

Another color way from Angela Walter’s line. Really loving this pattern.

Bonnie and Camille's booth, featuring their new line Vintage Picnic.

Bonnie and Camille’s booth, featuring their new line Vintage Picnic.

Sweet Amy Ellis with her new line.  Loving the corals and greys.

Sweet Amy Ellis with her new line. Loving the corals and greys.

Isn't this a great idea for a kid's room?  Same idea as the corded bowls we've made but just lays flat with fabric wrapped around the cording.  At the Ella Blue booth.

Isn’t this a great idea for a kid’s room? Same process as the corded bowls we’ve made but just lays flat. Wrap fabric around the cording. At the Ella Blue booth.

Kate Spain at her booth.  Another sweet, sweet lady!

Kate Spain at her booth. Another sweet, sweet lady!

Jen Kingwell's new line.

Jen Kingwell’s new line.

Jen Kingwell's fabulous booth.

Jen Kingwell’s fabulous booth.

Isn't that gorgeous?  Another angle of Jen Kingwell's booth.

Isn’t that gorgeous? Another angle of Jen Kingwell’s booth.

Your local store needs these, don't you agree?  In the hoop pin cushions from Smith Street Designs.

Your local store needs these, don’t you agree? In the hoop pin cushions from Smith Street Designs. Yum.

I hope you’ve enjoyed this little tour through market.  You’ll find MUCH more if you go to instagram or twitter #quiltmarket and #houstonquiltmarket.  Right now, Quilt Festival is going on in Houston, and of course, that’s open to the public.  #quiltfestival   #houstonquiltfestival #showmethemoda #fatquartershop

Going in Circles

Whipped up a little tabletop quilt with inspiration from Sylvain Bergeron, Bernina educator. One of his Software Inspirations tutorials included a couple of fun embroidery designs in circles.  It was part of a much larger presentation, but I wanted to stitch the circle designs out for my students to see.

circlesIn this overview photo, it’s hard to see the detail inside the circles, but the effect of stitching them on vibrant colors offset by simple background fabric is striking.

The background fabric is 4 or 5 variations of Modern Background Paper by Zen Chic, one of my new favorite lines.  I want to use this background fabric on everything….and I do.  It’s so versatile, it looks great everywhere.  Anyway, on this quilt, I just crazy pieced some variations together and cut them to fill the “on point” circles.
circles4

Sylvain called this one “Dragon Scales” and I guess if you think about it, that’s what it looks like.

circles5


The green one is called “Snake skin” for obvious reasons.


If you work in Bernina embroidery Software at all, these are very simple.  You just digitize a circle and morph the fill.  Of course, you’ll have to play with the settings of fill spacing and morphing, but that’s basically the way these are created.  You’ll have to attend Software Sampler at your local dealer to get all the details.

I added another circle to the quilt, using the ripple fill.

circles3


All are mesmerizing to look at when you get close enough to notice the detail.

circles6


christmasrushUp next, the first block for a disappearing hour glass quilt for my 13 year old son, who has requested it be made entirely of junk food fabric.  Hoping to finish as a Christmas gift. Also hoping not to gain any weight while working on it.


Bag Obsession

bag3

I’ve been making these little cosmetic/chotchke/jewelry bags now for a couple of days.  So easy and fun to make.

They’ve become an obsession.

All the ones I’ve made (8 of them in total, so far) are made from Art Gallery Fabric, Sketchbook.  The look of the fabric is artsy and lends itself well to these small bags. They are approximately 6 x 8 in. finished.

These are all done in embroidery, by the way.  I digitized the lines for the bags, and all the work is basically in the cutting of fabric.

First stitch is a placement for the zipper, then you lay down the zipper, then folded fabric with batting in the middle across the top of the zipper, stitch a line, same thing with the bottom layer of fabric, stitch a line, then lay the lining/backing down (a quilt sandwich) and stitch around the outside.

bag4Voila! That’s it. You’re done. Trim and turn it inside out.

You use a sticky back stabilizer, so you end up picking that off the back at the end, but other than that, these bags go REALLY FAST.  Use batting in between every layer to give the bags a nice hand.

I’m thinking these would make great holiday gifts. I have gone through my stash and have come across some old home dec fabric that I think would be fun.  Denim would also be great.  Who doesn’t have an old pair of jeans that need to be repurposed into new life?  Add some embroidery or a little bling…anything is possible.

These in-the-hoop projects are great stash busters.  Gotta run, I need more zippers.

bag2


Quilting Using Machine Embroidery

machine embroidery quilting4I have wanted to try this technique for a long time now.  And I’m going to teach a class on it in the fall.

If you have a sewing machine that is capable of embroidery, you can do it too.

Many people love the look of a quilt that has long-arm quilting.  It gives a very polished, professional look to a finished quilt.  Most of my quilts I use free-motion and do them at home.  As you know this is awkward with larger quilts, twin size and up. But using your embroidery module to quilt is really worth trying, especially if you are someone who is comfortable with embroidery (hooping and hooping over and over…and if you’re not familiar, what a great way to get good at it).

embroidery quilting 1For this particular technique, I followed along with this book from Amelie Scott, “Edge to Edge Quilting on Your Embroidery Machine.” 

She provides special quilting embroidery designs that have an easy start and end point.  All the work is in the positioning and the time invested in the stitch-outs and hooping.

machine embroidery quilting2As you can see on my quilt, you will still be hefting around a a lot of fabric.  And by far, the trickiest part is calculating the number of hoopings and working out the positioning.  But that’s just a little bit of math and little bit of decision-making.

machine embroidery quiltingYou use 2 different files…an “A” and a “B” file.  You alternate them in rows so that the design looks randomly spaced. This really does work and the finished quilting technique is lovely.  While I can free-motion some great spirals or stippling or loops or hearts, I know I would never be able to get the perfect consistent quality of these daisies.

This 60 x 60 in. quilt took 32 hoopings, and my time invested was somewhere around 7-8 hours at the machine.  I love the way the quilting looks  — whimsical, yet professional.

machine embroidery quilting5 Would I want to do this for every quilt?  Of course not.  I like to be able to customize some of my quilts.  Is this great for gift-giving and finishing some of those UFO’s?  A resounding yes!  And a terrific way to get more use out of your embroidery module.  Your local quilt shop should be able to get you the book.

What are you waiting for?  Let’s get those quilt tops quilted!


Shipshewana Dreamin’ – Part 3

Don’t worry, this is my last post about Shipshewana.  I’m not a travel brochure.  But it was a peaceful getaway not far at all from home and so I just wanted to share.

I had the opportunity to meet an Amish woman who sells hand-quilted Amish quilts from her basement  —  some of them she works on herself, some of them she contracts out from others, and some she sells on consignment.

(An aside: the stark contrast between an Amish basement and my own is embarrassing. Hers was empty, with a few things on shelves, not a dust bunny or piece of anything unnecessary in sight.  Mine is filled with boxes from outdated electronics, old toys, old furniture, old books, old pictures.  What a cluttered, junk-filled life we live. )

Here are a few of the quilts she showed me.  This is just a sampling as she had many more. Make sure you scroll to the bottom, because at the end is an absolute masterpiece.

While she gave me permission to take the pictures and put them on a blog, she did not want her name given.  “What if someone sees a quilt and cannot live without it?”  I asked, in my total blundering non-Amish way.

She smiled and gave me a card.

So if you cannot live without one, leave a comment and I will privately give you her info. The prices are very reasonable for the amount of work.

While I did purchase a piece from her smaller-sized collection, everyday I think about driving back out to get the whole cloth quilt.  And who knows?  Maybe she already sold it.

But we can all still appreciate it.

This is one she did herself.  She pieces by machine and quilts by hand.

This is one she did herself. She pieces by machine and quilts by hand.

SHe chose the colors for this, but asked others to do the piecing and quilting.  She said she's not good at curves.

She chose the colors for this, but asked other Amish women to do the piecing and quilting. She said she doesn’t like curves.

amish4

Hand appliqued and hand quilted.  A beauty.

Hand appliqued and hand quilted. A true beauty.

This one is a masterpiece.  She told me an Amish woman in Pennsylvania gave it to her to sell on consignment.  It is a whole-cloth quilt, and the hand quilting is so perfect it almost made me cry.

This one is a masterpiece. She told me an Amish woman in Pennsylvania gave it to her to sell on consignment. It is a whole-cloth quilt, and the hand quilting is so perfect it almost made me cry.

wholecloth4wholecloth3

THe whole quilt was for queen size but with overhang, so very large.  the entire edging was in scallops with these lovely feathers.

 The edging was in large scallops with these lovely feathers.


Shipshewana Dreamin’ – Part 2

My first stop of the the day was Yoder’s Department Store which opens at 8 am.  Honestly, they have a TON of fabric, and every book, (including modern quilting books) imaginable. I love this place.

yoders3 yoders4I had vowed to myself during this whole trip that I would only purchase items unique to the area.  I love Moda fabric, but I can get that at home.  So I began hunting for “local” goods.

First thing I ran into was this display of reproduction toweling.  I could purchase by the yard and got myself a vintage-looking design.  They had some very cute tablecloths in carriers that looked like handbags and I’d really like to use the toweling to make a handbag…add a little ricrac and I’m good to go!  Also in the display was a special edition “Yoder’s 70th Anniversary” hand towel.  While waiting in line to check out, another woman told me she was going to use hers to create a quilt around it.  What a great idea!

yoders2Of course, I purchased a little bit of anything that had some local charm.

yoders1Do you collect Row by Row?  Get your Shipshewana version at Yoder’s.

rowbyrowNext stop is the Davis Mercantile where you can find many stores, but I just had to see the famous Lolly’s Quilt Shop.

lollysLolly’s is another wonderful place with everything you could want or need — current fabric lines, reproductions, batiks galore, and plenty of solids, books, patterns. Found a wall of Kaffe Fassett florals, with an opposite wall of all his colorful stripes.  Really the largest selection of Kaffe I’ve ever seen.

Lolly’s has a “sister” store downstairs at the mercantile, called Cuddle Corner.

Don’t miss it.

I was amazed at the wonderful things being done with minky!

cuddlecornerFresh textures, colors and patterns…all in minky!  If you have a baby in your life, you need to stop here.  You won’t believe how soft and cuddly this stuff is.  If you’re like me, you’ll want one for your own home for winter snuggling.

Special tip from the gal at the counter: a stretch needle works best with minky.  We have this discussion at work from time to time…what needle for minky?  This gal says stretch is best and I believe her, but I will try for myself as soon as I sew up my quilt.

cuddlecorner2cuddlecorner3Around every corner in Shipshewana, you’ll find merchants that are selling hand-quilted quilts.  Having done a bit of this, I fully understand the time, effort and work that goes into these kinds of handmade masterpieces.

wallofquiltsIn the next post, I’ll share a few Amish handmade quilts I was shown when an Amish woman showed me the quilts she sells for herself and for other Amish women from her home.

Hint: absolutely breathtaking.

Quilt Market Mash-Up

quilt market springQuilt Market 2015 is in full swing in Minneapolis this year.  If you’re not familiar with Quilt Market, it’s the place where all the fabric designers and fabric makers and product developers present their new products to potential buyers (shop owners).

It is a twice-yearly event, spring and fall.  I am hoping to attend the one in the fall, but we’ll see as things get closer!

For this year, I am content to live vicariously through social media.

If you want to follow along with all the chatter and visuals and news, here are a few ideas for getting the scoop.

On twitter, instagram and facebook, follow the hashtags:

#quiltmarket  #fqsquiltmarket #showmethemoda #modagoestomarket

Fat Quarter Shop’s blog site will be live tweeting, updating, creating youtube videos and much more.

Art Gallery Fabrics is streaming live at certain times during the show.  Find out more here.

Want a visual overview?  Head over to #quiltmarket’s Instagram stream.

That’s enough social media to hold me for awhile — especially since I’ll be working into the weekend.  Have fun and enjoy all the new and exciting stuff out there!