Tell me why you sew, and I’ll tell you who you are. Isn’t that the truth? These wonderful ladies, friends of mine, wanted to learn machine embroidery. We won’t talk about how long they have had their embroidery units neatly packed away in boxes with all the best intentions in the world.
We’ve been talking about getting together for years to learn the ins and outs, tips and tricks of the trade. Finally — we did it.
They came over to my house for a day and and I gave them the basic Embroidery 101 lessons. Someday, I will write it all down in lesson form for this blog. I know there are plenty of others out there who have an embroidery unit packed away somewhere, hoping that they will use it eventually. Or maybe you gave up on embroidery entirely.
I am here to re-inspire you. Machine embroidery is truly fun. And the more you know, the more you can experiment, and the more you are inspired to try new things. The hardest part? Getting started.
You can see from these pics that one of the biggest impetuses (is that a word?) for machine embroidery is, wait for it, grandchildren. And children as well . But I think the grandkids get the machine embroidery lovin’. Why? Because they are fun. The things we do for them is done with pure love with no expectations for anything in return.
That’s also why I teach. I want to share what I know, so that others can enjoy this craft. I also want us to use our hands, machines, brains and ideas to make things and to inspire each other, and maybe that will spread into the world and make a difference.
I don’t know if it will. All I know is that they will be coming back for another lesson next week. I hope it inspires you to dig in, as well.
The old saying goes “You can’t take it with you.”
No you can’t. But with any luck, we can quilt it, sew, it, embroider it and leave some of it behind and hope it does some good.
A friend had been struggling with adding the Wisconsin fight song to a quilt she did for her son. It was made of flannel and very cozy. It had a 2 inch inner border which really was ideal for the words of the fight song. She had already pieced it, and had it quilted professionally.
Over breakfast one day, several of us were talking about the best approach. My friend had purchased some minky-like yarn and was hoping to create the words by couching it. I suggested using the Bernina free-motion couching foot. It seemed like a good approach, but she was not sure she had the foot or knew how to use it. I thought I would test it out for her.
As you can see on my test-out, disaster ensued. The #43 couching foot let the yarn slide around too much to catch it, and basically the thread did not grab the yarn. So then I thought I would try the Bernina stitch regulator on zigzag using the free-motion foot. Slightly better results but still horrific. My experience with the couching foot has been to use very specific sizes and yarn has never worked well. I’ve had much better results with cording, which neither of us had.
I then suggested embroidery might be the best way to go.
After finding a font that was similar to what she wanted (cursive) I then created embroidery hoopings for all the words to go around the quilt. It had to be spaced decently so that it would be readable.
From the above pic, you can see that I positioned every phrase and laid it out on the quilt so that I would have a guide for spacing. The quilt was about a twin size. This took 17 hoopings, all done in the software from a TrueType font. I matched the bobbin thread to the back of the quilt, so, while you could see the embroidery on the back, it did not noticeably stand out. When finished, the embroidery words actually acted more like quilting.
We needed a satin stitch because a plain stitch of the words –or even a triple stitch–was just not visible.
In the end, I think the words ended up looking sharp, and added a lot of personalization and interest to the quilt.
Could we have managed the same result with couching? Maybe with cording, but almost certainly not with yarn.
I have seen that Bernina now offers couching inserts to attach to the #72 ruler work foot and I’m interested in seeing how easy that is to use. For our purposes, I think embroidery ended up being the best result.
Can you have too much Elvis in Graceland? Too many lights in Vegas? Too many labrador puppies?
I think not.
And you can’t have too much cute in Kimberbell. If you are going to do these designs, then you might as well go all the way. Get the dingle balls, the glitter paper, the froufrous and the doodads. Go all in.
I purchased the ornament designs recently to make for a group of quilty friends.
After one attempt, I realized that if I wanted them to be perfect, I needed to find not only the proper shade of gingerbread felt to highlight the features, I also needed the hoops, the accessories, glitter paper, a hot glue gun, and some patience.
Kimberbell is an exercise in excess and if you can’t do it at Christmas, you can’t do it at all. I am understanding the addictiveness of the Kimberbell phenomenon, but I don’t think it’s my permanent state. I love it at the moment and for special occasions. I’m not sure it’s my style forever and always.The same with Elvis and Vegas and labrador puppies.
Maybe you can have enough.
But for now, I’m on cuteness overload.
Have yourself a Merry Little Holiday.
Used a glue gun in 2019. Check. On to 2020.
P.S. After all the elaborate accessorizing of Kimberbell, I went back to simplicity for my holiday wrapping. I’m a realist. This stuff needs to be reduced, reused and recycled. Simple brown paper with scraps of fabric. The fabric can be saved and made into a quilt at some point, and the paper can just be folded and reused or recycled. I think we, as sewists, can balance adorable with sustainable. At least I’m going to try.
Through the years, I’ve come across a lot of machine embroidery books. Most of the time, I find they are complex, stuck in the weeds, focused on things that are not important, or are just plain hard to get through.
But this new book from Bernina really works. Because it is written and edited by Bernina educators, I thought it might simply be a hard sell for Bernina products. And make no mistake, it has no shortage of Bernina machine specifics.
However, it really gives a good breakdown of everything you need to know about machine embroidery, including tips and tricks that make life easier.
The images, graphics, tables and info in this book are all really easy to read. And the spiral binding is helpful. Nothing worse than anything step-by-step that won’t stay open.
Don’t get me wrong.
Wherever you purchase your machine, you should be sure to take the free classes they offer so you become comfortable with your machine (and all good dealers do that.). I don’t care how many books you read, you will not learn to hoop your fabric properly by reading. You can only learn that by doing.
When I teach classes, I tell my students that there are 3 variables in embroidery:
Stabilizer.
Your fabric.
The density and size of the design
Any of these could and should change based on the others.
The book addresses all of these right up front. But more than that, it gets into techniques, and stitching on different types of fabric. Want to learn about minkee? It’s in there. In-the-hoop projects? Free-standing lace? No problem.
I’ve done all of these things, so I read with a critical eye. And I have to admit, all the categories are thorough and succinct.
Will you read the book and be an expert? No. I tell my students that they will only become experts after making their own mistakes. No book can tell you what to do when your machine is acting up. Or if your thread is breaking or you haven’t cleaned your machine in awhile. These things come from experience and the only way to get that is to stitch.
But I’m putting this one on my top shelf and keeping it handy. It’s new this summer and is available anywhere Bernina machines are sold. It’s a solid resource for any machine embroiderer.
If you’ve followed this blog at all, you know that I have a lot of fun with Kraft-Tex, a paper/fabric that can be washed, doesn’t fray, and needs no finishing.
This time, since I am into garden season, I thought I’d try something slightly different by adding a garden flag made from Kraft-Tex. Now, I know that it has been a truly rainy season in my area, so I though it would be interesting to find out how the flag holds up during rain. I know it can be washed and dried without any issues, and I already tested the ribbon I’m using for color-fastness. So I’m not really worried about the rain.
I promise to show you what it looks like after a few weeks. We’ll all find out!
The embroidery showed up really well on white, and then I placed it on the grey or charcoal color. I find that Kraft-Tex holds up well with lots of embroidery…upwards of 20,000 stitches..as long as I use the right stabilizers. I find it best to use a medium weight cutaway, with a layer of Stabilstick cutaway on top of that — 2 layers of cutaway in total.
Then I cut out the pieces and used a bit of scrapbook tape to hold them in position while I stitched them down onto a larger piece of Kraft-Tex.
After assembling the flag, I added some velcro to the top, along with a fold so that it hangs nicely on the iron bar. A bone folder works great to give a nice solid crease. And the velcro makes it easy on-off. I’m thinking that I could make a number or these through the seasons…Fourth of July next.
Finally, I’m playing around with placement outside. I don’t have my annuals set up out there yet, so it’s a bit early. In the meantime, this is easy and gratifying stitching to get done for any season.
Not just the ones who had children at a very young age, but also now those who had them at a normal or not-so-very-young age.
I first started quilting in my twenties when all my friends had babies. I made dozens and dozens of flannel baby quilts, most of them hand-tied and filled with the fluffiest polyester money could buy. The parents and kids loved them.
I moved on to more traditional quilting, took classes, and eventually started teaching. But I never forgot how I got started.
Babies.
These days, I’m doing a lot on diapers and onesies. It took some experimenting, but I have found the best methodology.
Keep it simple.
Onesies absolutely do not support a whole lot of stitches. Even some fonts are iffy, depending on the number and size of the satin stitches.
Use two layers of polymesh stabilizer.
I use OESD cutaway polymesh. I experimented with one layer and just didn’t think it was enough. Depending on your design, you may even want three layers. A traditional cutaway adds way too much bulk and stiffness, so go with a polymesh. I also tried fusible, but that distorted the look of the onesie. I’m not a fan of 505 spray so I don’t use it when hooping.
Use a ball point needle.
If you’re familiar with embroidering on knits, you already know this. But if you usually embroider on quilt cotton, it’s easy to forget to change out the needle. Onesies are very stretchy and the fabric really separates when you use a ball point or “jersey” needle. It makes a difference in the longevity of the embroidery, because a ball point separates the threads of the fabric instead of cutting right through them.
Washing Instructions.
I use rayon thread (Isacord) which is bleachable and holds up well when washed. I throw onesies right into the washer and dryer…even in hot water and high settings.
The fabric, 100% cotton, always shrinks a bit. And the embroidery may curl because of that. The best way to fix this is to lay a towel on your ironing board, and lay the onesie face down against the towel — with the embroidery against the towel. Iron the back of the onesie without steam until everything is laying flat again. No problem.
I sew on a Bernina and you can see that with their free arm, it’s really easy to stitch on a onesie without a lot of pinning, clipping and gyrations to keep the back out of the way.
Finally, use a 9 month size or larger.
Maybe it’s possible, but I never attempt to embroider a newborn or 3 month size. I just don’t see how I can stretch it enough around the hoop. I’d have to switch to the very smallest hoop which has a tiny field of embroidery. Most of the onesies I’ve done are size 12 month. They still look relatively small, and get smaller after washing. But they are large enough to work on comfortably.
Sending love and blessings to all my friends and co-workers and friends of friends and co-workers who are keeping the earth populated. There’s really nothing quite like participating in the ritual of welcoming the very newest generation.
I know I’m getting ahead of the game, thinking about Easter. But I felt like I needed a bit of Easter cheer early on, so these are what I found.
Do you have an embroidery unit you haven’t taken out of the box? (You know who you are, my friends.) This is about as simple a project as you can imagine.
Go to embroideryonline.com and search for “in the hoop”.Just download them onto a USB stick.
Prepare some fabric…you only really need scraps. And find some scrap batting. You know, the stuff you cut off around the edges of your last quilt.
Tip: After cutting small amounts of batting on your cutting mat, use a lint remover to clean up the batting.
Here’s the trickiest part. You need a nylon zipper. At least 7 inches. These are unbelievably common in the sewing world. Anything over 7 inches will work.
I used 14 in. zippers because that’s what I had on hand. Here’s a source that your local quilt shop may have even used: atkinsondesigns.com
And here’s a bonus. If you purchase her zipper pulls, you can easily change the color of the pull. Here’s instructions on how to do that. Your life will never be the same.
Back to the Easter egg pouches. I’m sure they come with instructions but I never read them. (Surprise, surprise.) Take some scraps of batting, approx, 6 inches x 6 inches, along with some scraps of fabric, about 6 inches x 12 inches. You’ll need 2 of the smaller size for the top and bottom half of your egg, a larger quilt sandwich for the backing/lining.
Wrap the smaller size fabric around the batting, so you have a straight edge to lay against the fold.
As you can see here, I didn’t even cut my scraps with any precision, as they will be completely trimmed away. You are just making sure that the batting is covered front and back. The fabric shown is Modern Quilt Studio’s Dot Crazy. I love this because it has fabric with a line of larger dots through the center…no piecing necessary.
Hoop your large oval or any 5 x 7 or larger hoop with sticky back tearaway stabilizer. I used OESD Stabilstick tearaway.
The design will walk you through all the steps on your machine. The first stitch out will be the placement line for the zip, which stitches directly onto the stabilizer.
Then stitch down lines on the zipper, then you lay down the top part of the egg with the fold right up to the zipper. The design will then stitch across the top fabric on the zipper. The goal is to make sure you have enough fabric wrapped around the batting to cover both sides of the egg.
Next, it will stitch the top half of the egg down.
Then lay your bottom fabric with the fold up against the zipper, as you did with the top. The next stitch will secure the bottom fabric to the zipper, and the stitch after that will secure the bottom half of the egg.
Move your zipper pull to the middle of the design!
This will allow you to turn the pouch inside out once it has been stitched. Now, you can also add a ribbon or handle at the top before the backing/lining is stitched down. (As I did). Add a quilt sandwich with the backing and lining down on top.
The final stitch is a zigzag to secure the seams.
This entire stitch out is a total of 6 minutes–almost as long as it take to read this blog post. These are easy and really quick, using fabric and scraps you likely have lying around.
When you take it out of the hoop, trim close to the stitching. Remove the stabilizer from around the zipper, and then open the zipper as far as you can. This will help when you turn the bag inside out. Remove as much of the stabilizer on the rest of the bag as possible. You should only see a bit of stabilizer around the outside seam, and a tiny bit where the zipper is attached. Everything else can be removed. Turn your little egg inside out and press.
Use your egg pockets as decorations or gifts–a great gift card holder or candy pouch!
Actually, it’s just raining. but they say the snow is coming…and plenty of it. I am skeptical, but that’s nothing new.
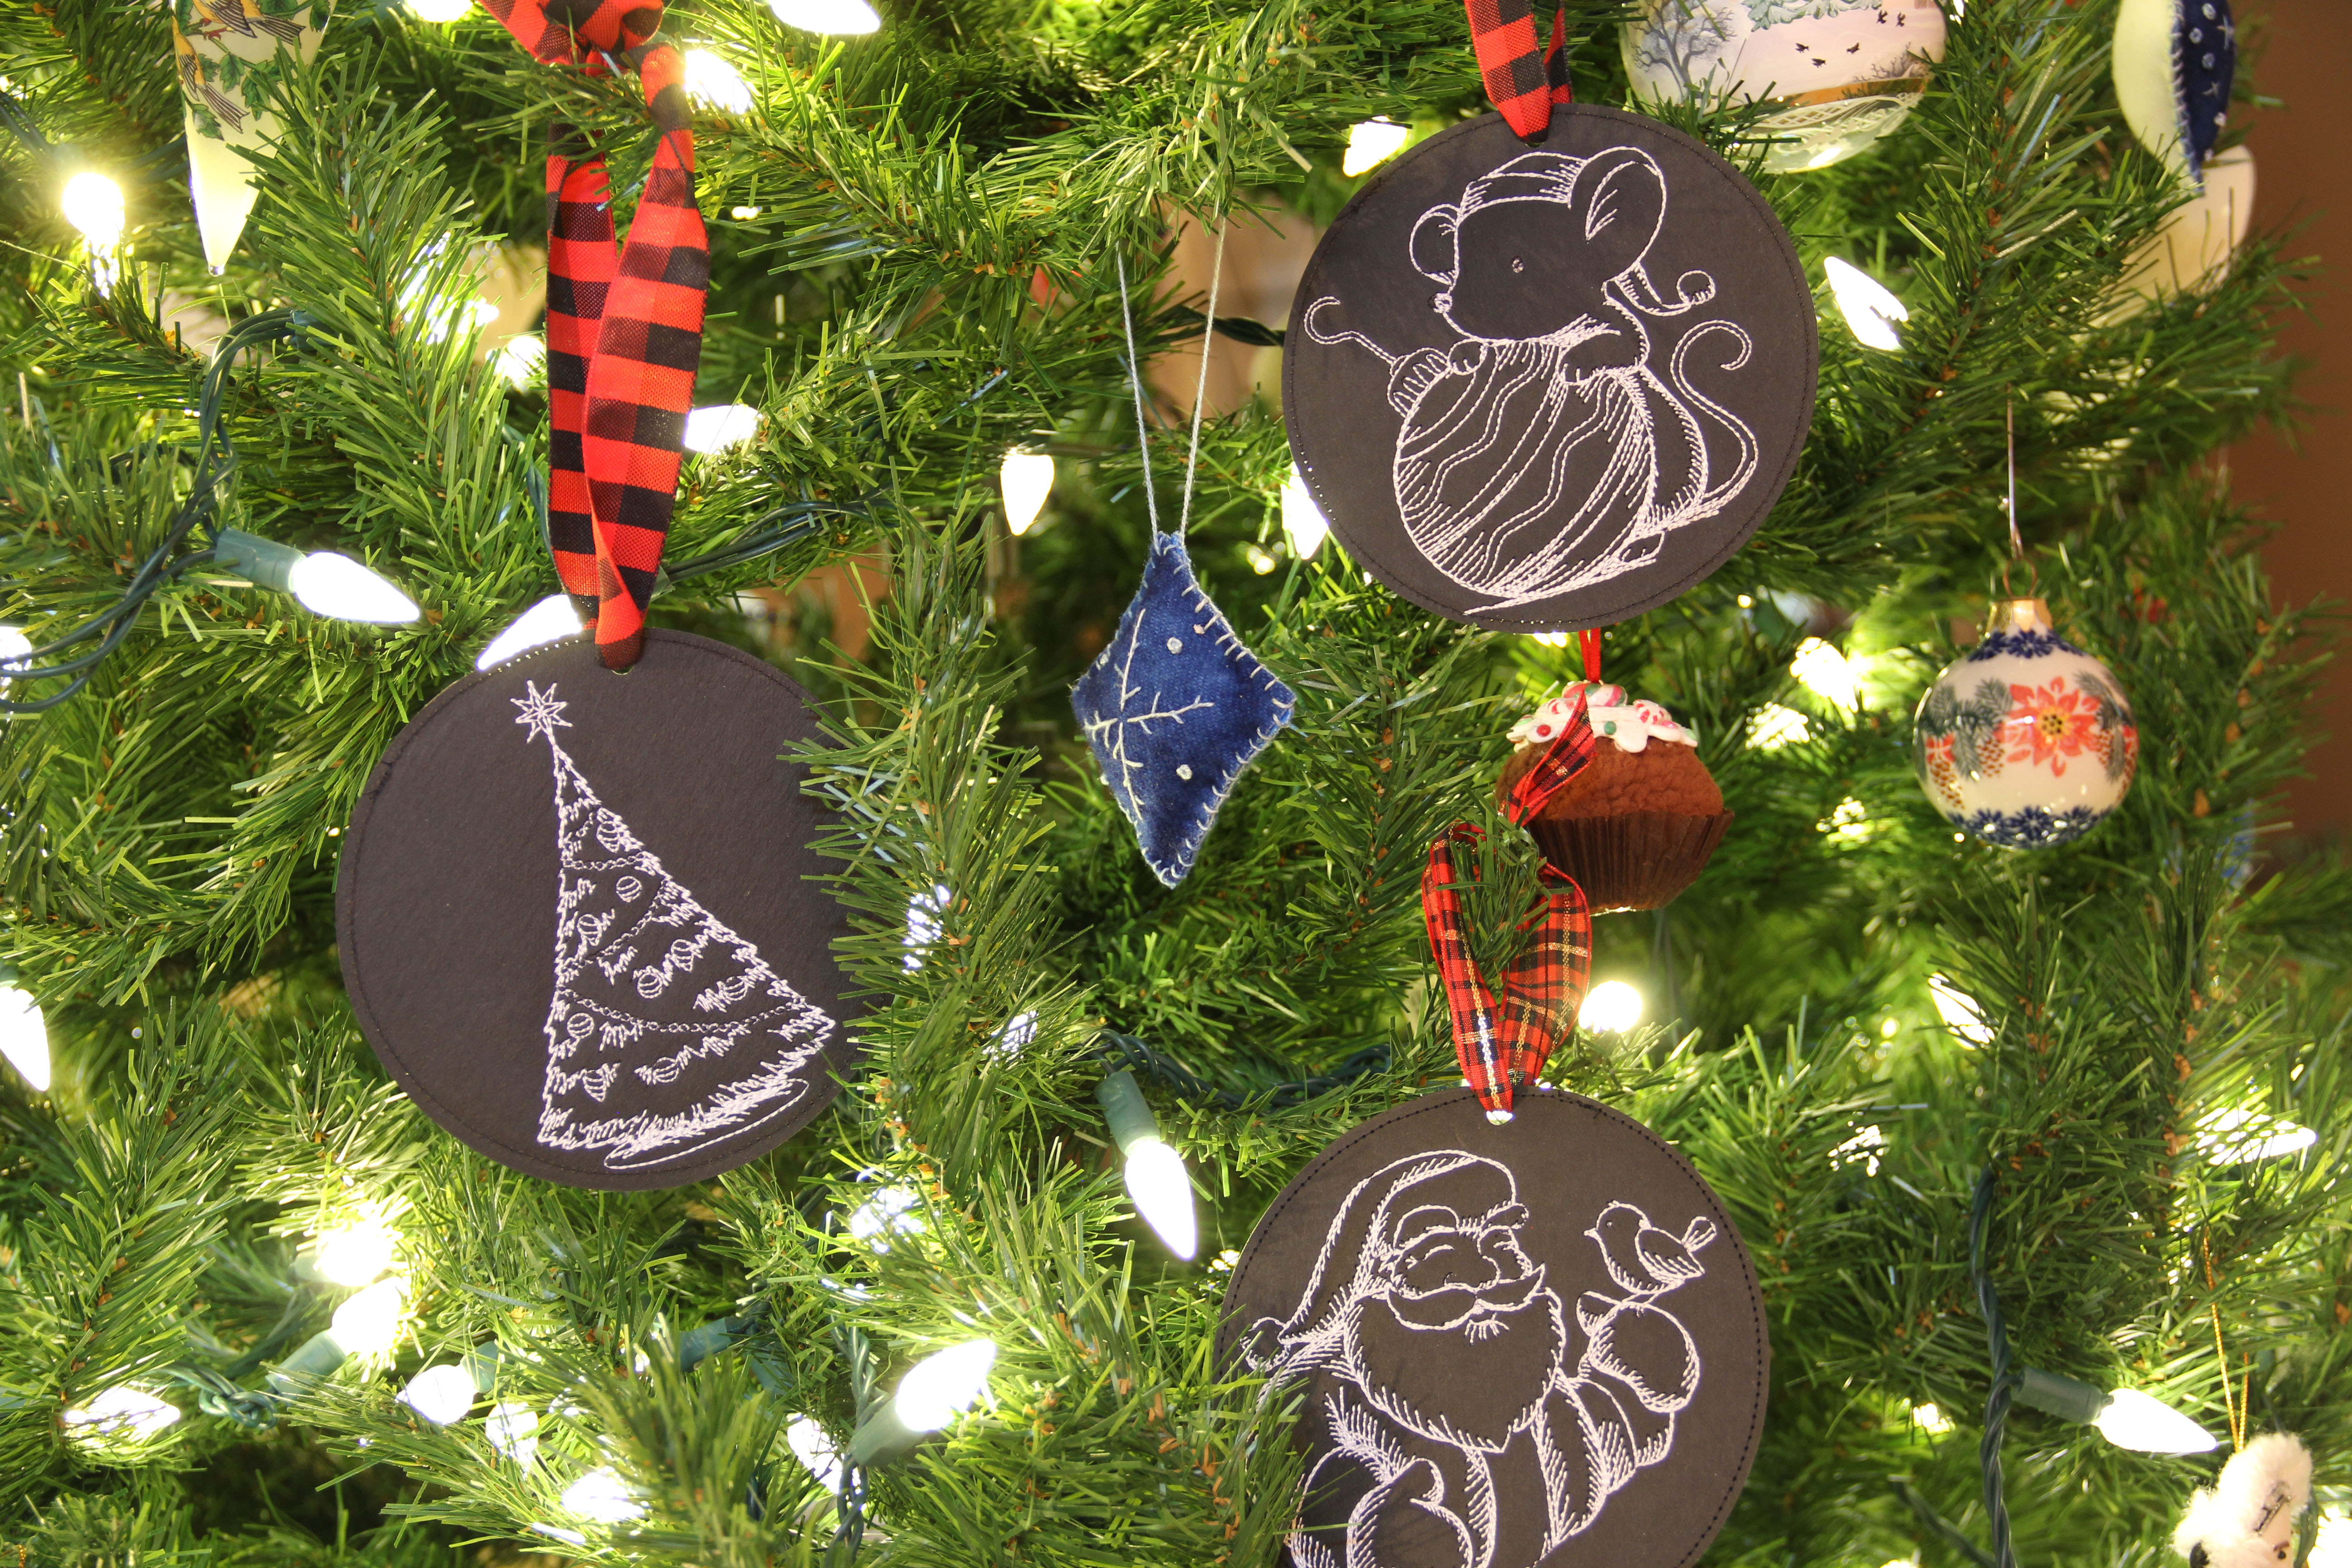
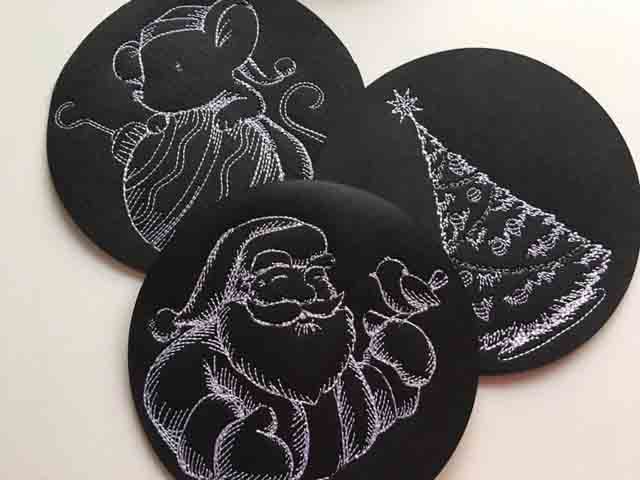
These little ornaments on the tree are made from Kraft Tex. (See my previous post for more details.) I think they turned out cute, and I am anxious to try stitching them out on fabric and turning them into little stuffed ornaments. I think that would be adorable. These have designs on both sides, because I just wanted some flexibility. I’ll need to make some minor adjustments to the software file I use to stitch out the designs on fabric. On the new ones, I’ll add a seam around the outside, leaving an opening to turn them. Then it will be just a matter of stuffing them. I’ll share when I start that.
But for this task, I wanted to show you the greatest little tool I got at the shop as it was closing. I didn’t think I’d ever need it, didn’t really have any idea why I might use it, but of course I purchased it anyway.
And it sat in my sewing room for over a year.
(Incidentally, as we speak, the rain has turned to snow out my window. Maybe they are not all liars after all.)
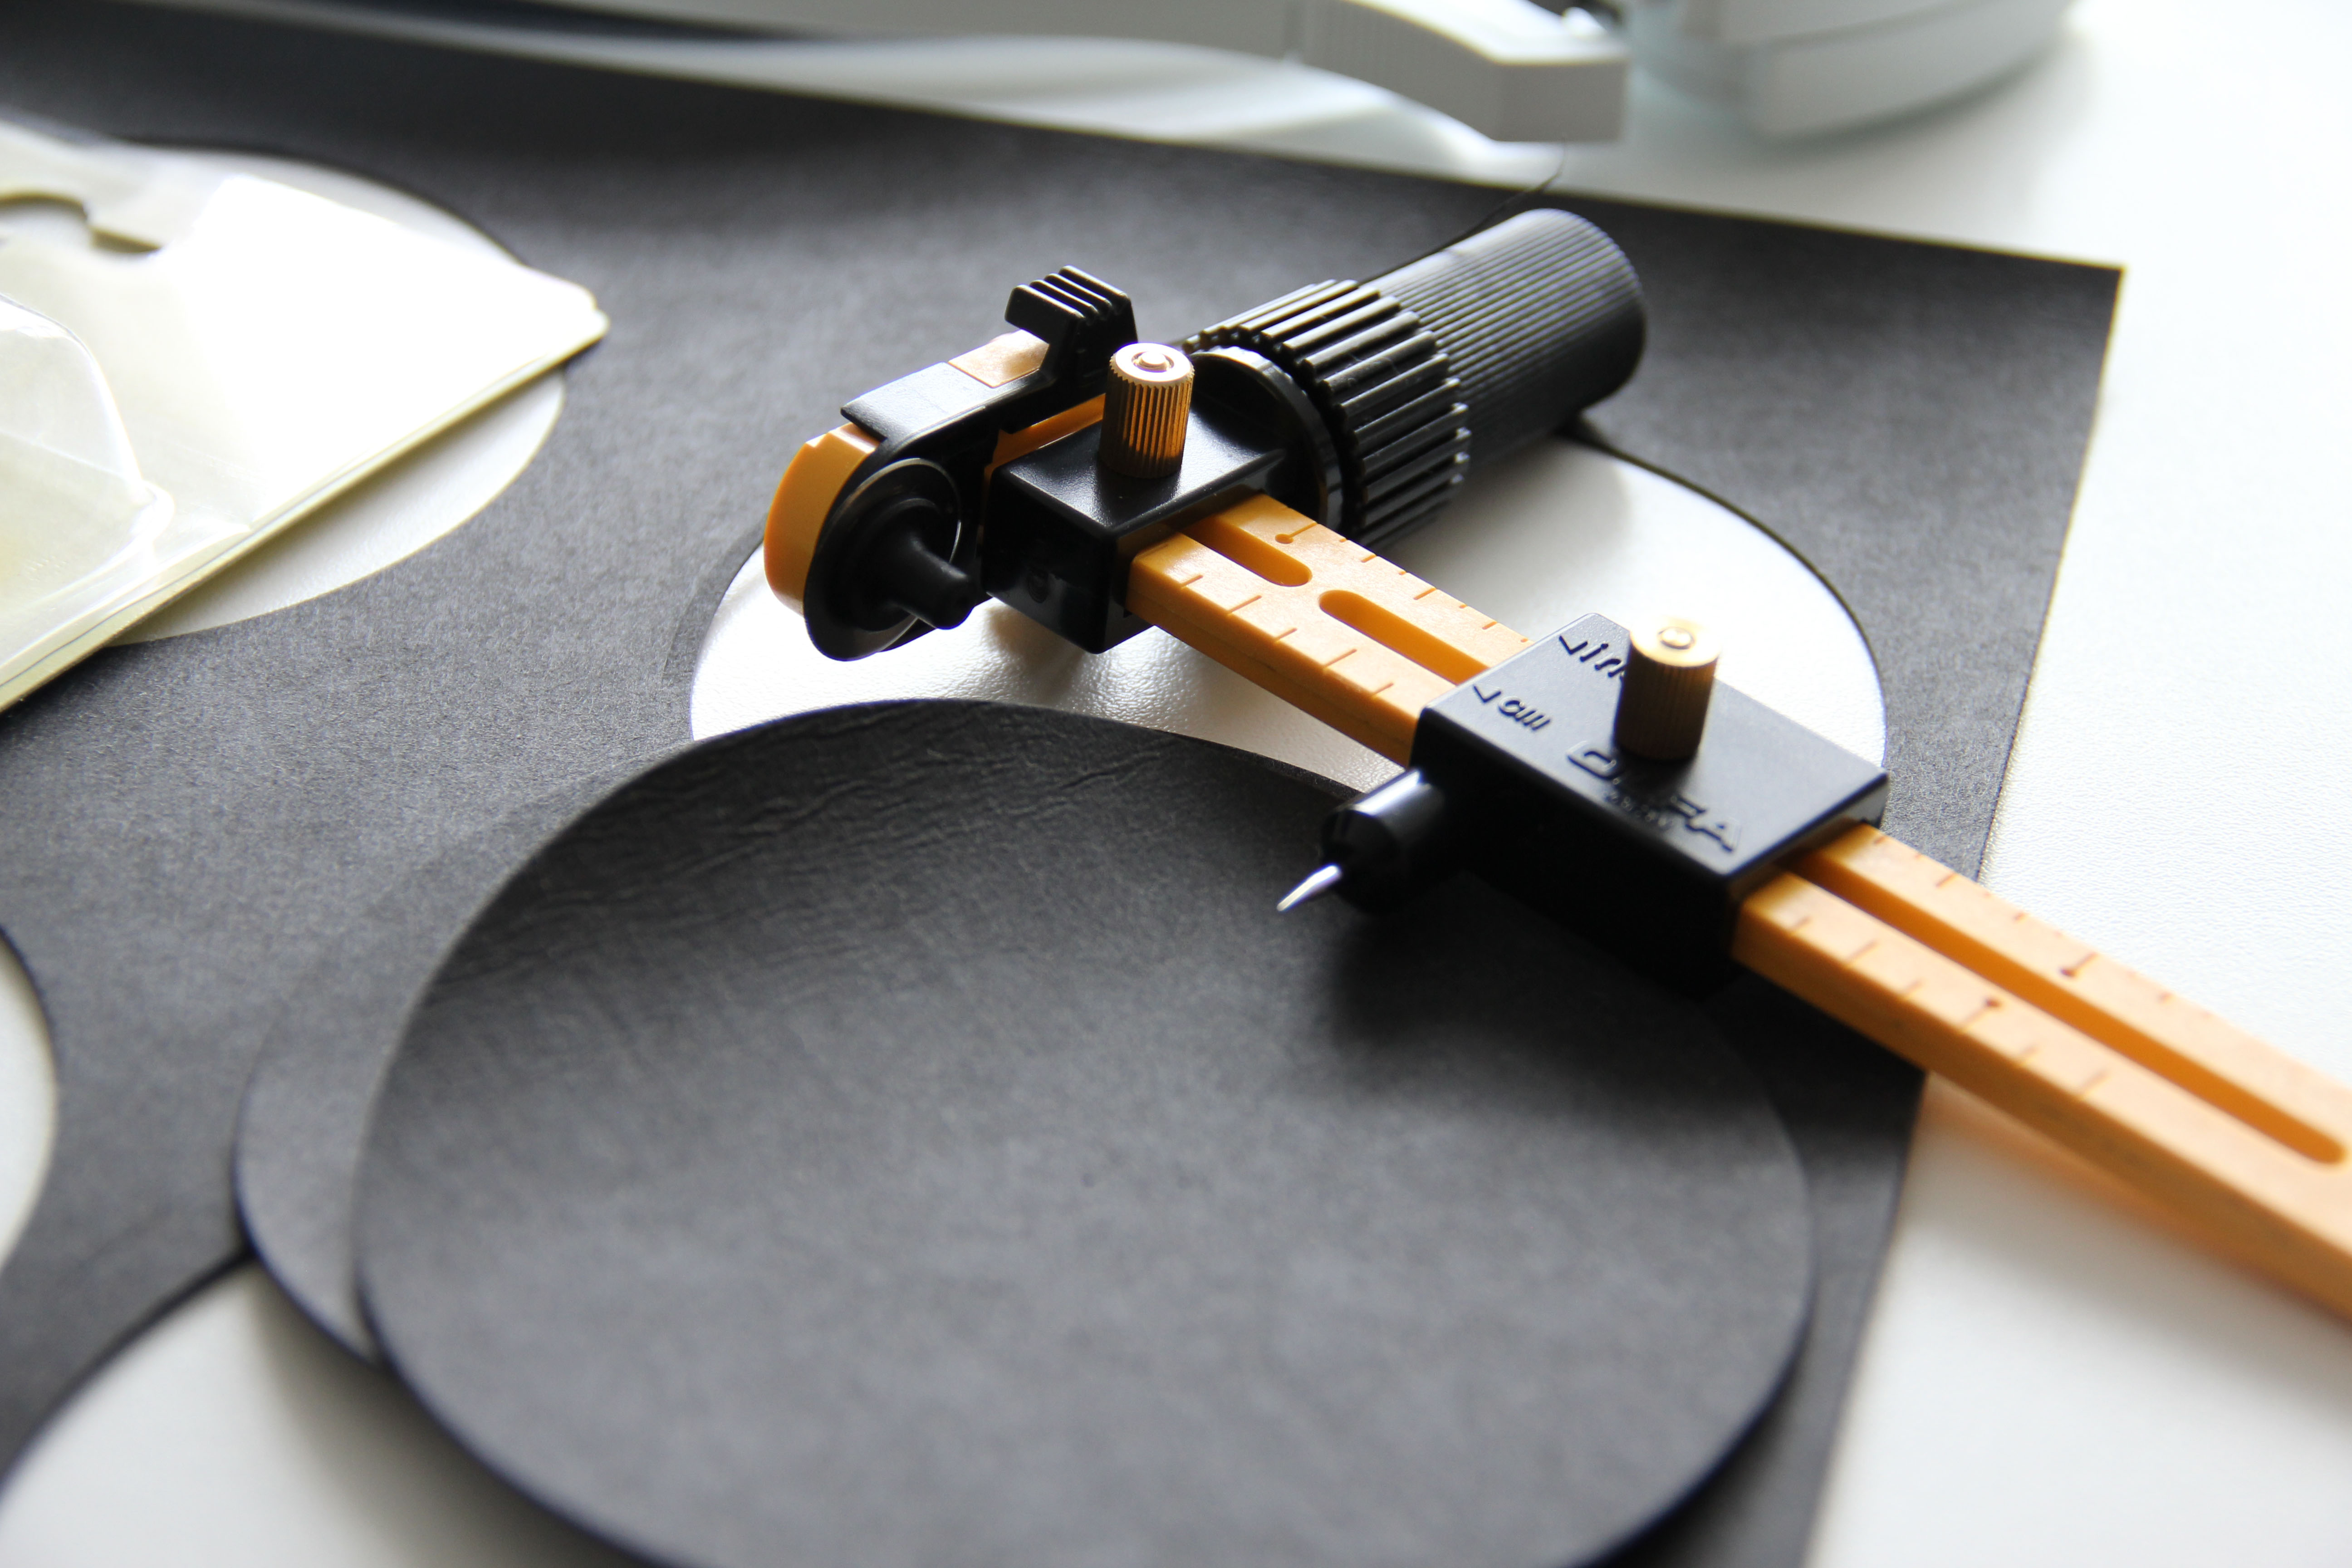
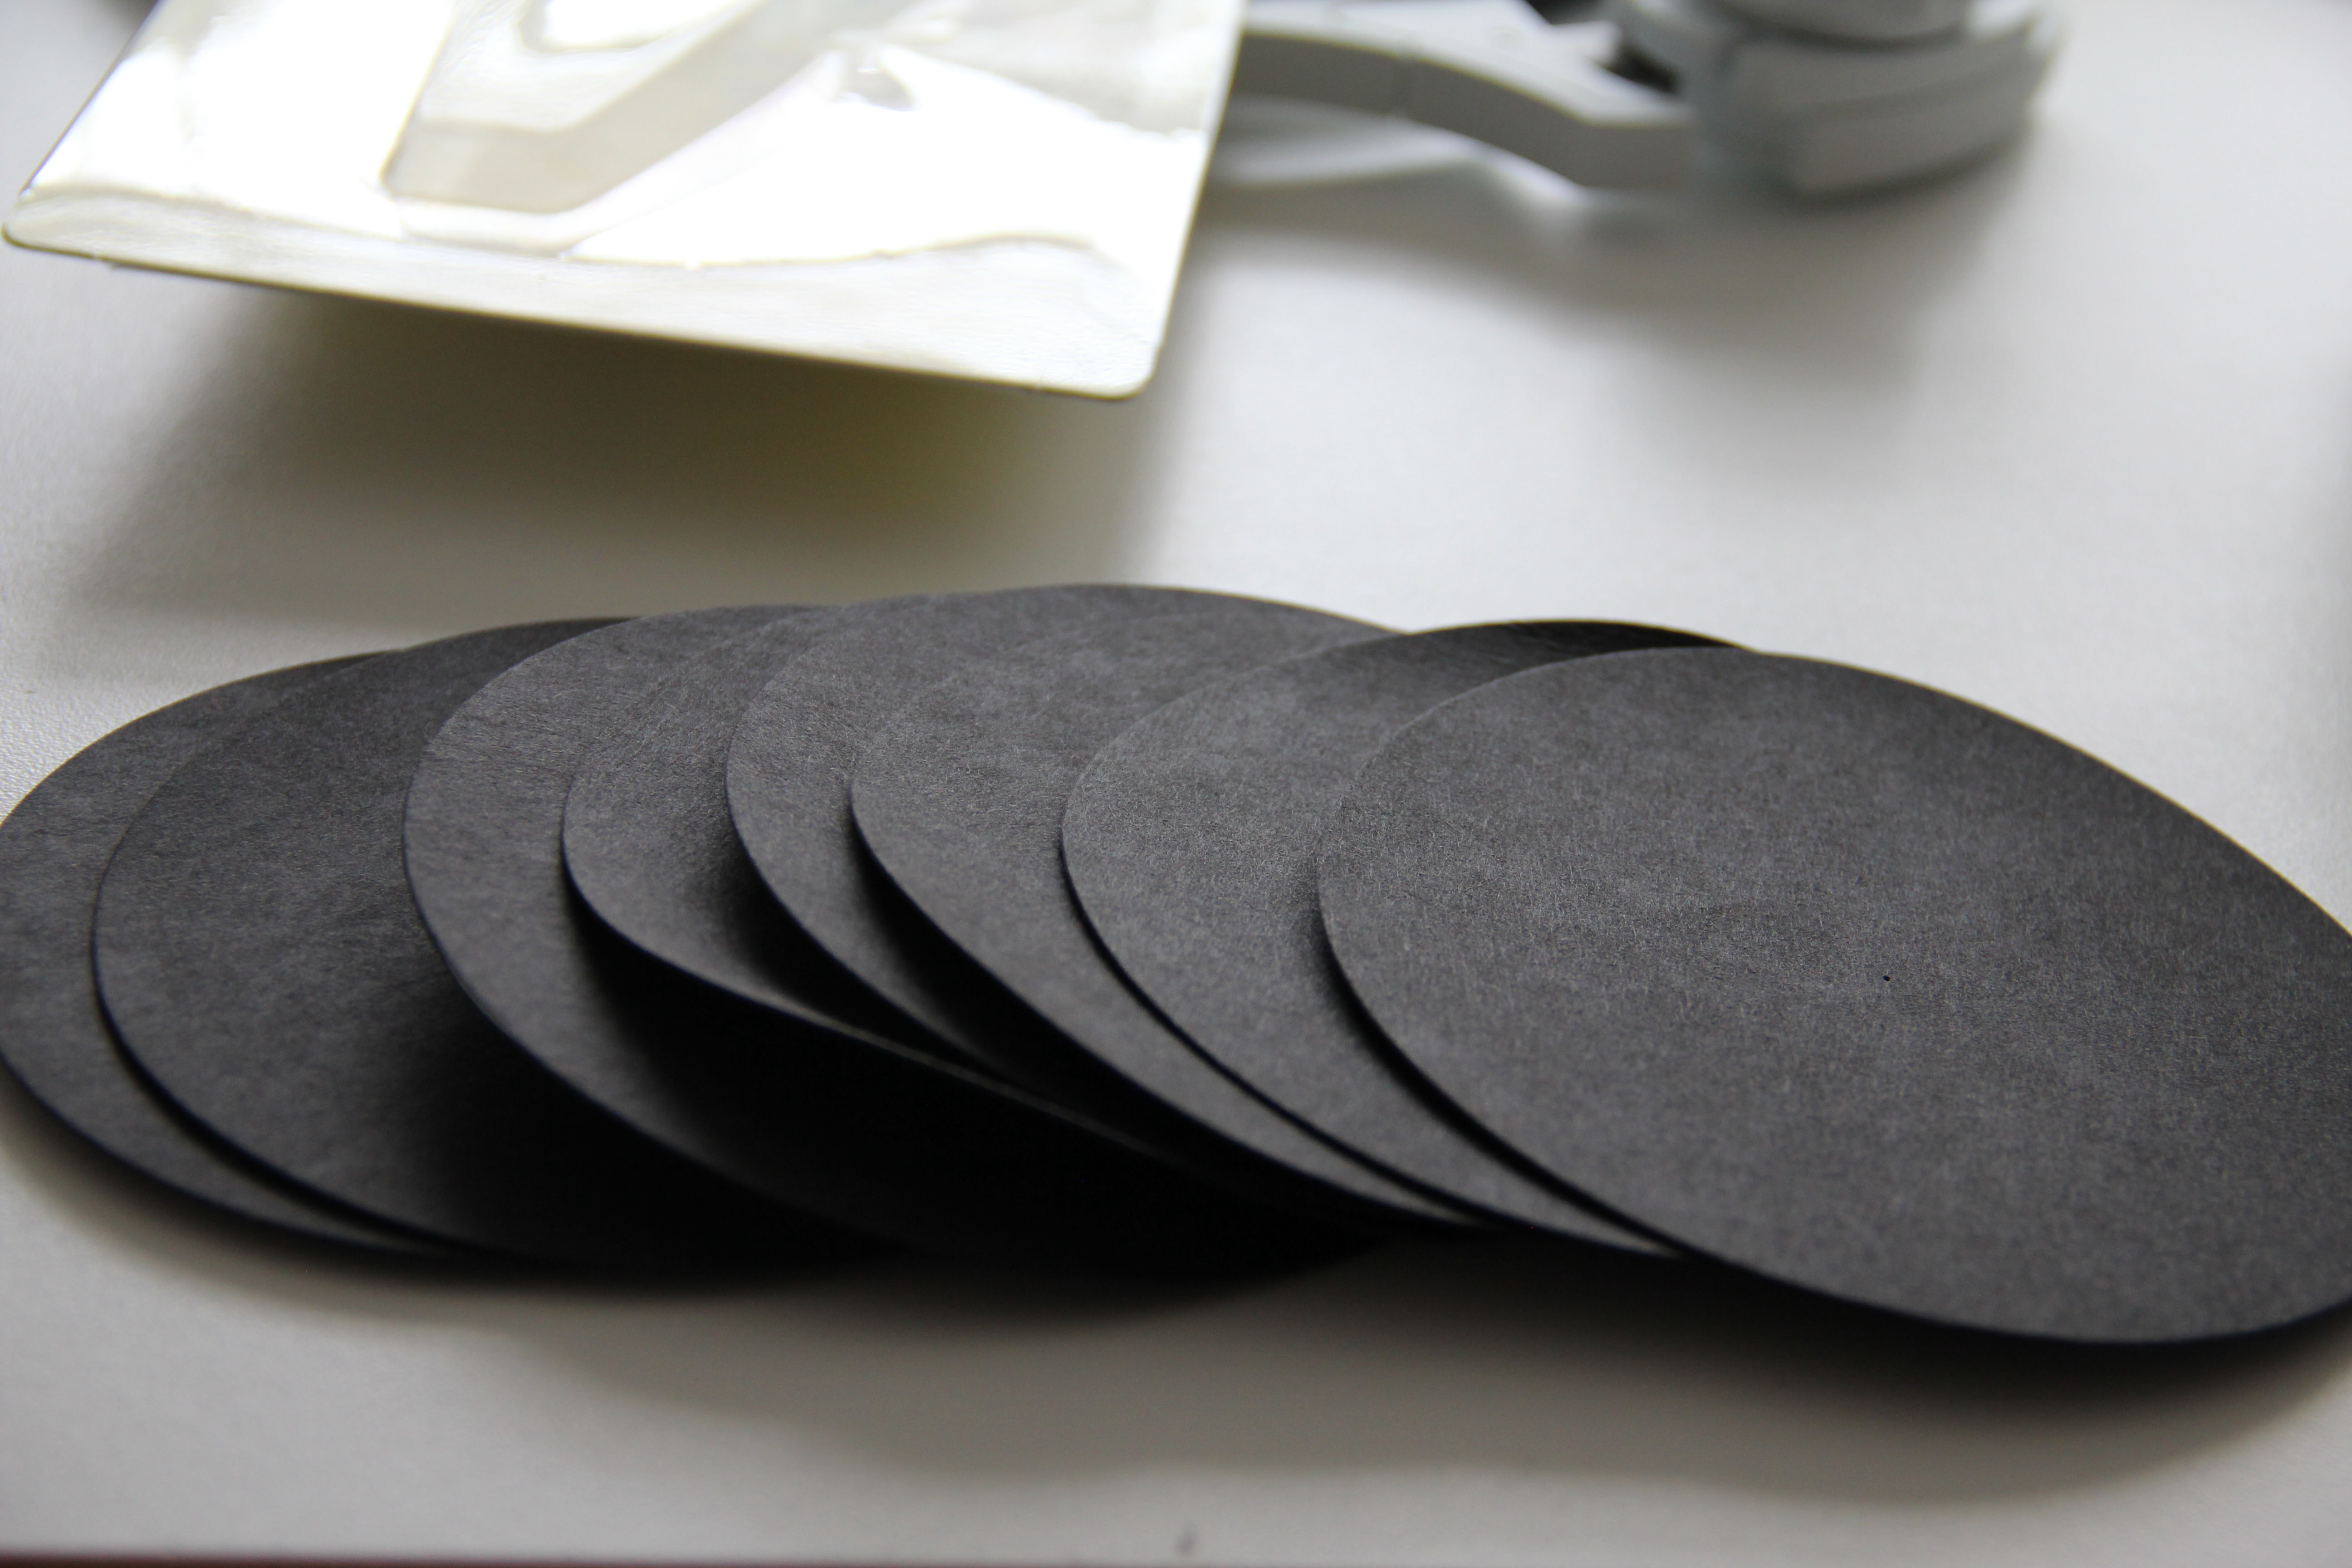
It’s called a Circle Rotary Cutter from Olfa. I finally decided to try it out for this project and I am in love with it. I guess I just didn’t know how desperately I needed to cut accurate circles. It has a ruler attached so you can set the radius. You basically use it like a compass, with the sharp point in the center, and a blade instead of a pencil at the end. Suddenly I am imagining all the wool projects I’d like to invent using circles, as well as paper, Kraft Tex, felt, and basically anything a rotary cutter will go through.
In minutes I had beautiful, ACCURATE circles. Do not discount the significance of getting a circle perfectly round.
I am off now, to work on a quick quilt that I must finish before the holidays. We all have those last minute projects. For those of you in the Midwest, Happy Blizzard-Sewing!
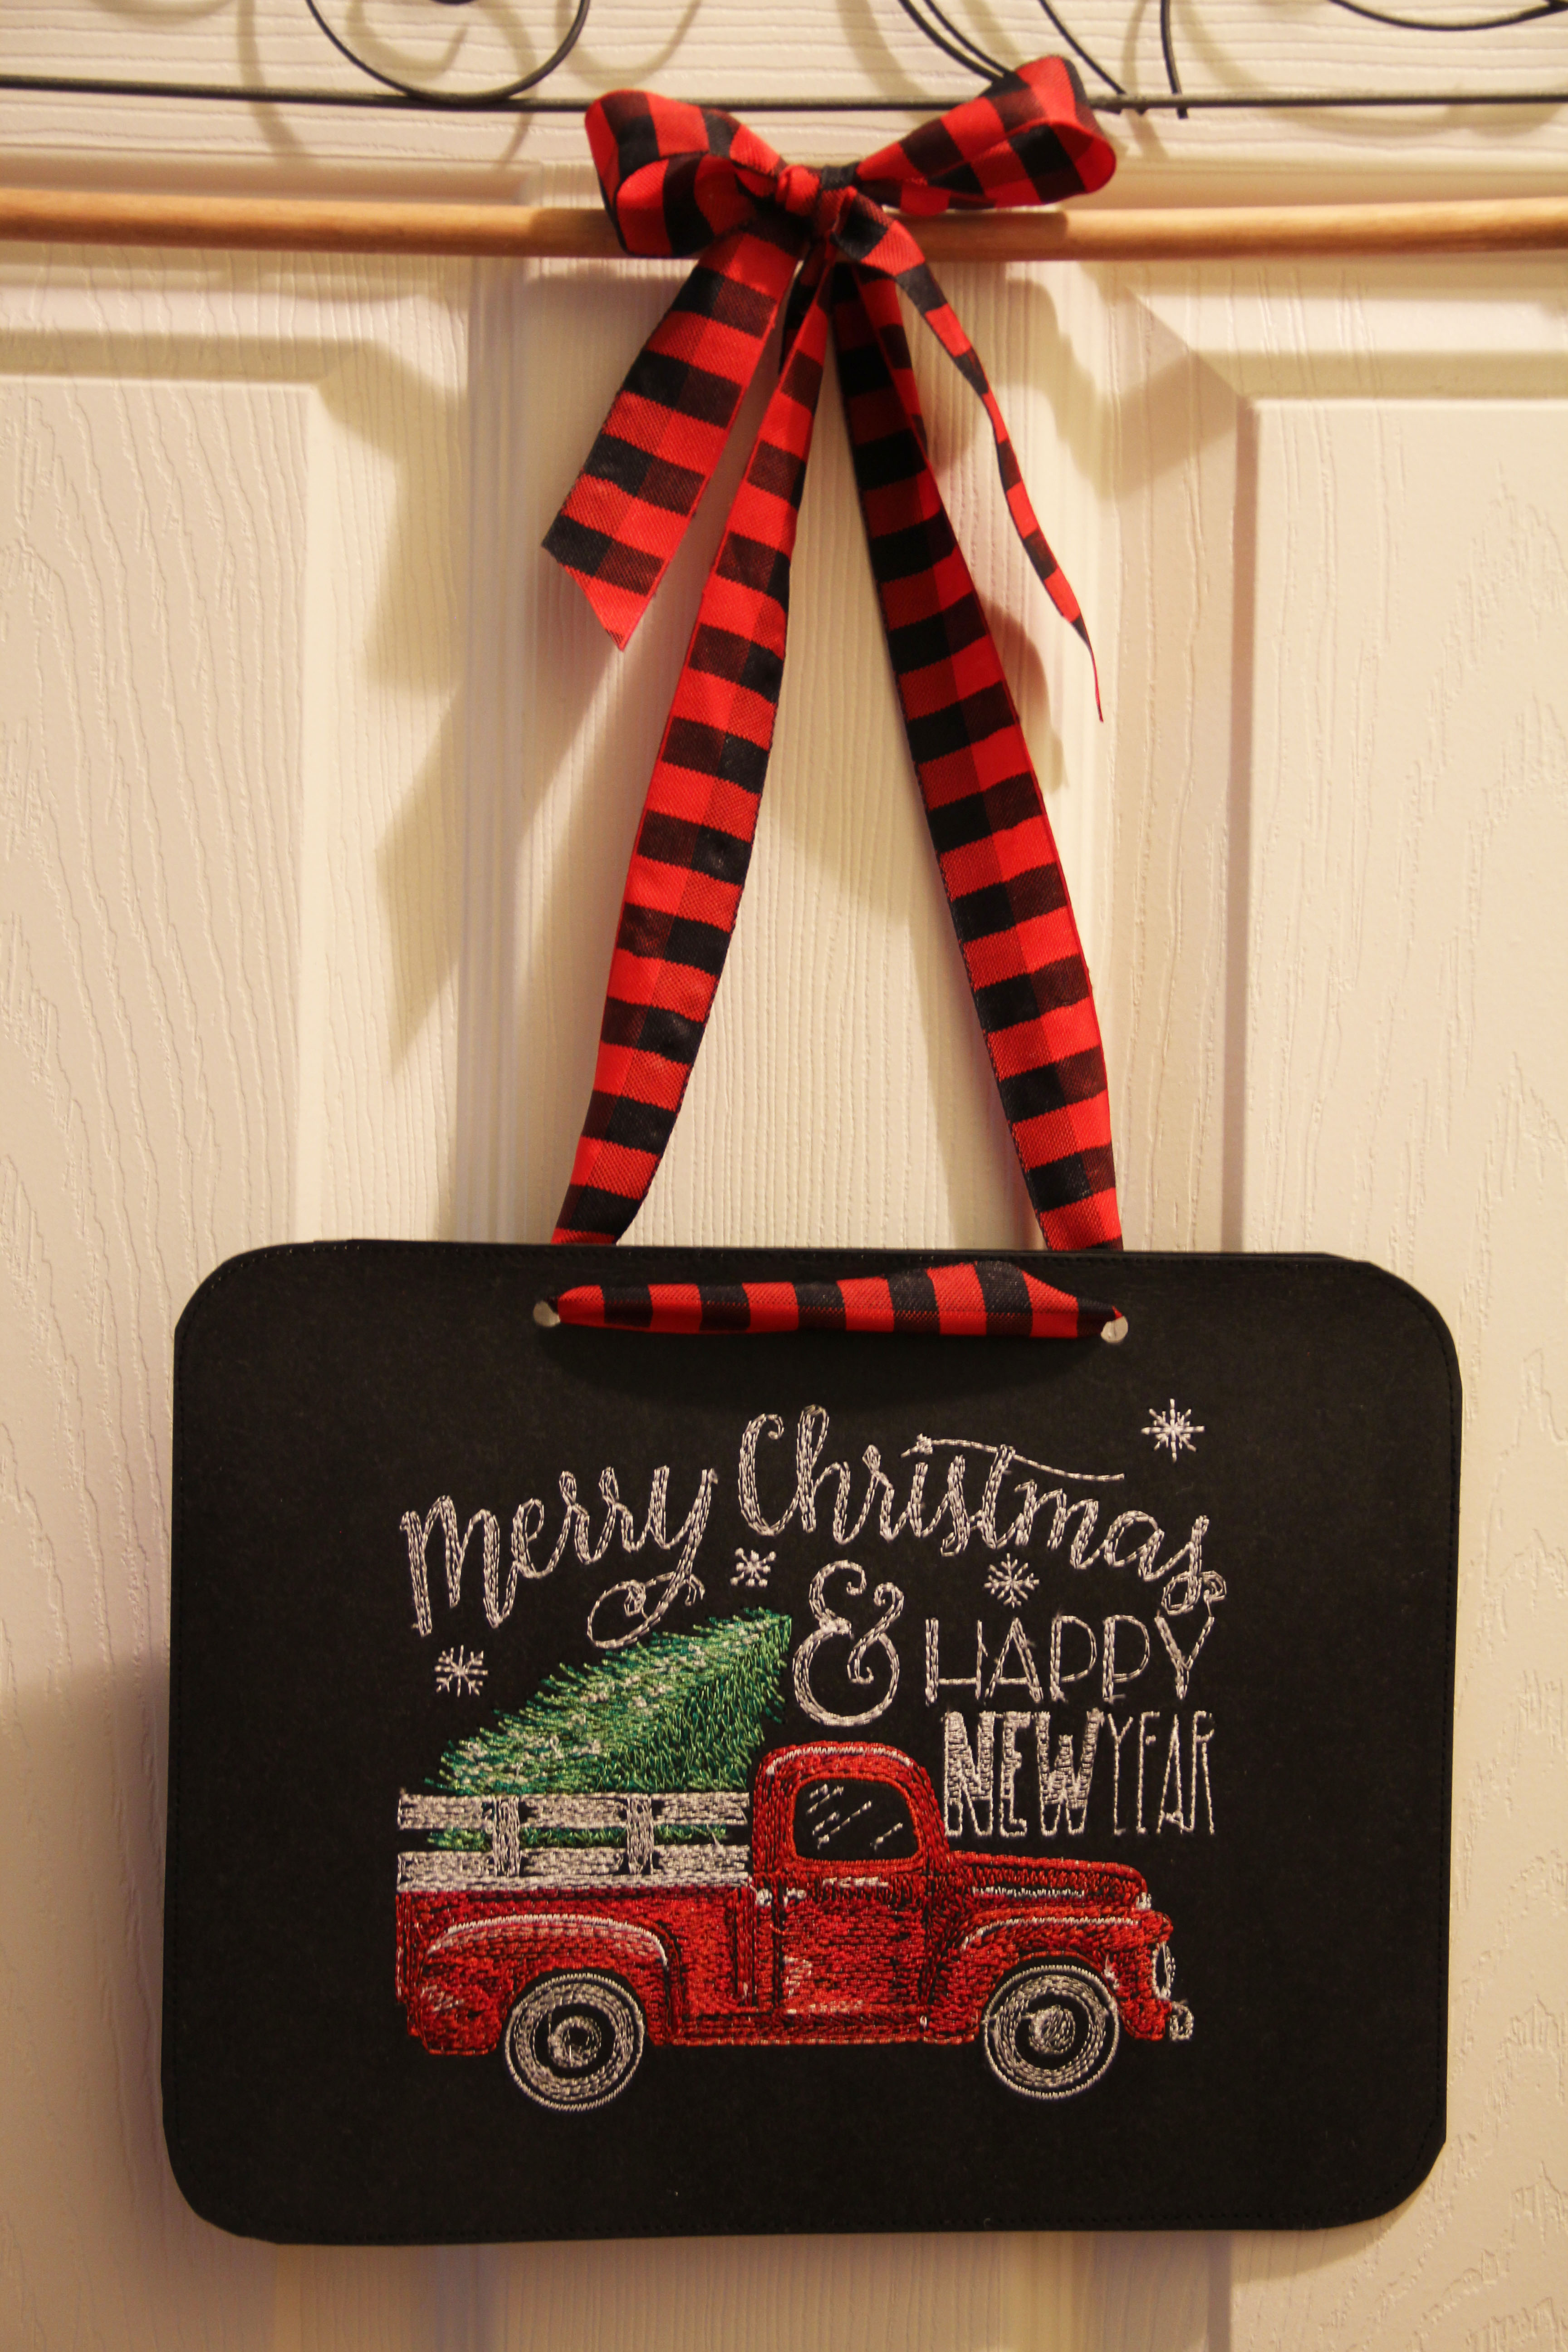
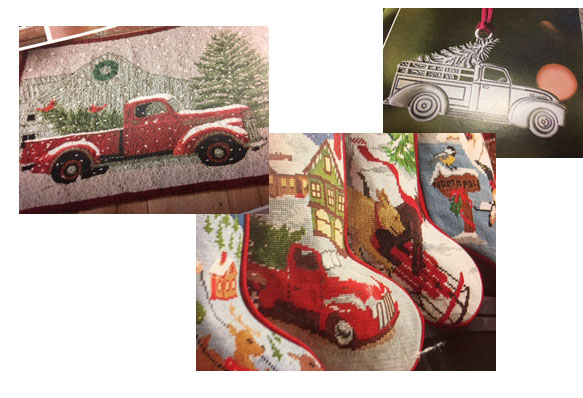
C’mon. You know you’ve seen this truck everywhere.
I’m not sure when it became the definitive retro/vintage/holiday symbol. But somewhere along the way it did. I’ve seen it in catalogs, in charming shops, on TV (Hallmark Channel has at least one movie where the truck is a co-star.) I’m sure this old truck obsession is a simple longing for tradition, simplicity, home-baked cookies and the scent of actual pine. But let’s remember: this cute, sentimental old truck could put out enough dangerous fumes to choke a horse pulling an open sleigh. We are excellent at suspending reality during the holidays.
That said, my grandfather had a dark green/blue one just like it on the farm. (You can see it in the pic with Mom and me below.)
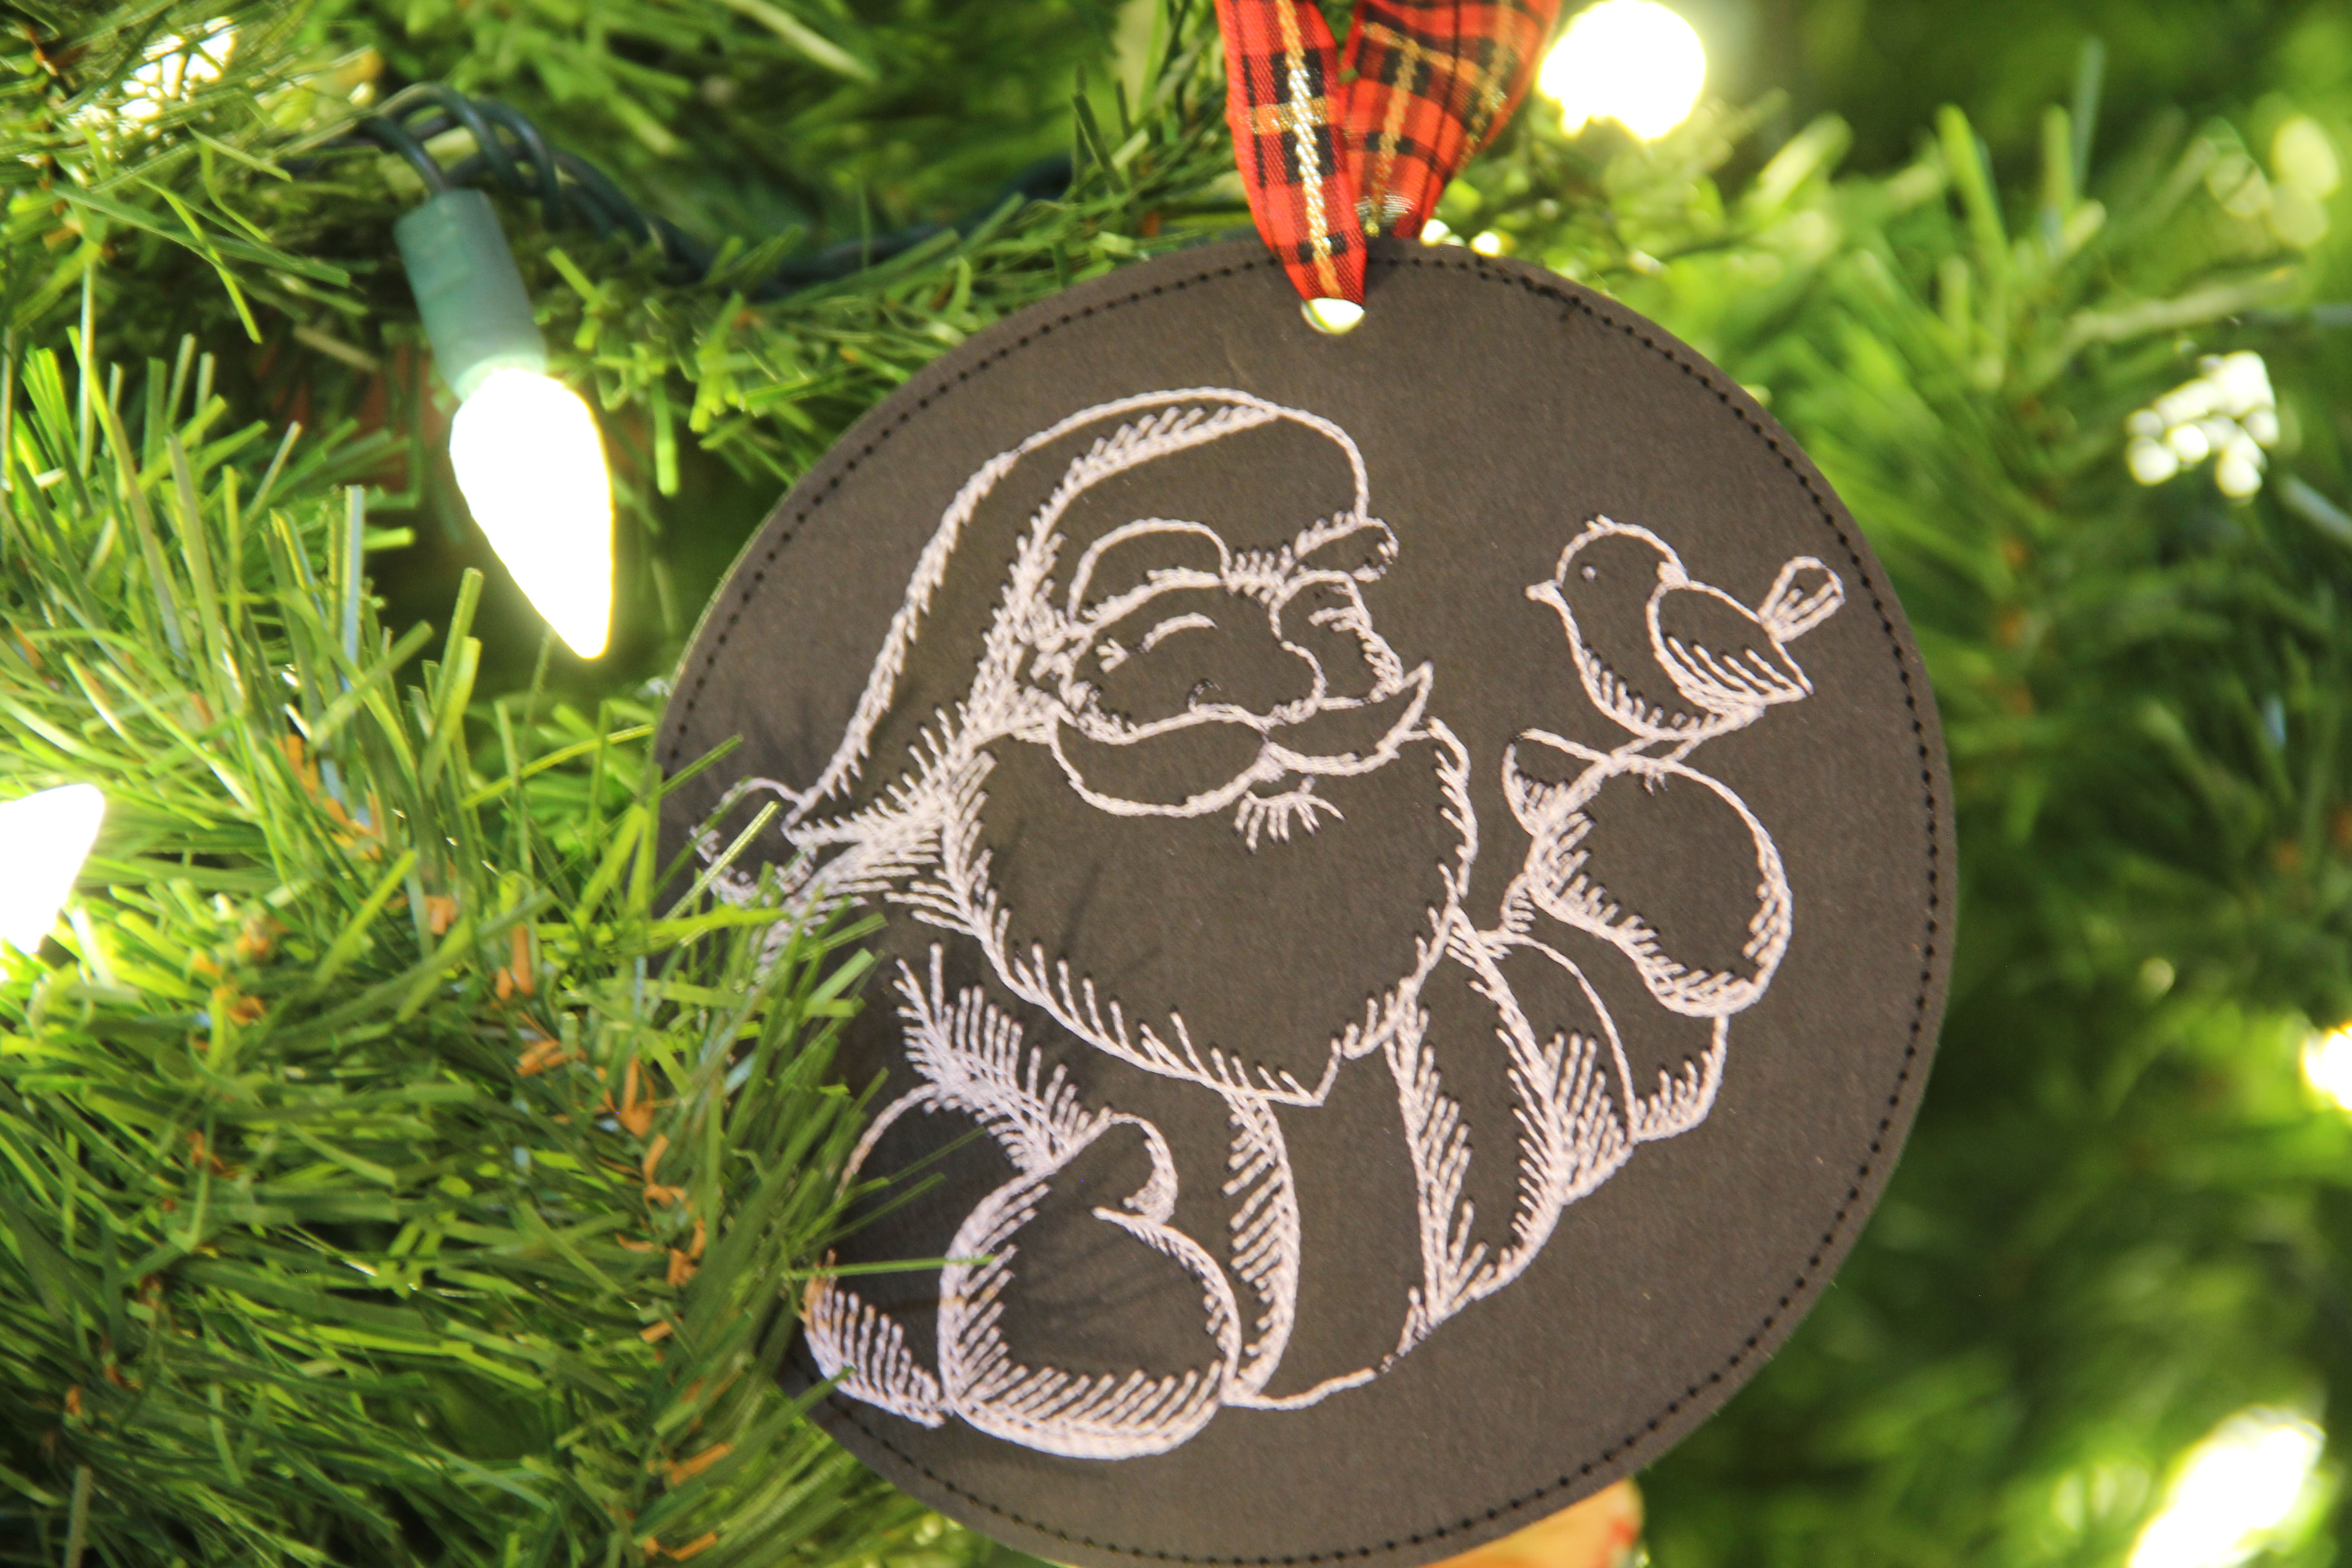
Since I’m as sentimental as everybody else around the holidays, I found myself purchasing the truck machine embroidery shown at the top. Buy it here.
I stitched it out on Kraft Tex. If you’re not familiar with Kraft Tex, it’s the miracle textile that the Levi’s logo is made of. It doesn’t rip. It’s washable. It lasts forever and takes a beating and doesn’t show wear and tear. And you can sew with it and on it.
I wasn’t sure how it would hold up with 22,000 stitches on it, but I used Stabilstick Cutaway stabilizer and it was perfect.
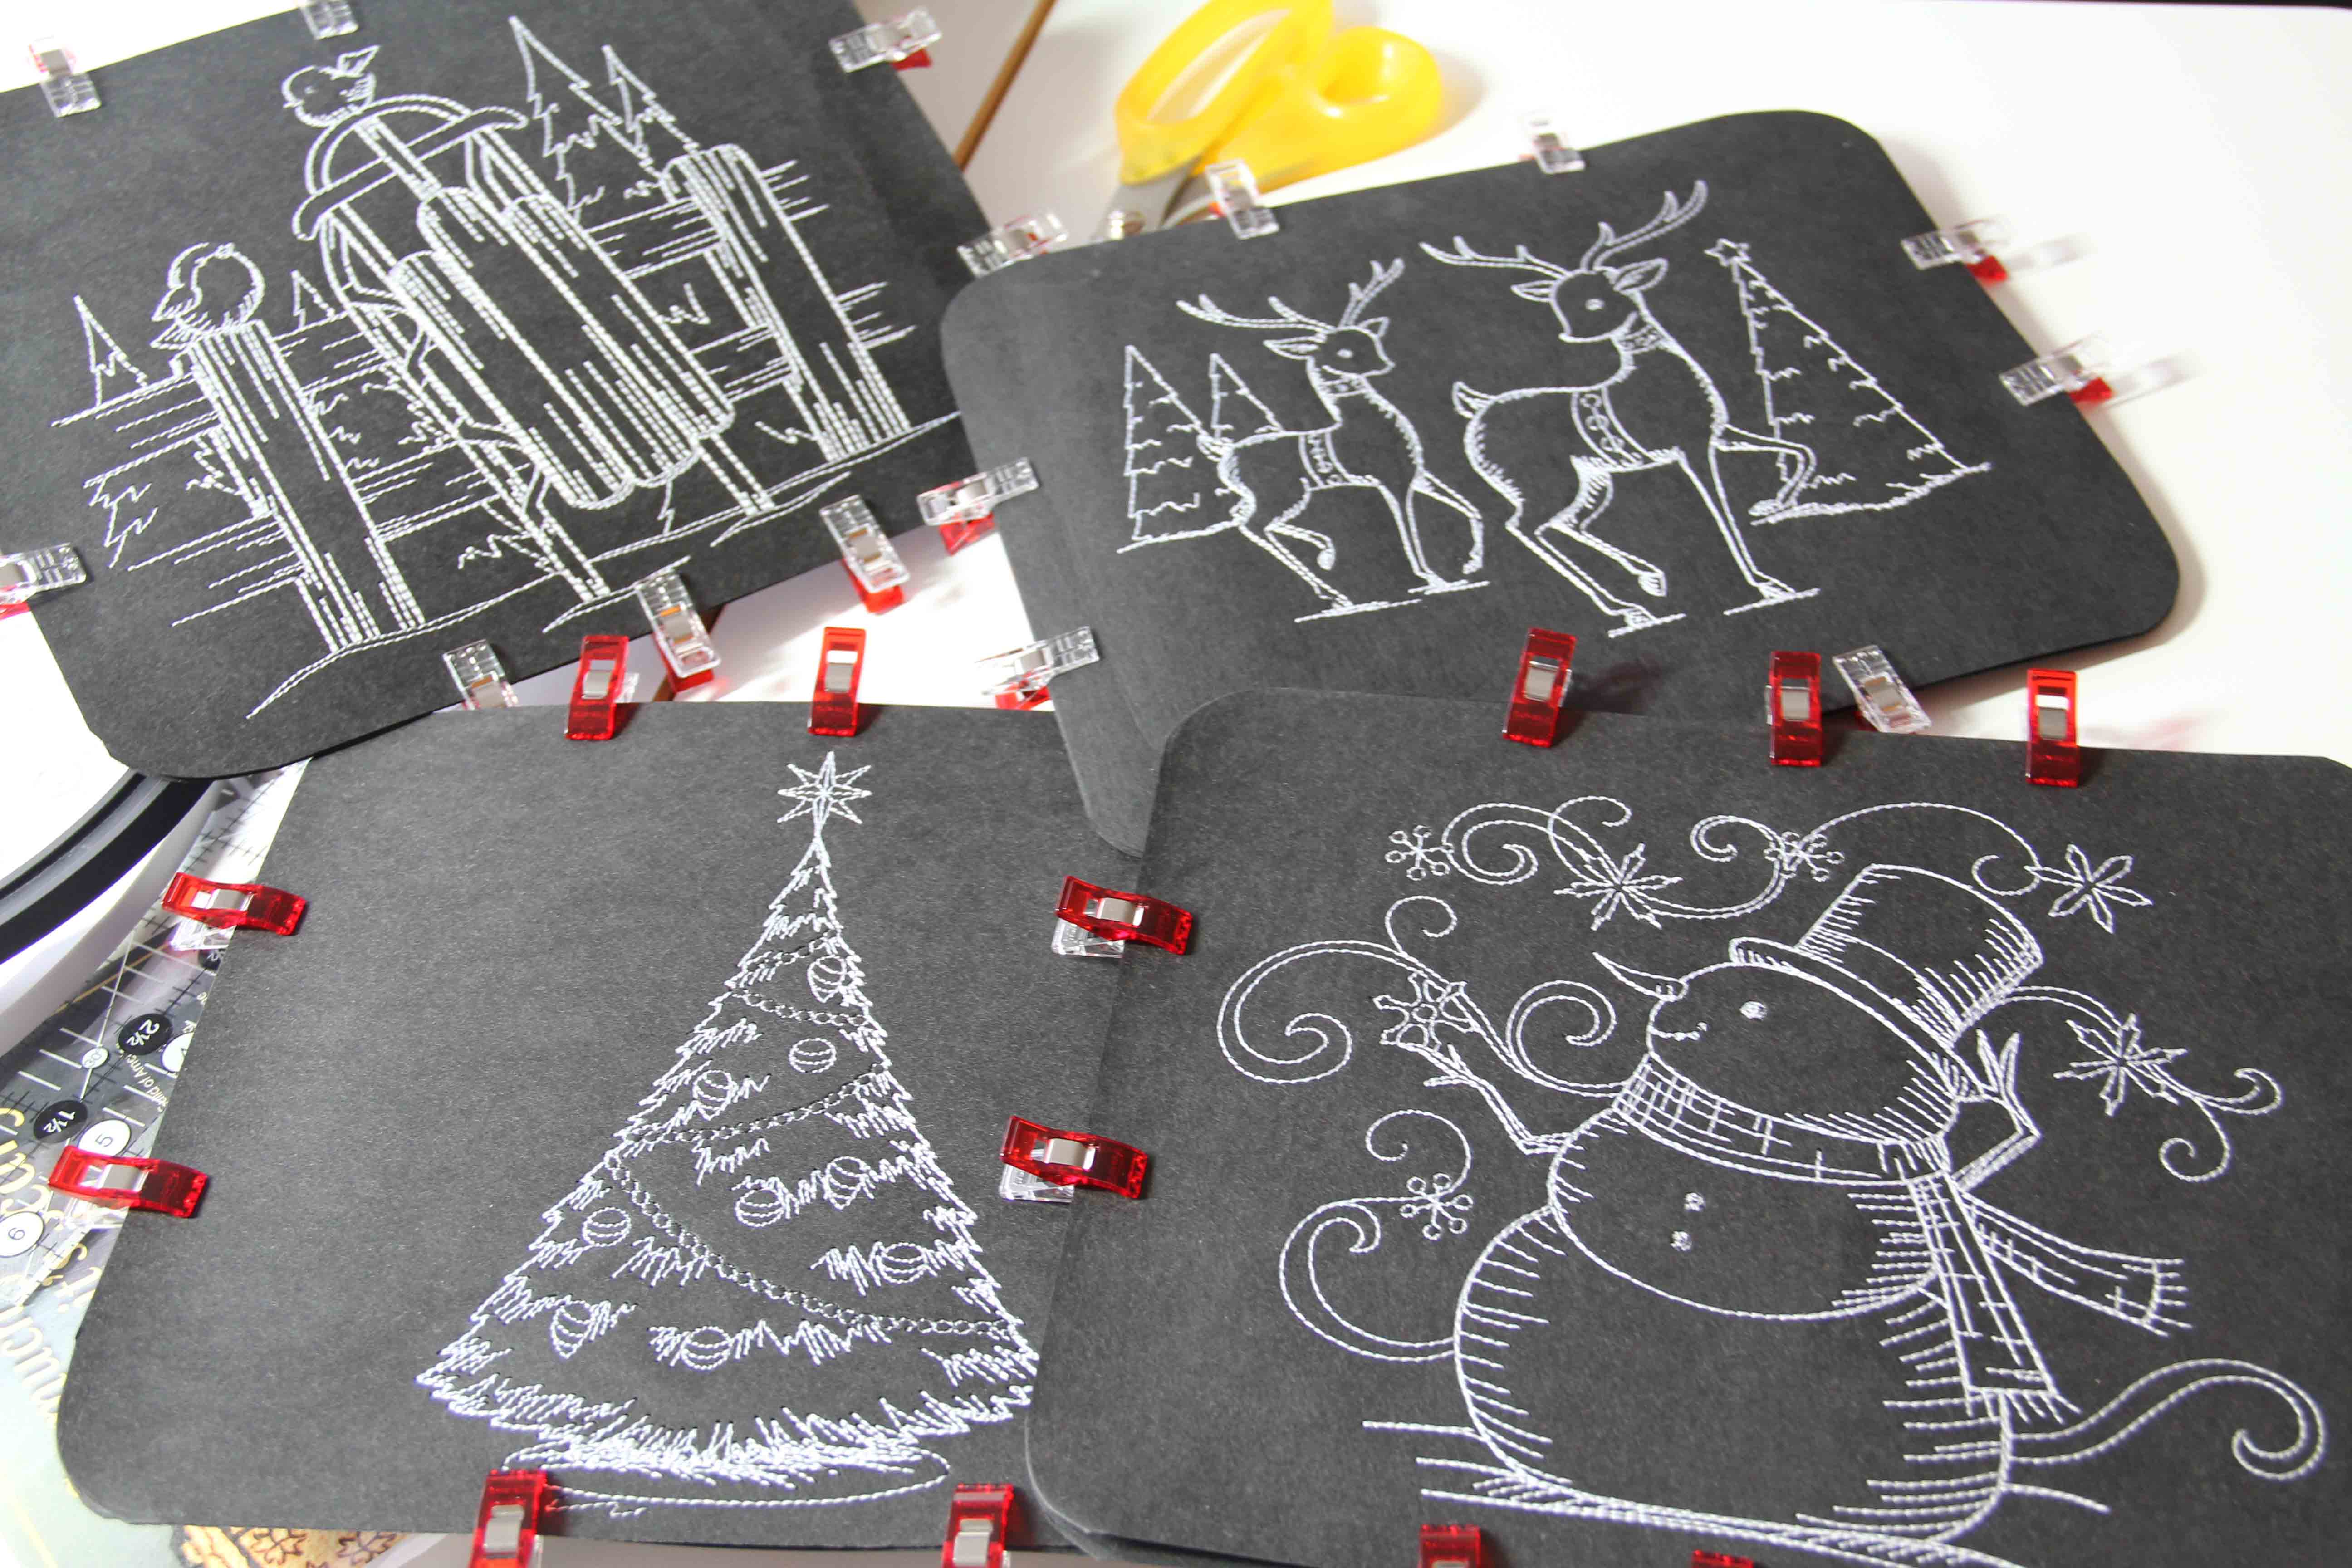
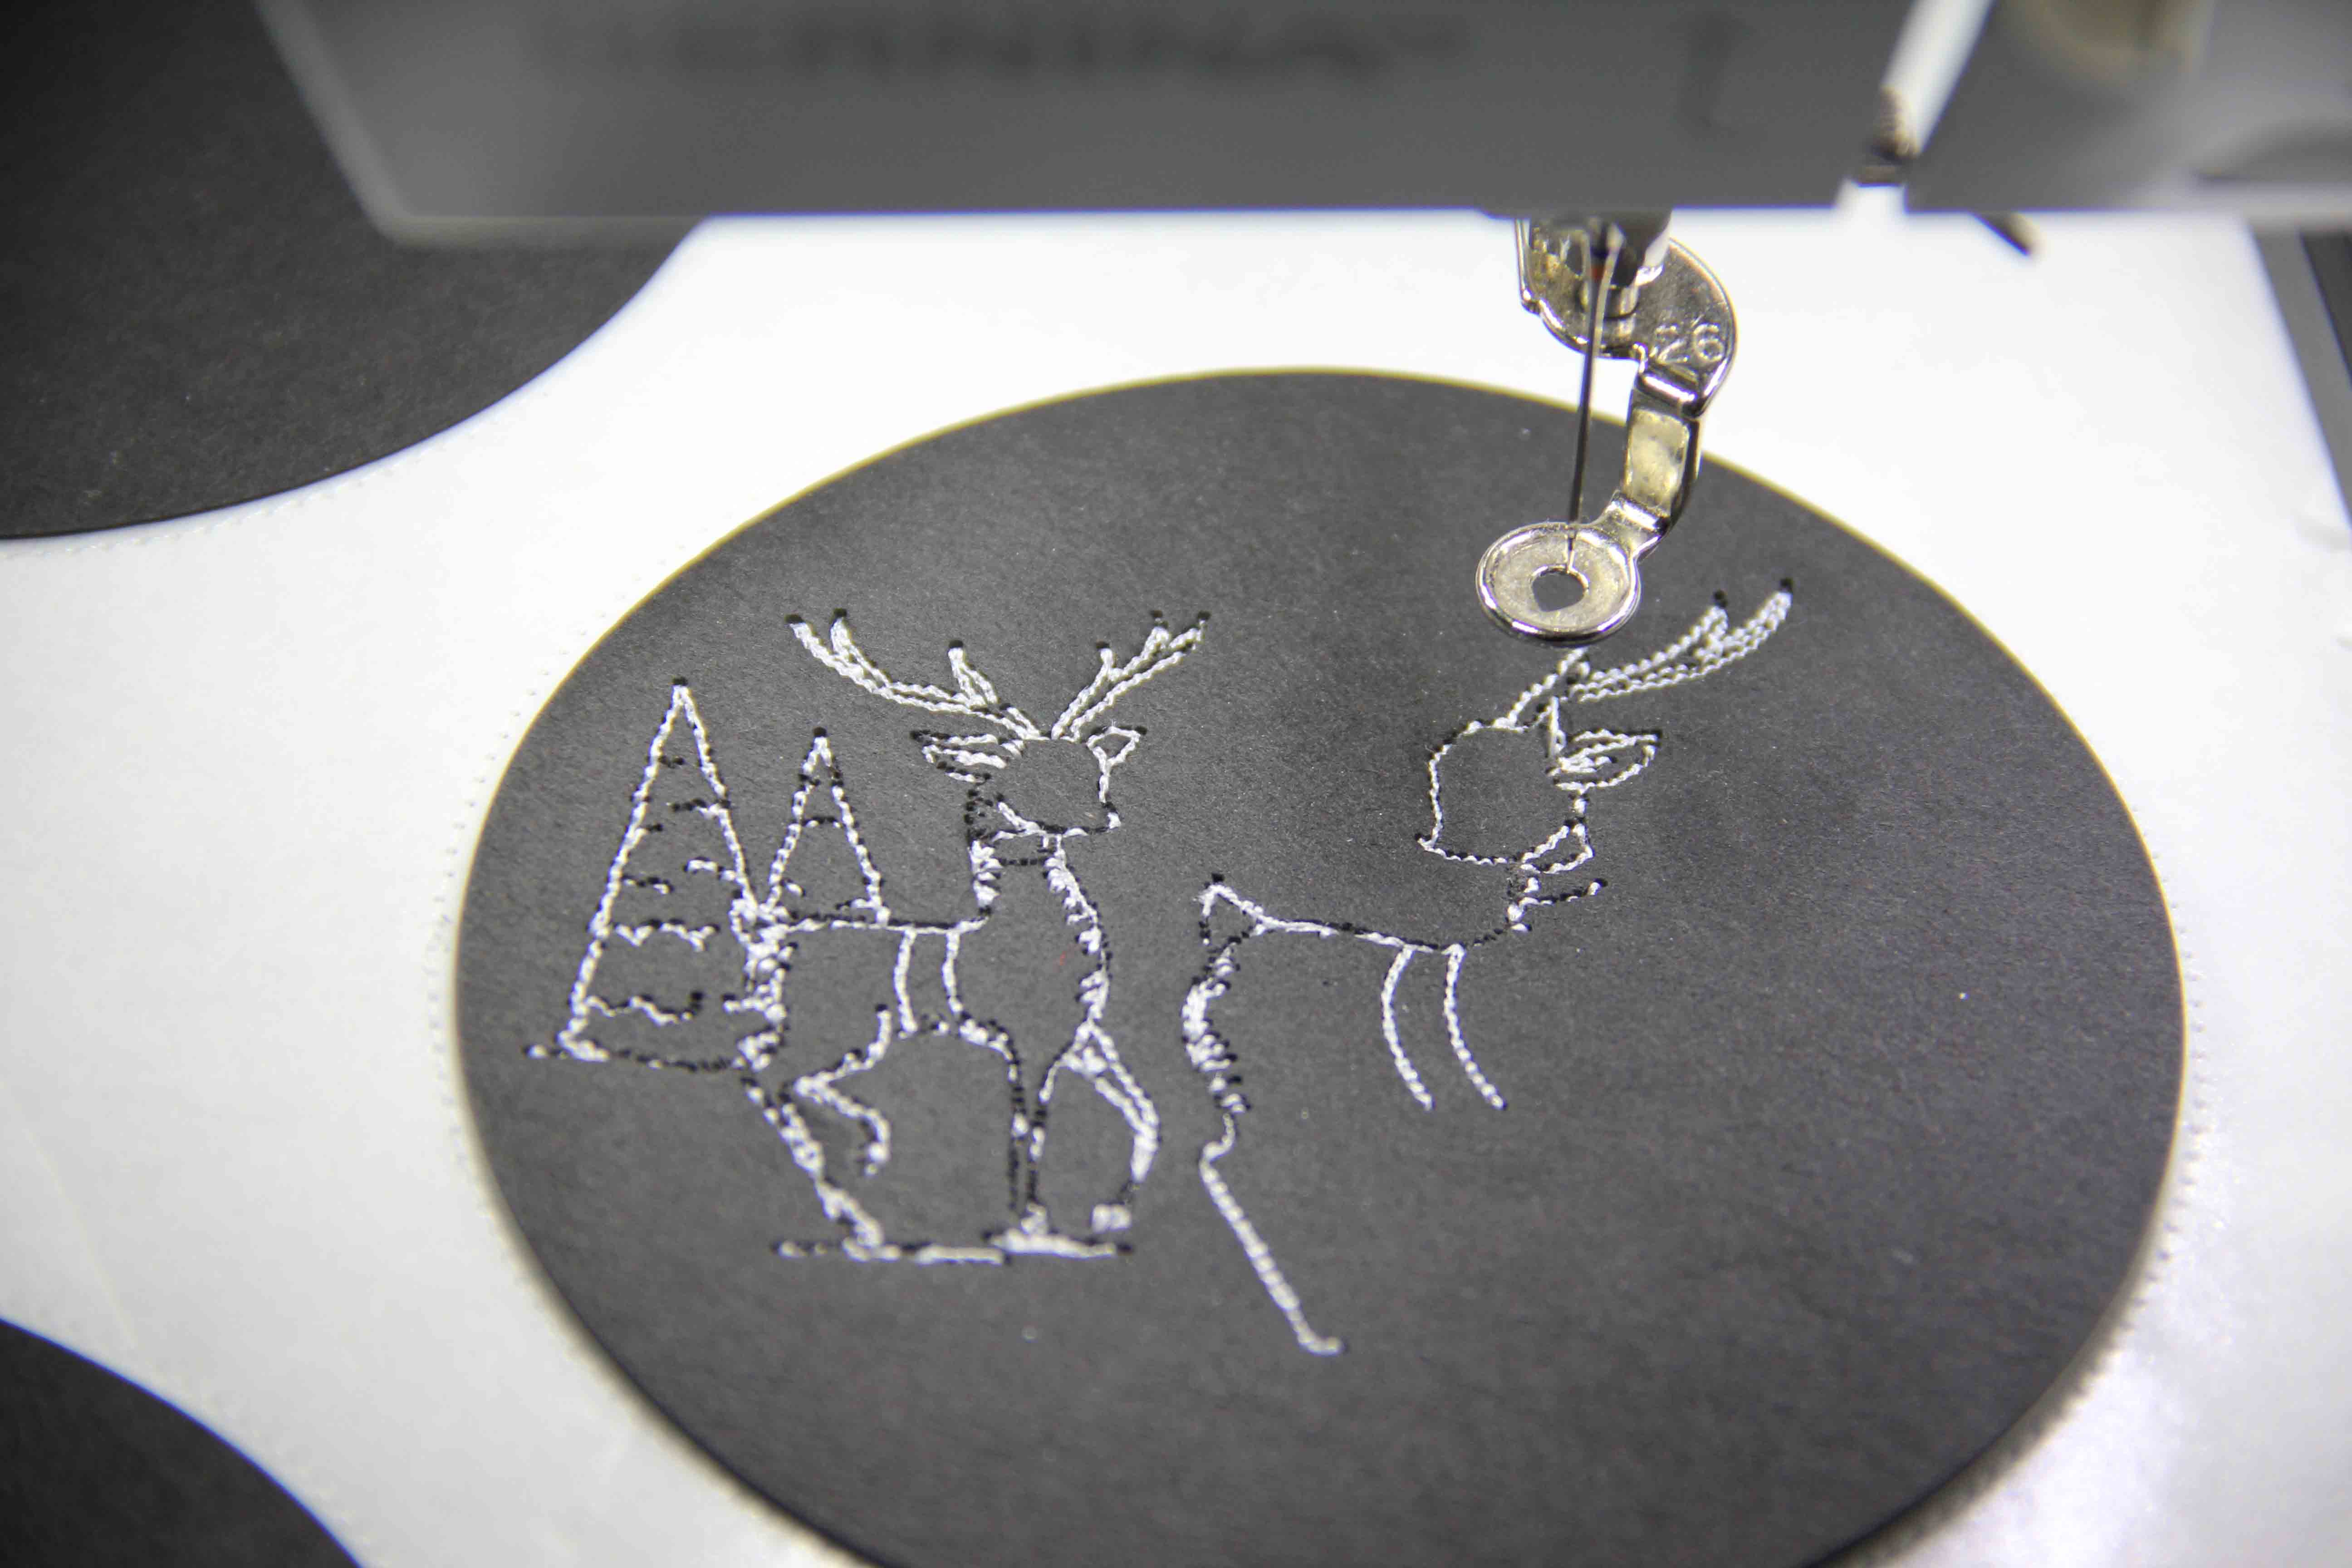
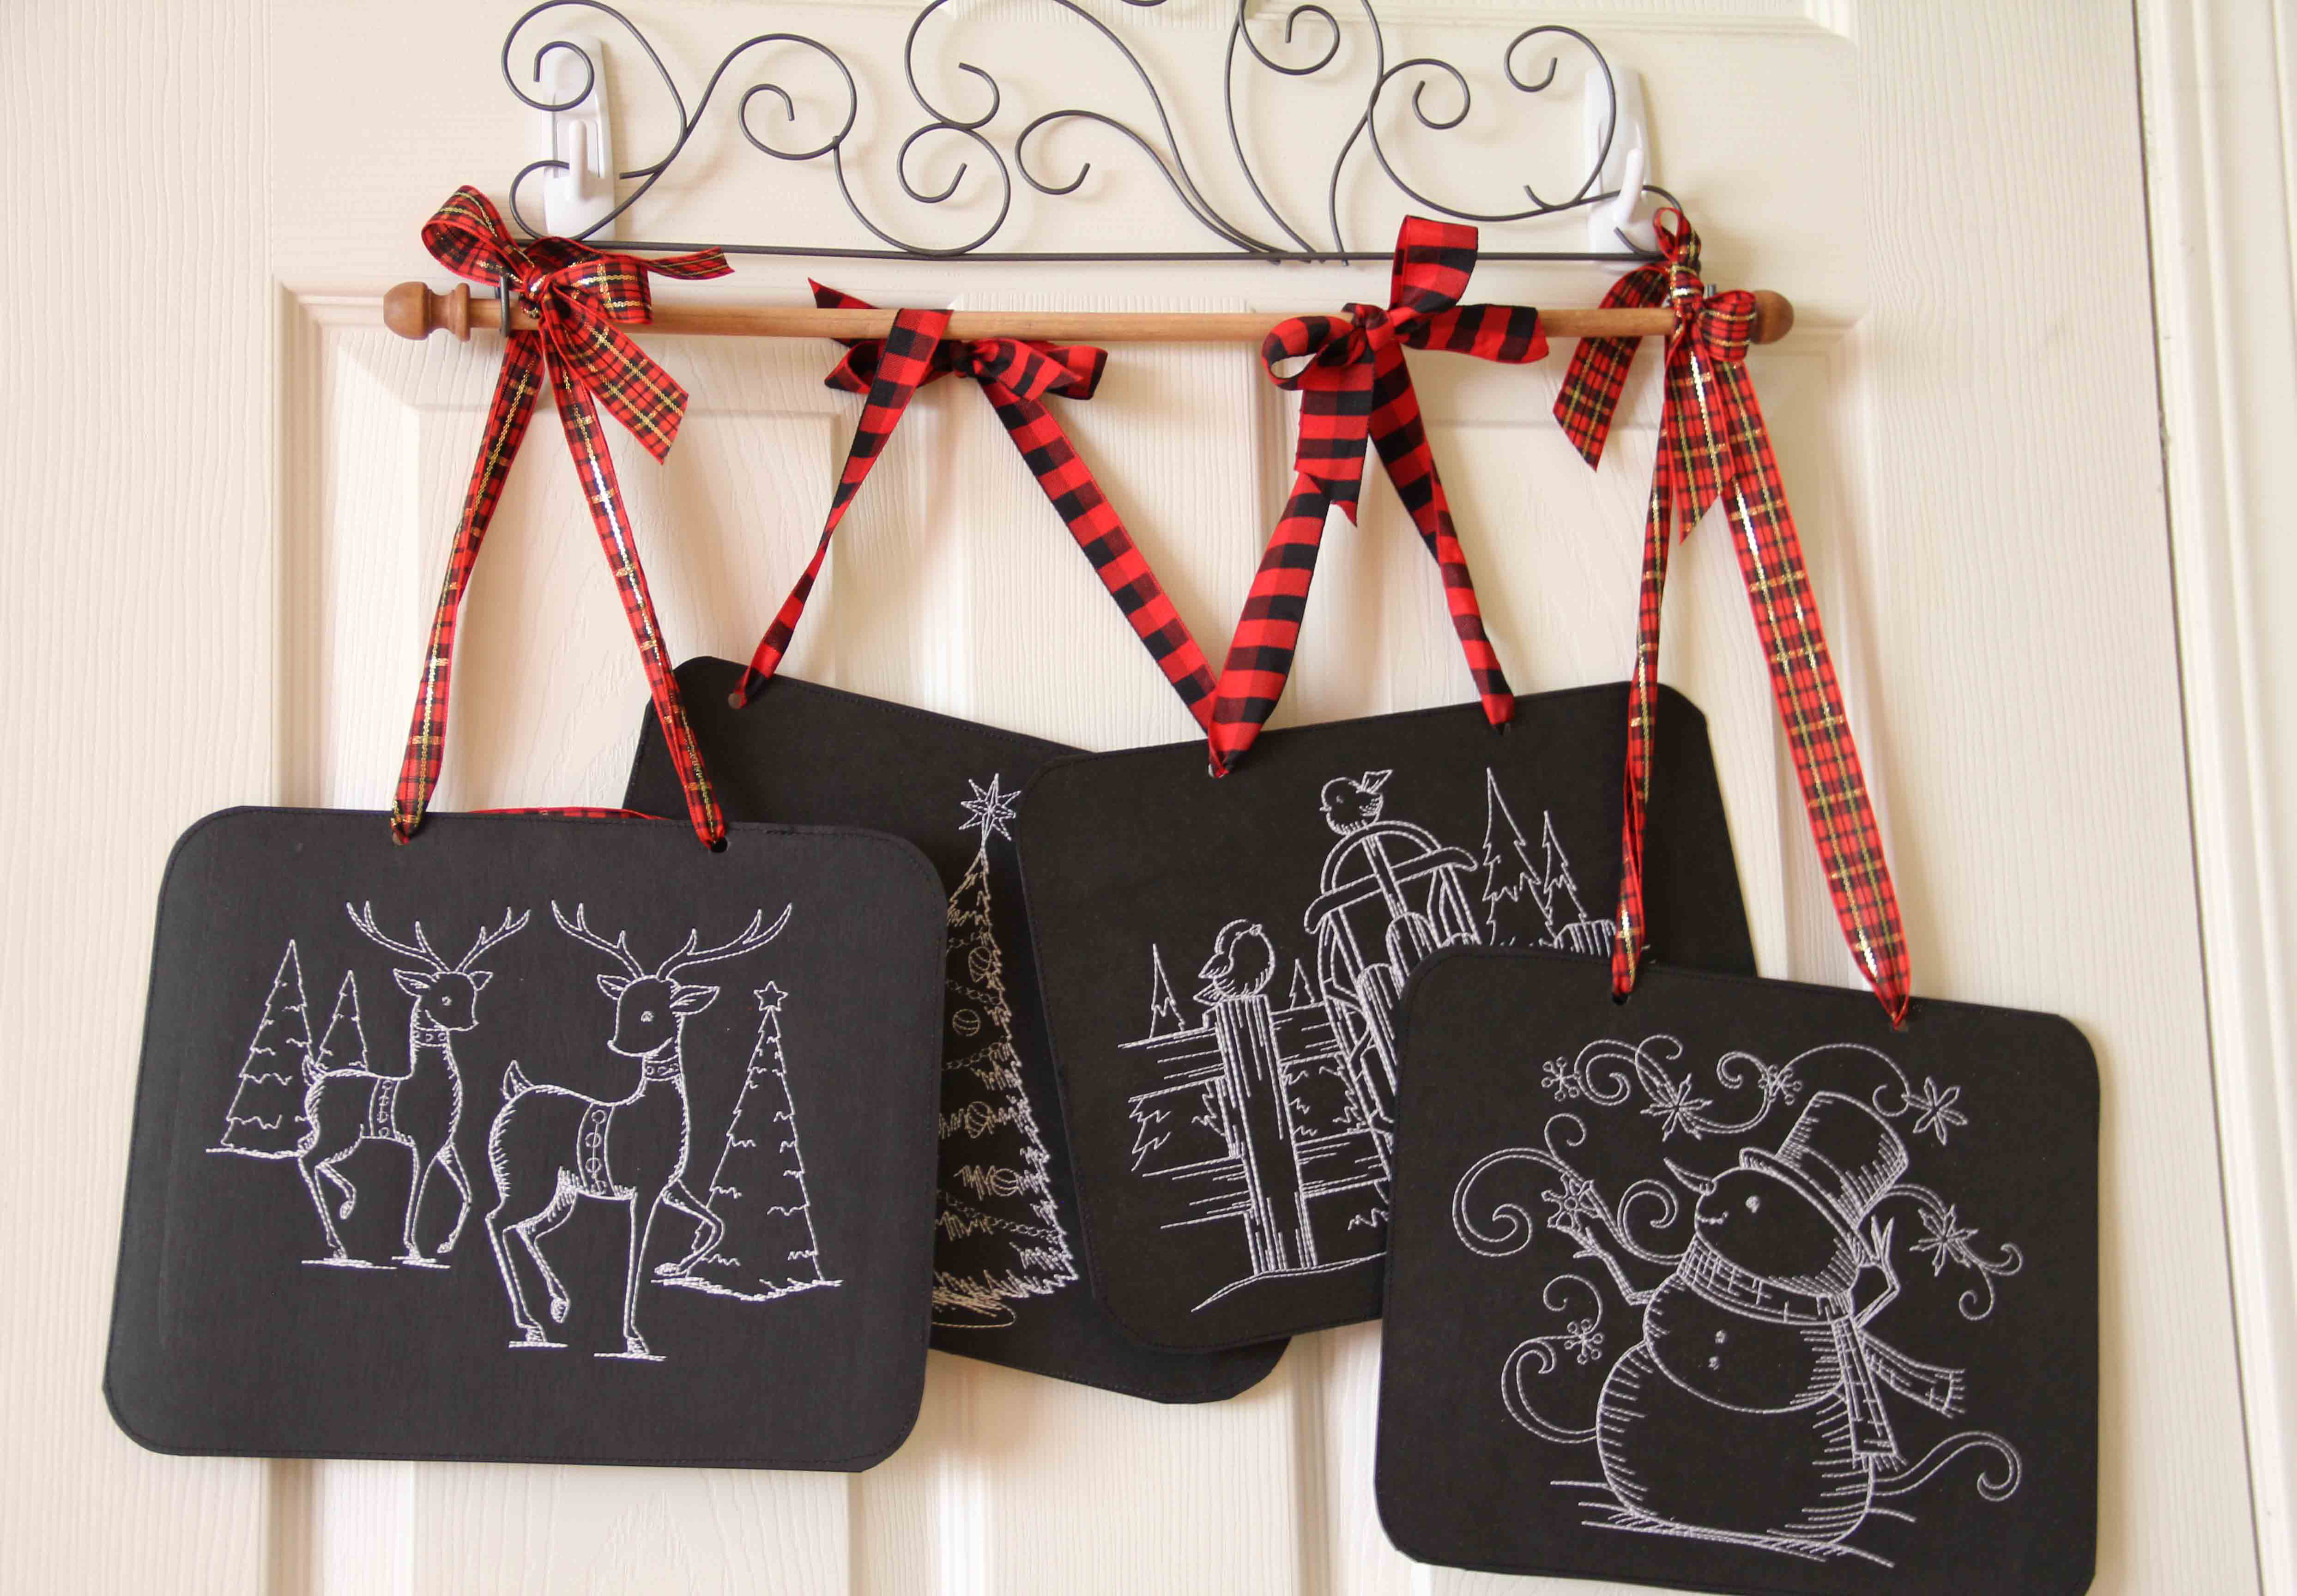
Then I started getting more ideas about holiday decor using Kraft Tex and machine embroidery. You can find some cute and simple designs here.
I stitched them out, again using the Stabilstick cutaway stabilizer. I put a design on the front and on the back, trimmed them to size, rounded the corners, and stitched in black around the outside. They are the perfect shape for mouse pads. But I added ribbon and will give them out on Thanksgiving as a holiday decoration.
Once I did those, I started testing ornaments.
CAUTION: Don’t just resize the designs.
I tried to take them from 7 or 8 in. wide down to 4 in. Even in software, they did not size down properly. They were not originally .ART files, so the software was struggling to reduce stitches. I tried it anyway, but…
Yuck. Big mistake. So I went back to the website and ordered some new ones in smaller original sizes.
These turned out just fine. I’ll be adding ribbon and using them as ornaments. They will have different designs on each side. I’ll share more when I get them completed.
For now, I’m wishing all of you a wonderful Thanksgiving and a relaxing weekend with loved ones. My holiday will be spent with 10 close family members and 2 dogs. That’s charming and sentimental enough for me.
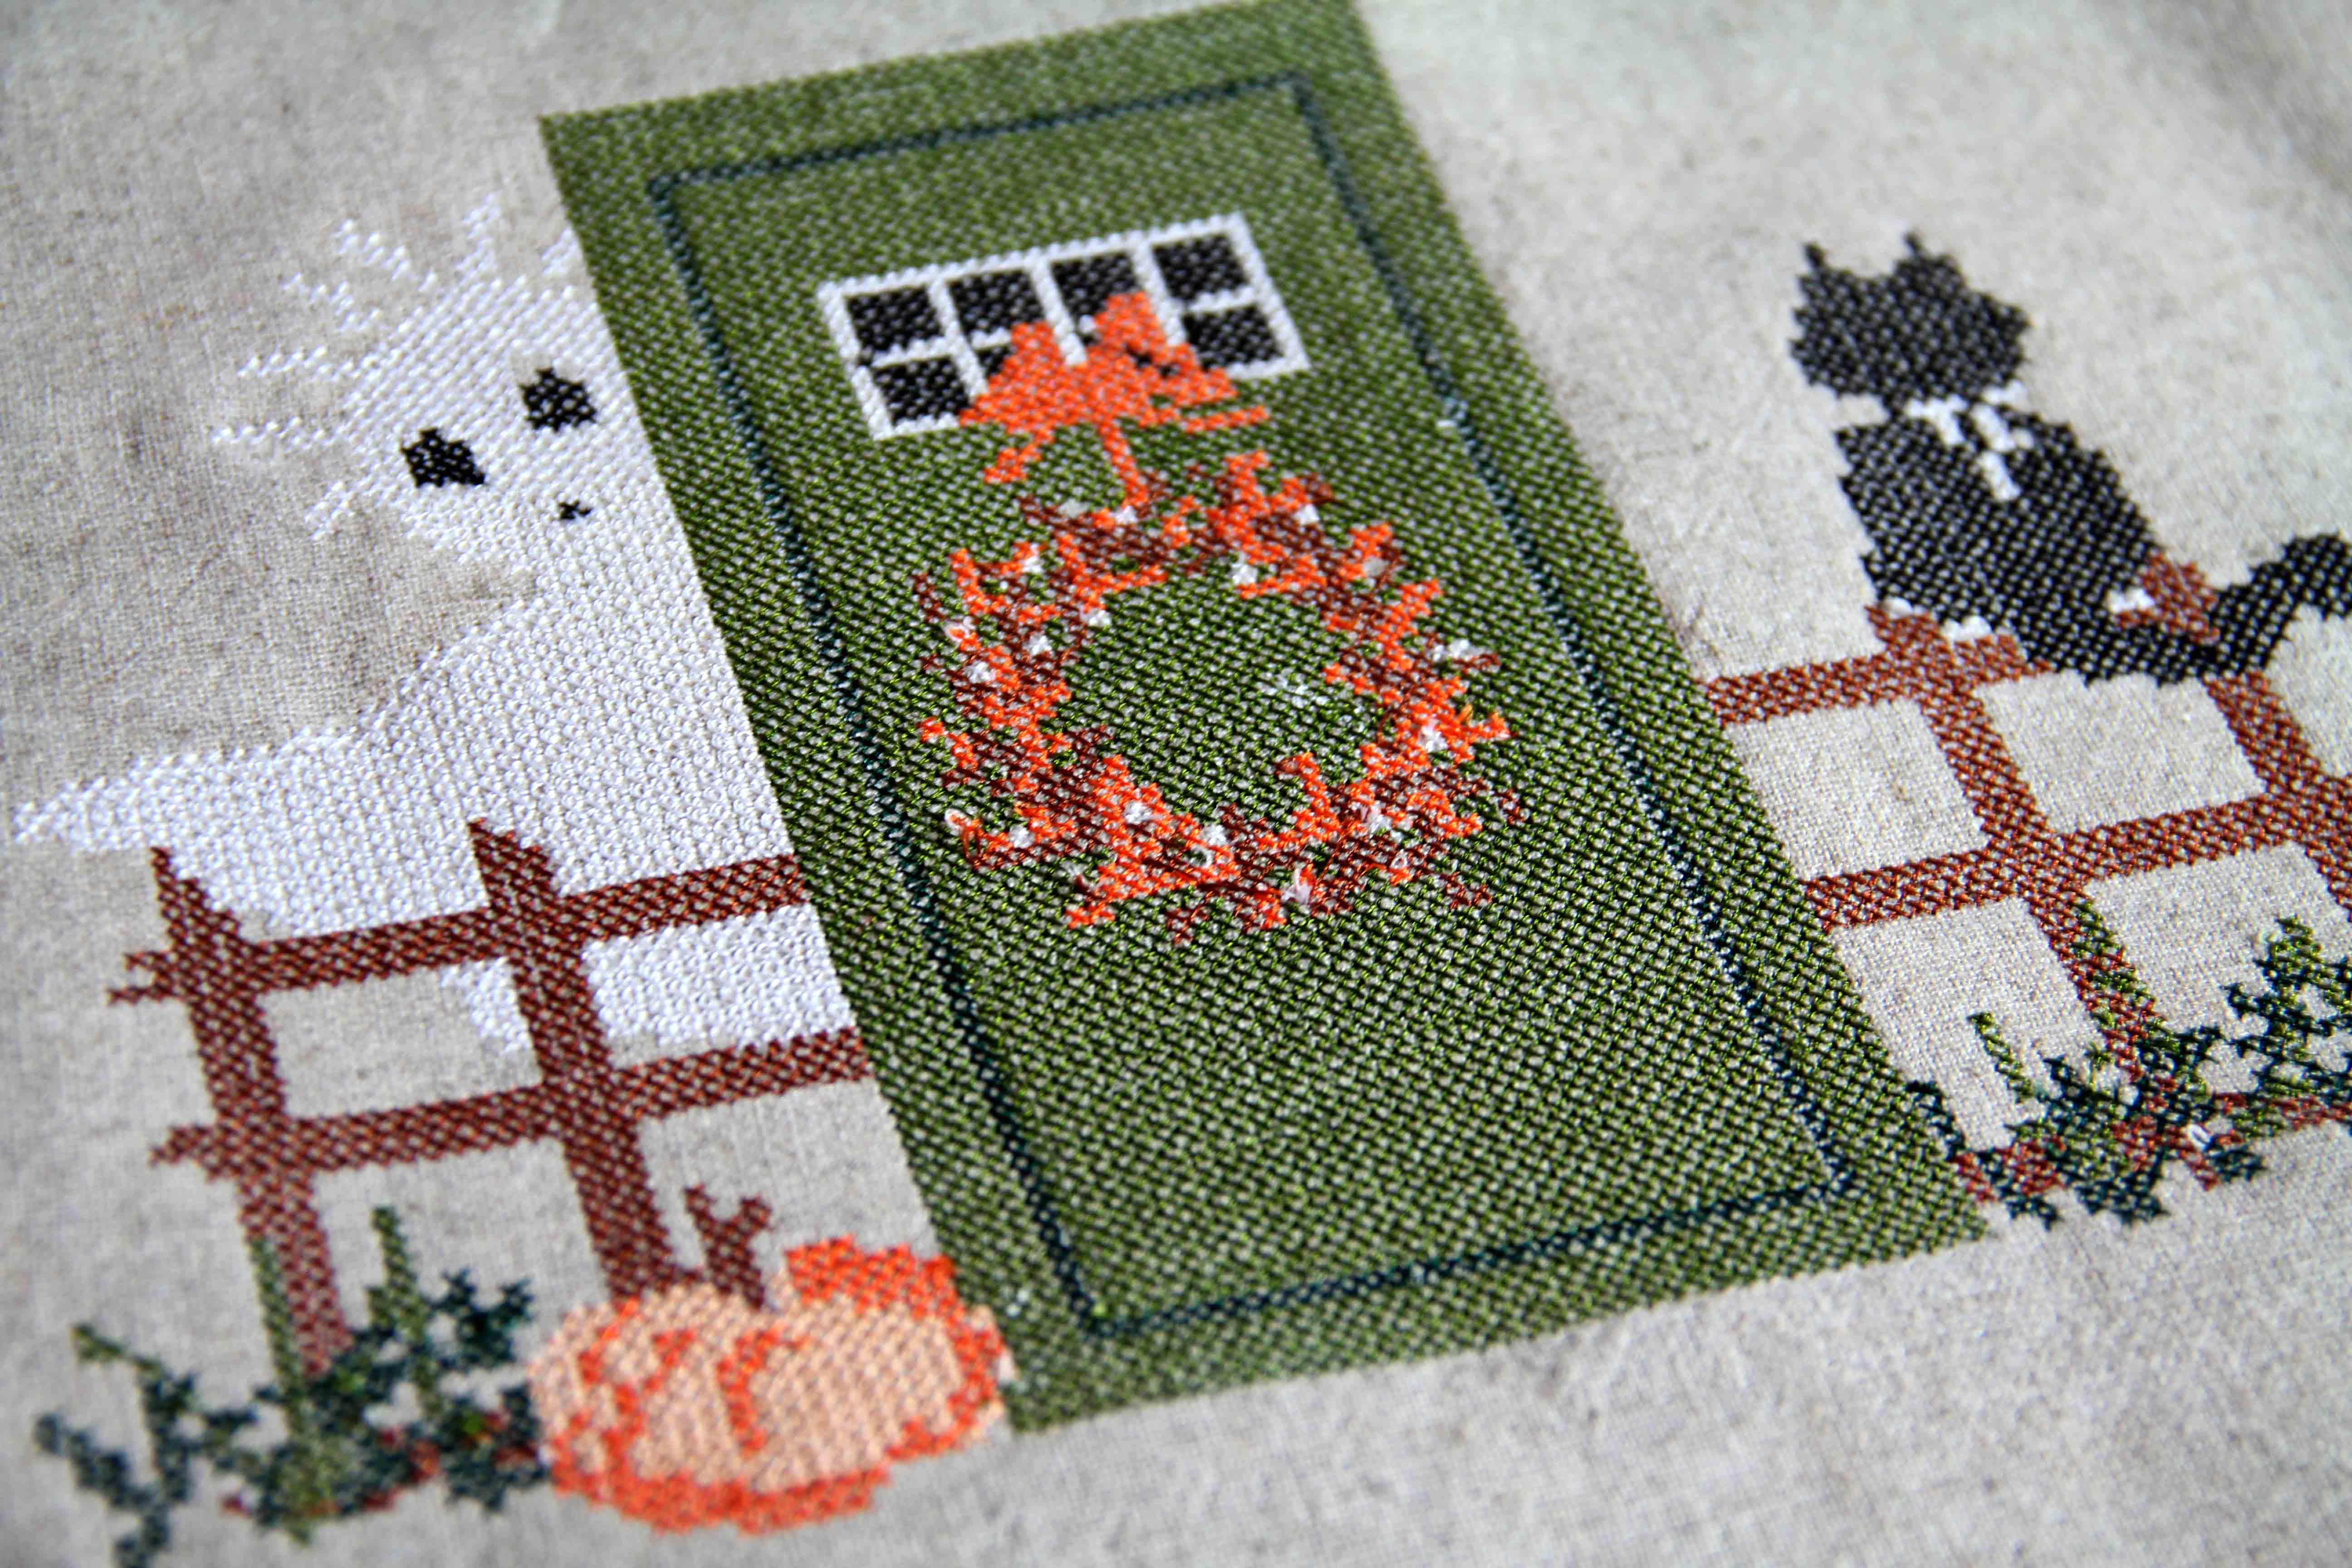
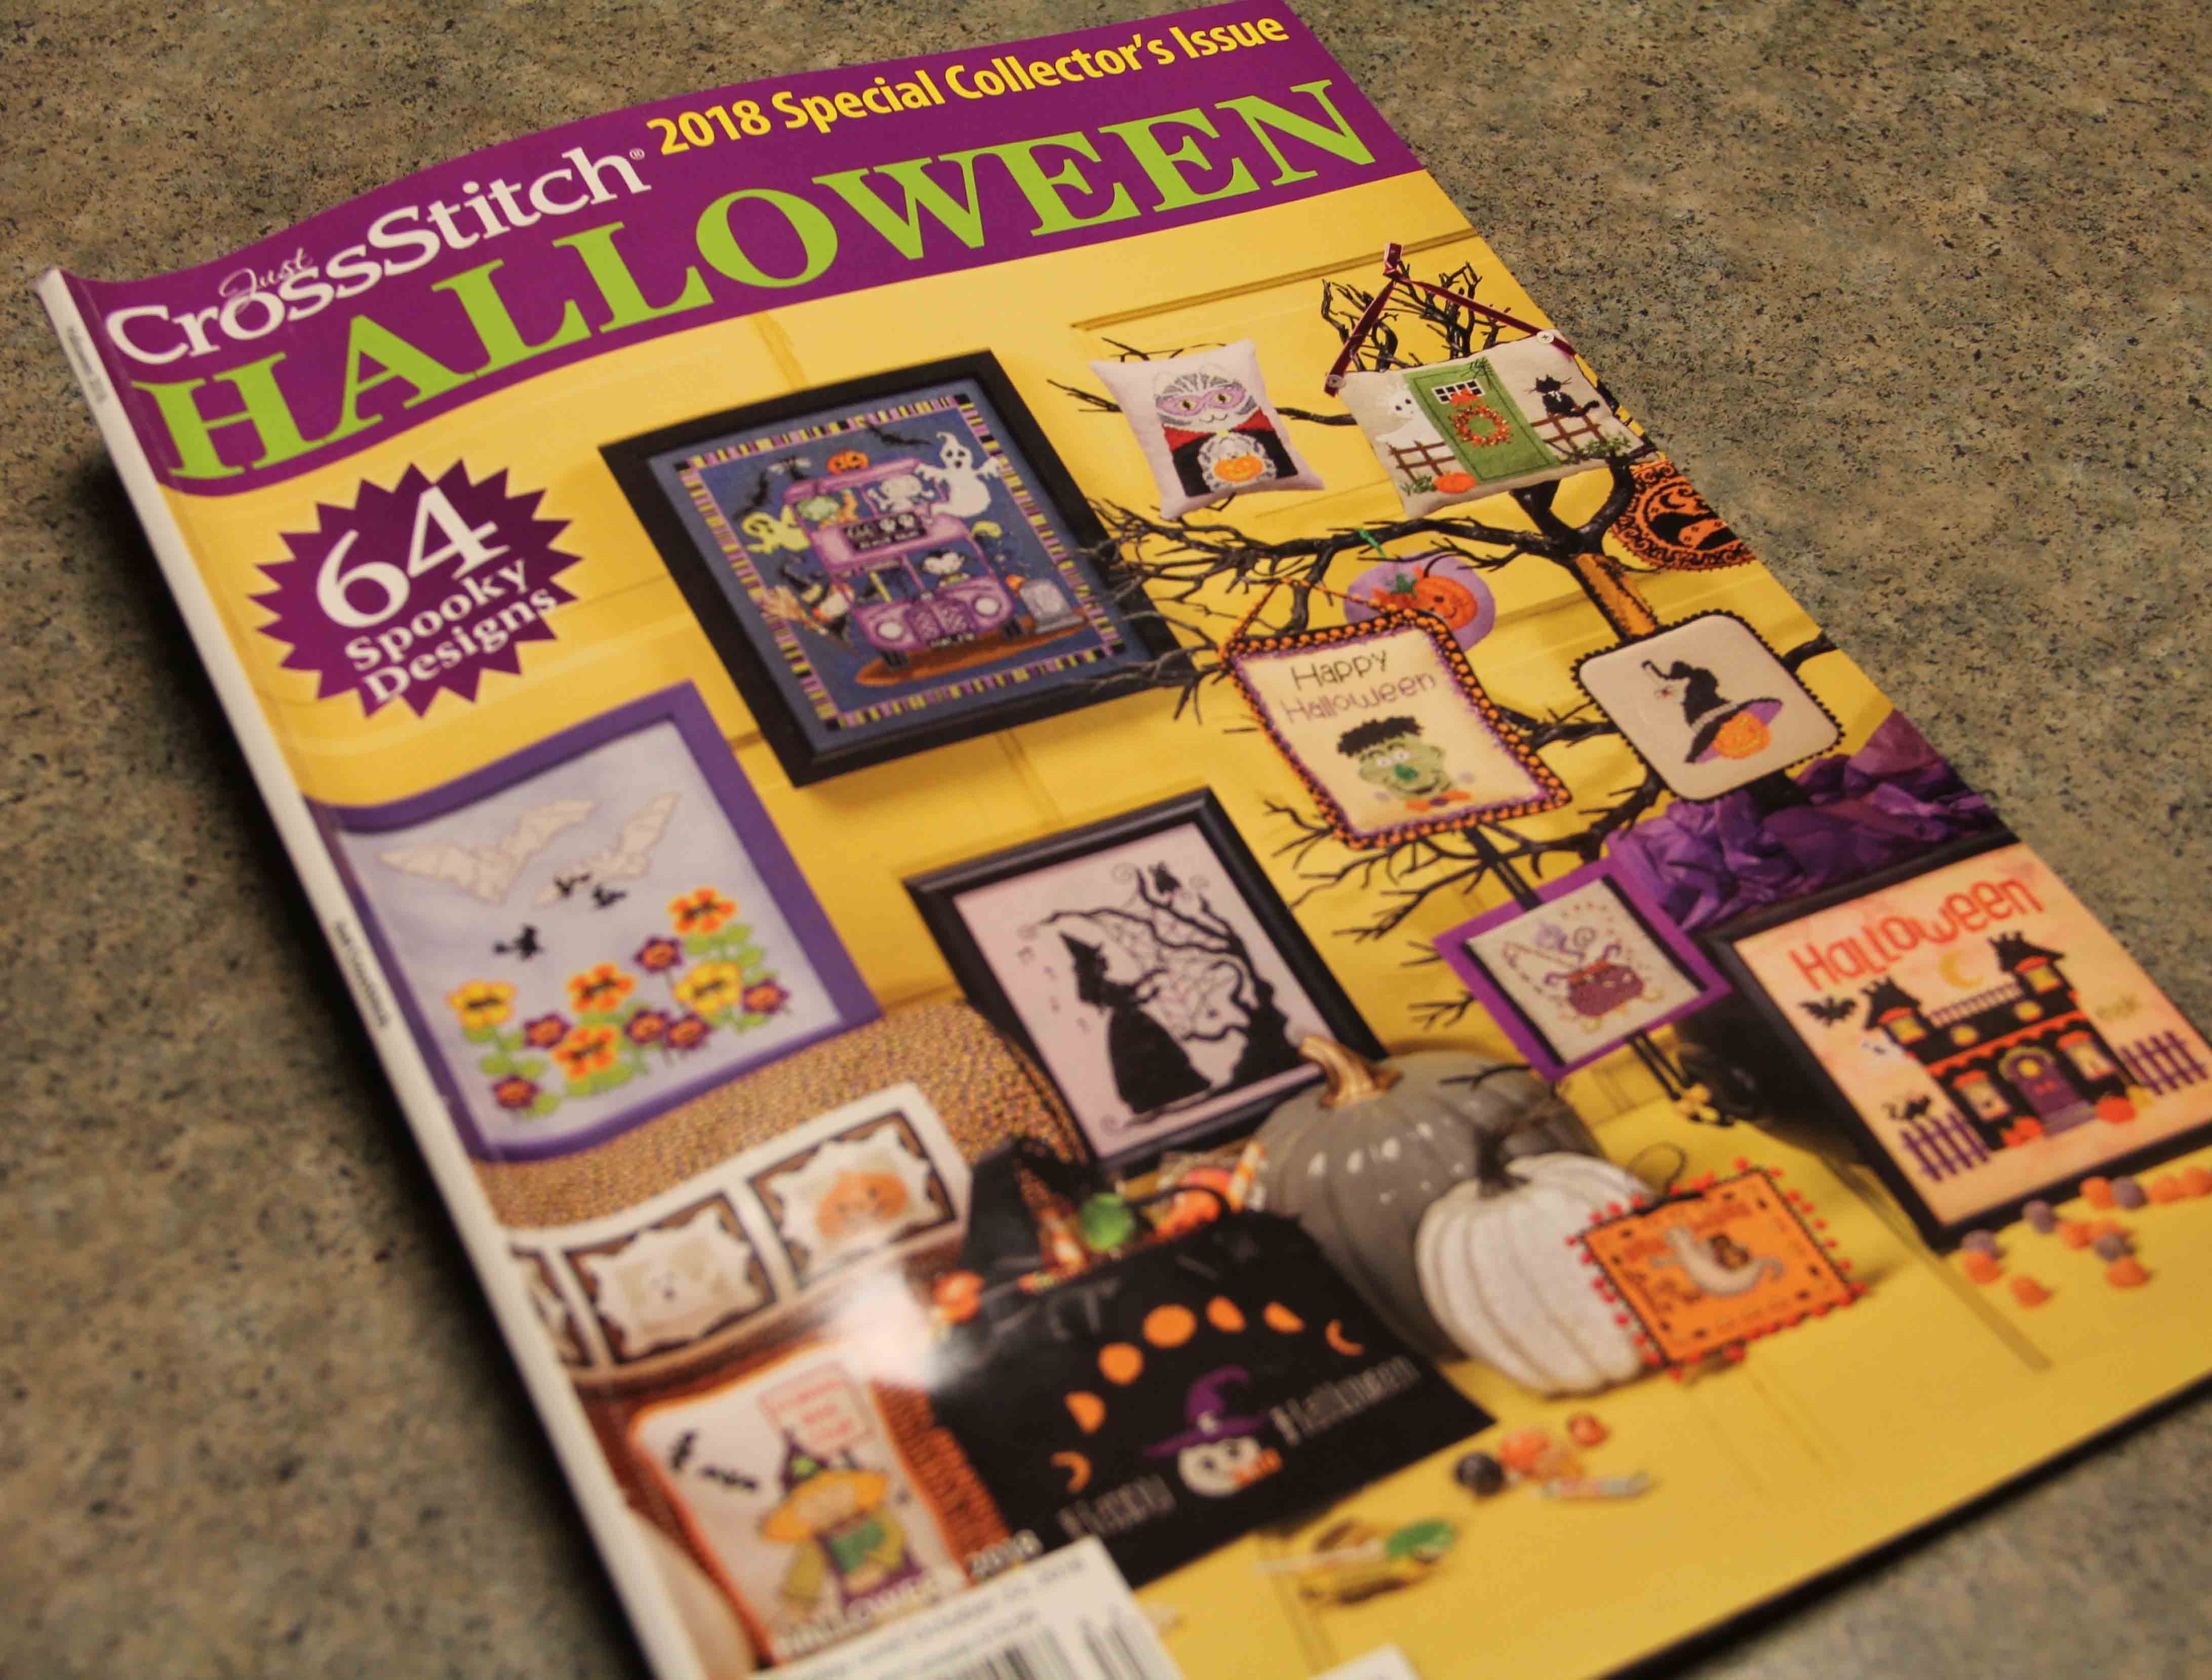
I found this cute embroidery in Cross Stitch Magazine, Halloween edition.
I am not someone who is into cross stitch, but I think it looks so charming around the holidays. My way of handling this is to digitize it and then use the machine to embroider it. I use Bernina Embroidery Software 8, which has a cross stitch application within the program. If you are not familiar with it, the sub-program has its own “help” section and manual. I find that it is really pretty simple if you know a few basics.
I will share with you what I did to create this design, and you can explore another of my Halloween posts right here.
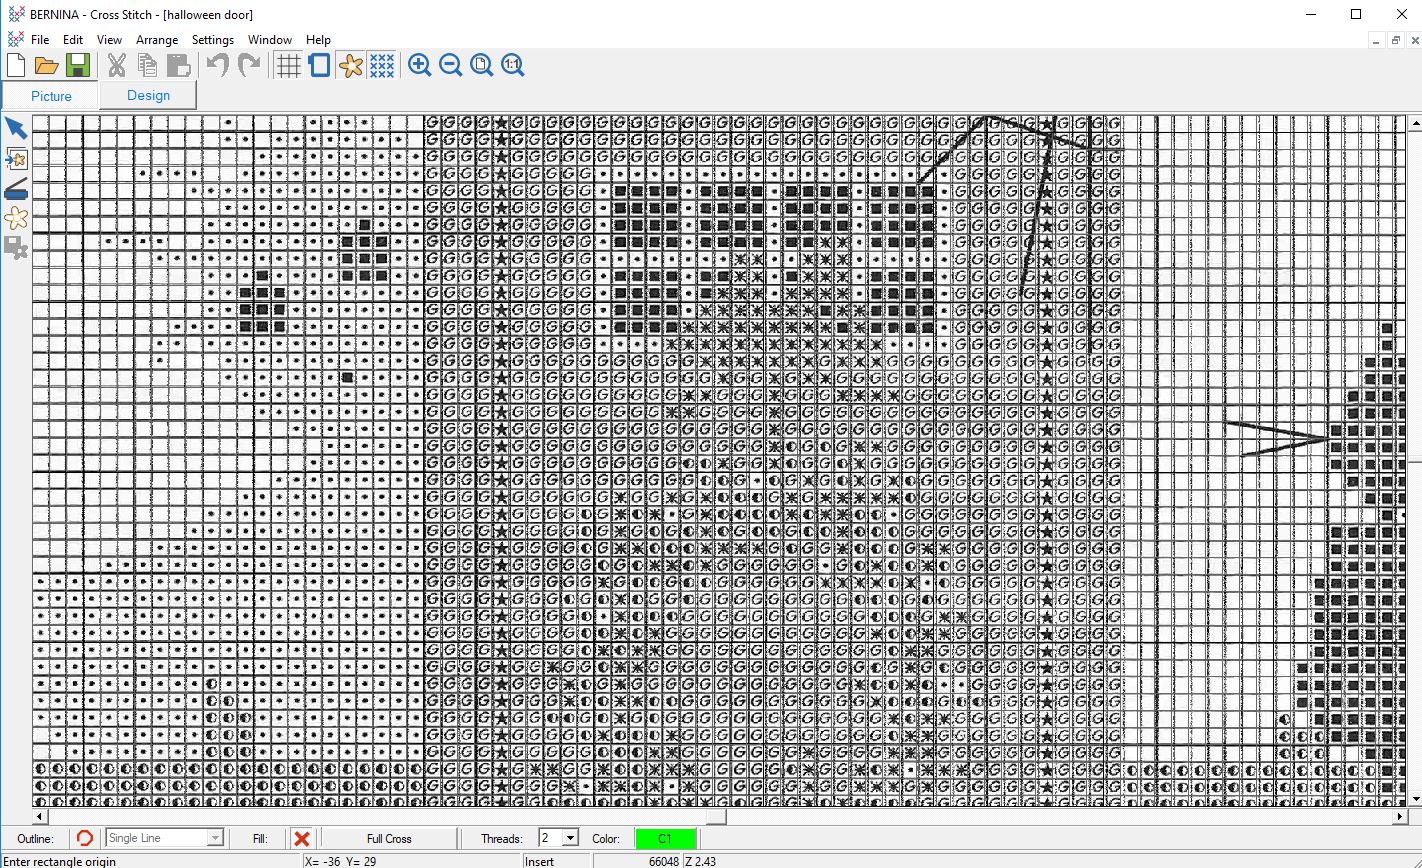
The first step is to scan the pattern at its original size. This design was approximately 7.5 in. x 6 in. Shown above is the black and white scan of the image, but you can see that this image is enlarged enough to show that I can see the markings of all the different thread colors. That will be important later when I manually add them.
A few basic steps:
Crop the image right up to the outline of the grid. You want it to be cropped as perfectly as possible when you load it into the cross stitch program. I use Adobe Photoshop to do this, but Corel is built into the software program and you can easily use that instead.
Count the grid. The heavy lines indicate ten spaces, so you can get an accurate count. You’ll need that later.
Open the cross stitch program in applications.
Click the “picture” tab and load the picture.
Right click on the picture (this is an important step!) and plug the dimensions of the grid in the width and height. These are the number of grid boxes you counted in the second step. This aligns your image with the grid in the program.
Begin adding in your stitches by clicking on the pencil. At the bottom you can choose the type of stitch…I almost always use a full cross, but you have a number of options.
Choose a color, and you’re ready to fill in your stitches using the image as your guide.
Left click on each grid box to add in your stitches.
In the image above, you can see what it looks like after I added all the stitches. This did not take long at all, maybe half an hour to get them all filled in.
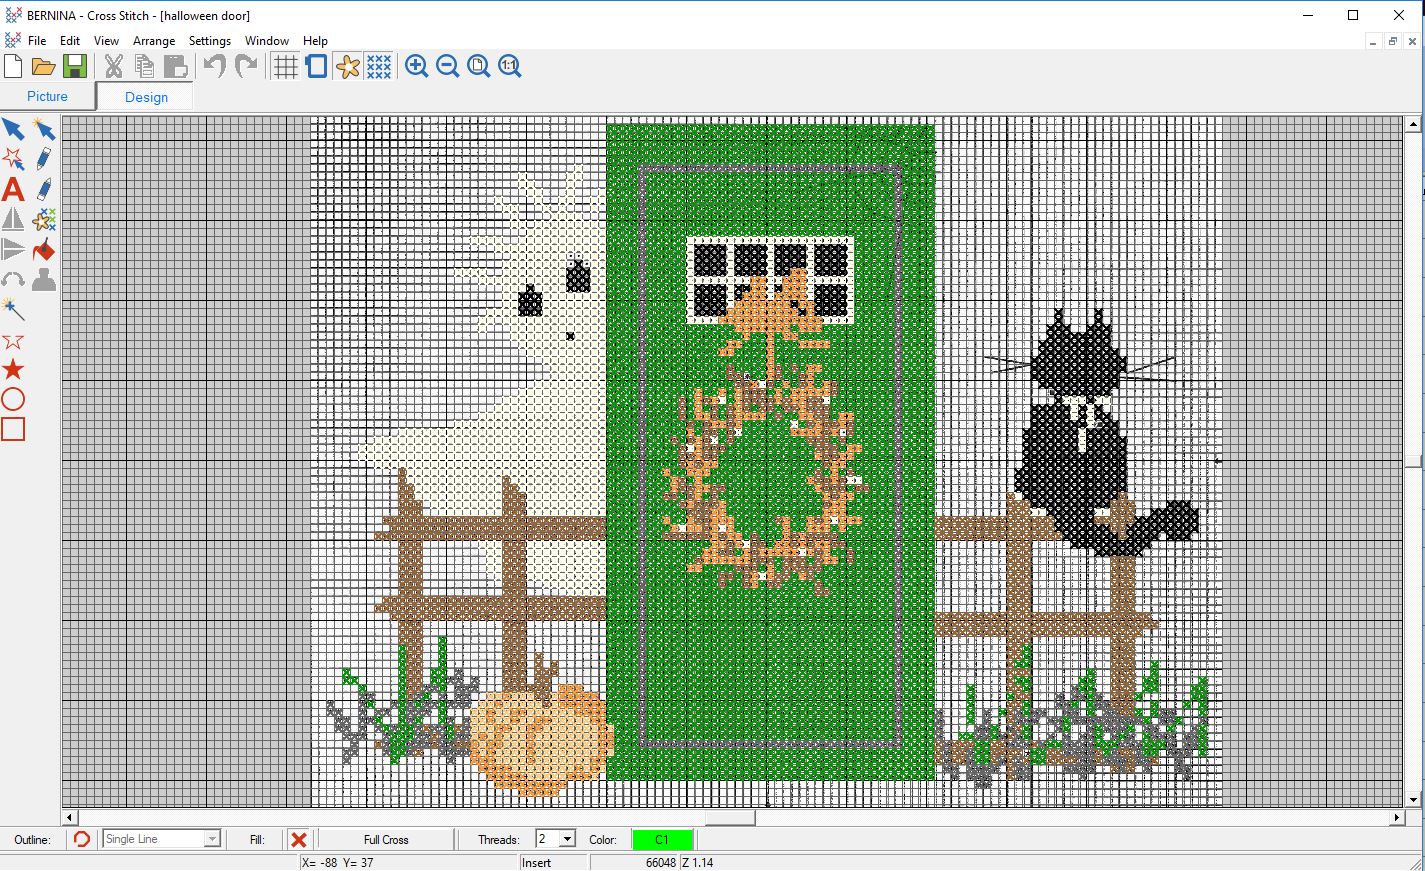
Save the file as filename.arx. .arx is the extension used by the cross stitch program.
Now you can close the whole cross stitch program and your embroidery software will still be open. When opening this file, just be sure to choose the .arx extension or “All Files”.
This is the great part. The software will digitze those cross stitches and turn the whole design into an embroidery file. Above, you can see how it turned out on my screen. I exported it then as .exp as I would any embroidery design file and saved it on a usb stick.
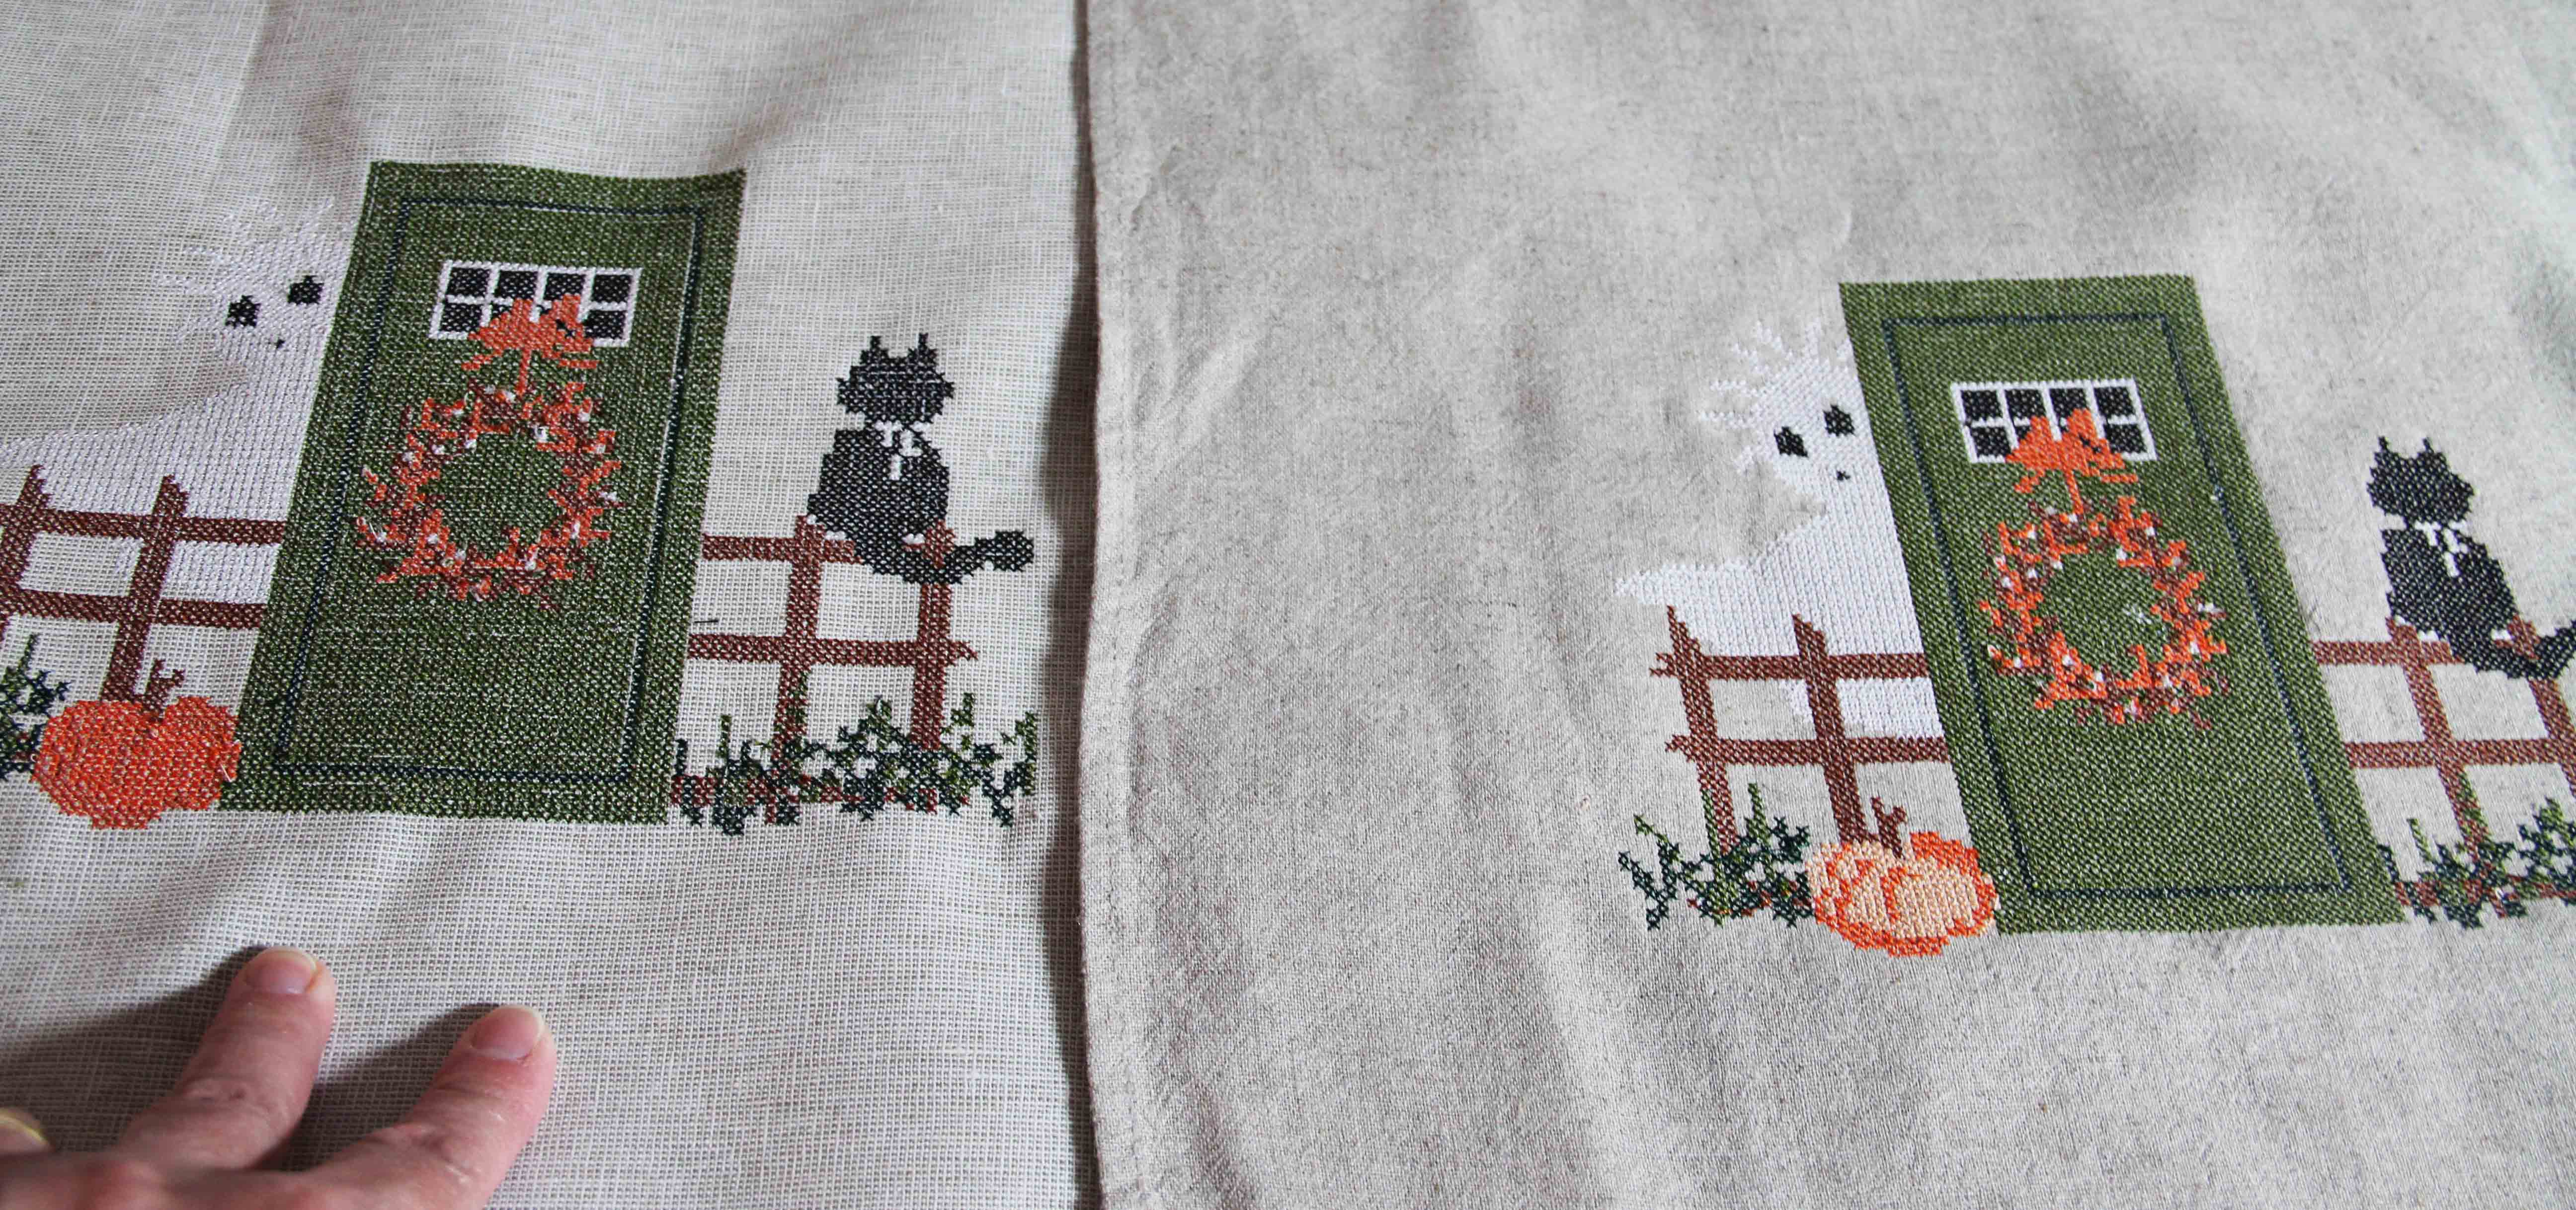
The first time I stitched it out, the ghost in the background was just a little too faded. I switched to a slightly darker fabric and the ghost appears more clearly on the right (although I think the picture is a little fooled by the lighting.) In real life (!) the one on the right lets the ghost show up much better.
I had fun with this project and it’s actually a lot less time consuming than cross stitching by hand — though I have great appreciation for those who do that!
This way, I can stitch it out over and over again…on a pillow, as an ornament, on a bag, etc. I used Isacord thread for these, which is 40 weight embroidery thread. But I am curious how it would turn out if I had done it with 28 weight, a heavier weight thread. I think that would be really sharp. The cross stitch program would allow me to adjust the size of the grid as well, so I have lots of opportunity to go deeper and try new things.
Hope this inspires you. The cost of one magazine provides you with so many cute patterns to try. And cross stitch is a program that is so often overlooked in digitizing software.